
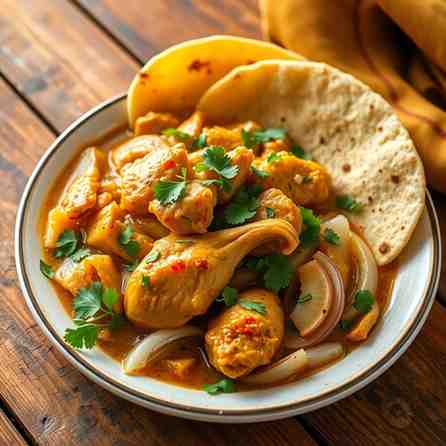
El Salvadoran Pollo Encebollado
El Salvadoran Pollo Encebollado
- Serves: 4 People
- Prepare Time: 20 minutes
- Cooking Time: 40 minutes
- Calories: -
- Difficulty: Easy
Get ready to bring the warm, vibrant flavors of El Salvadoran food right into your kitchen! This Pollo Encebollado (Chicken with Onions) recipe is a true hug in a bowl – a cozy, onion-forward chicken dinner that’s so simple it’s perfect for a weeknight, yet tastes like a special Sunday meal. Imagine tender chicken, braised to perfection in a rich, savory sauce with sweet, caramelized onions. This isn't just any chicken dish; this is the authentic Salvadoran-style chicken braised with onions, a beloved staple that’s sure to become a new family chicken meal favorite. Whether you prefer chicken thighs with skin or chicken thighs bone in, this recipe is designed to deliver maximum flavor with minimal fuss, making it one of those essential family chicken recipes you'll turn to again and again.
What it tastes like: Savory, lightly tangy, with a comforting sweetness from the onions.
Best sides: White rice, refried beans, a simple green salad, and warm tortillas.
Pollo Encebollado literally translates to "chicken with onions," and that's exactly what it is – a wonderfully straightforward yet incredibly flavorful dish where chicken pieces are braised until fall-off-the-bone tender in a rich sauce dominated by caramelized onions. It’s popular across Latin America, but each country has its own delicious spin. This recipe focuses on the authentic Salvadoran preparation, known for its distinct use of ingredients like Worcestershire sauce and mustard, which give it a unique savory depth and a subtle tang. It’s a hearty, comforting dish that’s cherished in Salvadoran homes for its simplicity and incredible taste.
Making amazing Pollo Encebollado doesn't require a huge list of fancy ingredients, but understanding what each one brings to the table makes all the difference:
Chicken: We highly recommend using chicken thighs bone in and with skin. The bones add extra flavor to the sauce, and the skin helps keep the meat incredibly juicy while browning adds a fantastic texture. If you prefer boneless, skinless chicken breast, you can absolutely swap it in, but be sure to shorten the simmering time to prevent it from drying out.
Onions: The star of the show! Yellow onions are your best bet here because they sweeten beautifully as they cook down. The key is to slice them thinly and uniformly so they caramelize evenly and melt into the sauce.
Garlic: While optional, a couple of cloves of minced garlic add a wonderful aromatic foundation to the dish. It really complements the sweetness of the onions.
Worcestershire Sauce (“Salsa Inglesa” or “Salsa Negrita”): This is a secret weapon in Salvadoran cooking! It adds an incredible umami depth, a touch of tang, and a slightly smoky note that rounds out the sauce. In the US, any standard Worcestershire sauce works perfectly. Don't skip it – it's crucial for that authentic flavor.
Mustard: Just a small spoonful of yellow mustard might seem unusual, but it’s a brilliant addition. It helps emulsify the sauce, adding a subtle sharpness and a creamy texture that balances the richness of the chicken and onions.
Liquid (Water/Chicken Stock): This is what creates our braising liquid. Water works fine, but chicken stock will give you an even richer, more savory sauce. It’s essential for gently simmering the chicken and allowing the flavors to meld.
Salt & Pepper + Oil: The basics! Salt brings out all the flavors, pepper adds a little kick, and a good cooking oil (like vegetable or canola) is needed for browning the chicken and softening the onions.
You don't need a lot of specialized gear for this recipe, just a few kitchen essentials:
Large Deep Skillet or Dutch Oven with Lid: This is crucial for browning the chicken and onions, and then braising everything together. Make sure it has a tight-fitting lid to keep all that moisture and flavor locked in.
Tongs: Super helpful for flipping chicken pieces and stirring onions without making a mess.
Instant-Read Thermometer (Optional but Recommended): While not strictly necessary, an instant-read thermometer gives you confidence that your chicken is perfectly cooked to 165°F (74°C) without overcooking.
Ingredients
Directions
- Prep the Onions: Peel your onions and slice them thinly, aiming for uniform rings or half-moons. Once sliced, gently separate the rings so they cook evenly. Set aside.
- Season & Brown the Chicken: Pat the chicken pieces dry with paper towels – this helps them brown better. Season generously all over with 1 teaspoon of salt and ½ teaspoon of black pepper. Heat the vegetable oil in your large deep skillet or Dutch oven over medium-high heat. Once hot, carefully add the chicken pieces, skin-side down first, in a single layer (you might need to do this in batches to avoid crowding the pan). Cook for 5-7 minutes per side, until the skin is beautifully golden brown and crispy. Don't worry about cooking the chicken through; we're just building flavor here. Remove the browned chicken to a plate and set aside.
- Cook Onions Low-and-Slow: Reduce the heat to medium-low. Add the sliced onions to the same skillet, scraping up any browned bits from the bottom of the pan (those are flavor bombs!). Cook the onions for 10-15 minutes, stirring occasionally, until they are very soft, translucent, and just beginning to turn lightly golden. Don't rush this step – slow-cooked onions are key to the sauce's sweetness. If using, add the minced garlic during the last minute of cooking the onions.
- Build the Sauce: Stir in the Worcestershire sauce and mustard with the softened onions. Pour in the water or chicken stock. Bring the liquid to a gentle simmer, scraping the bottom of the pan again to release any remaining browned bits. This creates a flavorful base for your braise.
- Braise: Return the browned chicken pieces (along with any accumulated juices from the plate) to the skillet, nestling them into the onion sauce. Make sure the chicken is mostly submerged. Bring the liquid back to a gentle simmer, then reduce the heat to low, cover the skillet with a tight-fitting lid, and let it braise for 25-30 minutes, or until the chicken is fork-tender and cooked through. The internal temperature should reach 165°F (74°C) if you're using a thermometer.
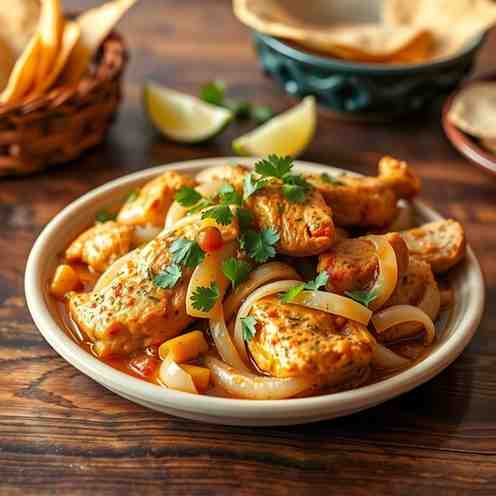
- Finish & Adjust: Remove the lid. If the sauce seems too thin, you can increase the heat slightly and simmer uncovered for a few minutes to allow it to reduce and thicken to your desired consistency. Taste the sauce and adjust salt and pepper if needed. For an optional finishing touch, sprinkle with fresh chopped cilantro and serve with lime wedges.
- What You Should See: Checkpoints for Success
- Onion Stage: They should transform from crisp, white rings to soft, translucent strands, eventually taking on a beautiful light golden hue. No burnt bits!
- Sauce Stage: Initially brothy, the sauce will gradually thicken and become lightly glossy as the onions break down and the liquid reduces, coating the chicken beautifully.
- Chicken Doneness: The chicken should be incredibly tender, easily pierced with a fork, and the internal temperature should register 165°F (74°C).
El Salvadoran Pollo Encebollado

- Serves: 4 People
- Prepare Time: 20 minutes
- Cooking Time: 40 minutes
- Calories: -
- Difficulty: Easy
Get ready to bring the warm, vibrant flavors of El Salvadoran food right into your kitchen! This Pollo Encebollado (Chicken with Onions) recipe is a true hug in a bowl – a cozy, onion-forward chicken dinner that’s so simple it’s perfect for a weeknight, yet tastes like a special Sunday meal. Imagine tender chicken, braised to perfection in a rich, savory sauce with sweet, caramelized onions. This isn't just any chicken dish; this is the authentic Salvadoran-style chicken braised with onions, a beloved staple that’s sure to become a new family chicken meal favorite. Whether you prefer chicken thighs with skin or chicken thighs bone in, this recipe is designed to deliver maximum flavor with minimal fuss, making it one of those essential family chicken recipes you'll turn to again and again.
What it tastes like: Savory, lightly tangy, with a comforting sweetness from the onions.
Best sides: White rice, refried beans, a simple green salad, and warm tortillas.
Pollo Encebollado literally translates to "chicken with onions," and that's exactly what it is – a wonderfully straightforward yet incredibly flavorful dish where chicken pieces are braised until fall-off-the-bone tender in a rich sauce dominated by caramelized onions. It’s popular across Latin America, but each country has its own delicious spin. This recipe focuses on the authentic Salvadoran preparation, known for its distinct use of ingredients like Worcestershire sauce and mustard, which give it a unique savory depth and a subtle tang. It’s a hearty, comforting dish that’s cherished in Salvadoran homes for its simplicity and incredible taste.
Making amazing Pollo Encebollado doesn't require a huge list of fancy ingredients, but understanding what each one brings to the table makes all the difference:
Chicken: We highly recommend using chicken thighs bone in and with skin. The bones add extra flavor to the sauce, and the skin helps keep the meat incredibly juicy while browning adds a fantastic texture. If you prefer boneless, skinless chicken breast, you can absolutely swap it in, but be sure to shorten the simmering time to prevent it from drying out.
Onions: The star of the show! Yellow onions are your best bet here because they sweeten beautifully as they cook down. The key is to slice them thinly and uniformly so they caramelize evenly and melt into the sauce.
Garlic: While optional, a couple of cloves of minced garlic add a wonderful aromatic foundation to the dish. It really complements the sweetness of the onions.
Worcestershire Sauce (“Salsa Inglesa” or “Salsa Negrita”): This is a secret weapon in Salvadoran cooking! It adds an incredible umami depth, a touch of tang, and a slightly smoky note that rounds out the sauce. In the US, any standard Worcestershire sauce works perfectly. Don't skip it – it's crucial for that authentic flavor.
Mustard: Just a small spoonful of yellow mustard might seem unusual, but it’s a brilliant addition. It helps emulsify the sauce, adding a subtle sharpness and a creamy texture that balances the richness of the chicken and onions.
Liquid (Water/Chicken Stock): This is what creates our braising liquid. Water works fine, but chicken stock will give you an even richer, more savory sauce. It’s essential for gently simmering the chicken and allowing the flavors to meld.
Salt & Pepper + Oil: The basics! Salt brings out all the flavors, pepper adds a little kick, and a good cooking oil (like vegetable or canola) is needed for browning the chicken and softening the onions.
You don't need a lot of specialized gear for this recipe, just a few kitchen essentials:
Large Deep Skillet or Dutch Oven with Lid: This is crucial for browning the chicken and onions, and then braising everything together. Make sure it has a tight-fitting lid to keep all that moisture and flavor locked in.
Tongs: Super helpful for flipping chicken pieces and stirring onions without making a mess.
Instant-Read Thermometer (Optional but Recommended): While not strictly necessary, an instant-read thermometer gives you confidence that your chicken is perfectly cooked to 165°F (74°C) without overcooking.
Ingredients
Directions
- Prep the Onions: Peel your onions and slice them thinly, aiming for uniform rings or half-moons. Once sliced, gently separate the rings so they cook evenly. Set aside.
- Season & Brown the Chicken: Pat the chicken pieces dry with paper towels – this helps them brown better. Season generously all over with 1 teaspoon of salt and ½ teaspoon of black pepper. Heat the vegetable oil in your large deep skillet or Dutch oven over medium-high heat. Once hot, carefully add the chicken pieces, skin-side down first, in a single layer (you might need to do this in batches to avoid crowding the pan). Cook for 5-7 minutes per side, until the skin is beautifully golden brown and crispy. Don't worry about cooking the chicken through; we're just building flavor here. Remove the browned chicken to a plate and set aside.
- Cook Onions Low-and-Slow: Reduce the heat to medium-low. Add the sliced onions to the same skillet, scraping up any browned bits from the bottom of the pan (those are flavor bombs!). Cook the onions for 10-15 minutes, stirring occasionally, until they are very soft, translucent, and just beginning to turn lightly golden. Don't rush this step – slow-cooked onions are key to the sauce's sweetness. If using, add the minced garlic during the last minute of cooking the onions.
- Build the Sauce: Stir in the Worcestershire sauce and mustard with the softened onions. Pour in the water or chicken stock. Bring the liquid to a gentle simmer, scraping the bottom of the pan again to release any remaining browned bits. This creates a flavorful base for your braise.
- Braise: Return the browned chicken pieces (along with any accumulated juices from the plate) to the skillet, nestling them into the onion sauce. Make sure the chicken is mostly submerged. Bring the liquid back to a gentle simmer, then reduce the heat to low, cover the skillet with a tight-fitting lid, and let it braise for 25-30 minutes, or until the chicken is fork-tender and cooked through. The internal temperature should reach 165°F (74°C) if you're using a thermometer.
- Finish & Adjust: Remove the lid. If the sauce seems too thin, you can increase the heat slightly and simmer uncovered for a few minutes to allow it to reduce and thicken to your desired consistency. Taste the sauce and adjust salt and pepper if needed. For an optional finishing touch, sprinkle with fresh chopped cilantro and serve with lime wedges.
- What You Should See: Checkpoints for Success
- Onion Stage: They should transform from crisp, white rings to soft, translucent strands, eventually taking on a beautiful light golden hue. No burnt bits!
- Sauce Stage: Initially brothy, the sauce will gradually thicken and become lightly glossy as the onions break down and the liquid reduces, coating the chicken beautifully.
- Chicken Doneness: The chicken should be incredibly tender, easily pierced with a fork, and the internal temperature should register 165°F (74°C).
You may also like


Hey there! I’m just someone who seriously loves good food and believes that cooking doesn’t have to be complicated to be amazing. Whether it’s a quick weeknight dinner or a cozy weekend meal, I’m all about sharing easy, tasty recipes that actually work.


