
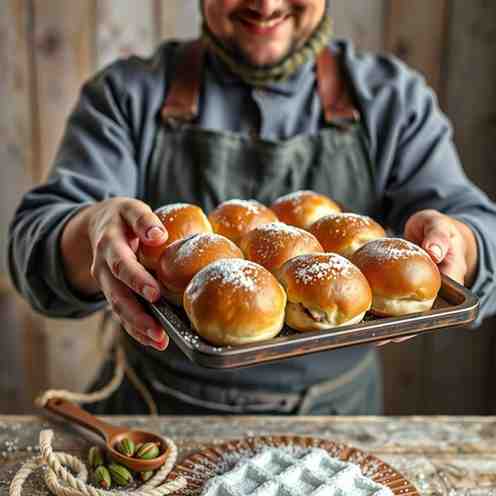
Estonian Vastlakukkel - Bake Fluffy Cardamom Buns
Estonian Vastlakukkel - Bake Fluffy Cardamom Buns


- Serves: 12 People
- Prepare Time: 30 minutes
- Cooking Time: 12-15 minut
- Calories: -
- Difficulty: Medium
Ever heard of a dessert that combines the cozy warmth of cardamom, the airy lightness of a sweet bun, and a generous dollop of fluffy whipped cream? Meet Vastlakukkel (pronounced VAHST-lah-koo-kel), Estonia's beloved Shrove Tuesday bun! While you might be searching for `gluten free buns` or `desserts for one`, this traditional recipe for Estonian Vastlakukkel offers a truly unique and delightful experience that’s worth every moment in the kitchen. It's more than just a sweet treat; it's a taste of Estonian tradition, perfect for sharing (or enjoying all by yourself!).
This recipe is your reliable guide to crafting these pillowy soft, cardamom-spiced buns, topped with a cloud of `almond whipped cream` (or classic vanilla!). We’ve tested every cue – from perfect proofing temperatures and kneading techniques to shaping consistency and bake signals – ensuring you build confidence with every step. Get ready to impress yourself and anyone lucky enough to share these `so delicious whipped cream` buns, fresh and warm from your oven. It’s simple `cooking for one` or for a crowd, and soon you'll be saying, "These were `baked by me`!"
Ingredients
Directions
- Bloom/Activate Yeast (or Instant Yeast Shortcut) Warm your milk to about 105-115°F (40-46°C). It should feel warm to the touch, but not hot. Pour the warm milk into the bowl of a stand mixer fitted with a dough hook (or a large mixing bowl if kneading by hand). Sprinkle the active dry yeast and 1 teaspoon of the sugar over the milk. Let it sit for 5-10 minutes until foamy. If it doesn't foam, your yeast might be old or the milk too hot/cold; start again with fresh yeast. If using instant yeast, you can skip blooming and add it directly with the dry ingredients.
- Mix + Knead Until “Smooth, Elastic, Slightly Tacky” To the foamy yeast mixture, add the remaining sugar, salt, cardamom, egg, and cooled melted butter. Mix until well combined. Gradually add the flour, starting with 3 cups, mixing on low speed until a shaggy dough forms. Increase speed to medium-low and knead for 8-10 minutes (or 12-15 minutes by hand). The dough should become smooth, elastic, and slightly tacky, pulling away from the sides of the bowl. It will look shiny and should pass the windowpane test (stretch a small piece thin enough to see light through it without tearing). If the dough is too sticky, resist adding too much flour; instead, let it rest for 10-15 minutes, then continue kneading. A little tackiness is good!
- First Rise (Proof) Lightly grease a large bowl. Transfer the dough to the bowl, turning once to coat. Cover the bowl tightly with plastic wrap or a damp kitchen towel. Place it in a warm, draft-free spot (like a slightly warm oven that's been turned off, or a microwave). Let the dough rise until doubled in size and airy, about 1 to 1 ½ hours.
- Shape Buns (The Easiest Method That Works) Once the dough has doubled, gently punch it down to release the air. Turn the dough out onto a lightly floured surface. Divide the dough into 12 equal pieces. For consistent sizing, you can weigh each piece (about 60-70g each) or aim for pieces roughly the size of a large egg. Roll each piece into a smooth, tight ball by cupping it with your hand and rolling it against the counter. This creates surface tension for a nice rise.
- Final Proof Line a large baking sheet with parchment paper. Arrange the shaped buns about 2 inches apart on the prepared sheet. Cover loosely with plastic wrap or a clean kitchen towel. Let them rise again in a warm, draft-free spot for another 30-45 minutes, or until visibly puffy and almost doubled. To check if they’re ready, gently indent a bun with your finger; if the indentation springs back slowly, they're ready to bake.
- Bake Preheat your oven to 375°F (190°C). While the oven preheats, whisk together the egg wash ingredients (1 egg + 1 tablespoon water). Lightly brush the tops of the proofed buns with the egg wash. Bake for 12-15 minutes, or until the tops are golden brown. For an optional check, an instant-read thermometer inserted into the center of a bun should read around 200-210°F (93-99°C). Immediately after baking, cover the hot buns with a clean kitchen towel for about 5-10 minutes. This traps steam and helps soften the tops, preventing them from tearing when you cut them for filling. Let the buns cool completely on a wire rack before filling.
- Whip the Cream + Fill In a cold bowl with cold beaters, whip the heavy cream, powdered sugar, and vanilla extract on high speed until stiff peaks form, but the cream still looks smooth and not grainy. Don't overmix! Using a serrated knife, carefully cut a "lid" (a small cap) off the top of each cooled bun. Gently hollow out a little bit of the soft interior from the bottom part of the bun – this creates a perfect pocket for the filling. You can discard the removed dough or snack on it! Transfer the whipped cream to a piping bag fitted with a star tip (or a zip-top bag with a corner snipped off). Pipe a generous amount of whipped cream into the hollowed-out bun. If using, add a tiny swirl of lingonberry or cowberry jam before or after the cream. Place the bun "lid" back on top, often slightly askew, and dust with a little extra powdered sugar for a snowy finish. Serve immediately!
Estonian Vastlakukkel - Bake Fluffy Cardamom Buns
- Serves: 12 People
- Prepare Time: 30 minutes
- Cooking Time: 12-15 minut
- Calories: -
- Difficulty: Medium
Ever heard of a dessert that combines the cozy warmth of cardamom, the airy lightness of a sweet bun, and a generous dollop of fluffy whipped cream? Meet Vastlakukkel (pronounced VAHST-lah-koo-kel), Estonia's beloved Shrove Tuesday bun! While you might be searching for `gluten free buns` or `desserts for one`, this traditional recipe for Estonian Vastlakukkel offers a truly unique and delightful experience that’s worth every moment in the kitchen. It's more than just a sweet treat; it's a taste of Estonian tradition, perfect for sharing (or enjoying all by yourself!).
This recipe is your reliable guide to crafting these pillowy soft, cardamom-spiced buns, topped with a cloud of `almond whipped cream` (or classic vanilla!). We’ve tested every cue – from perfect proofing temperatures and kneading techniques to shaping consistency and bake signals – ensuring you build confidence with every step. Get ready to impress yourself and anyone lucky enough to share these `so delicious whipped cream` buns, fresh and warm from your oven. It’s simple `cooking for one` or for a crowd, and soon you'll be saying, "These were `baked by me`!"
Ingredients
Directions
- Bloom/Activate Yeast (or Instant Yeast Shortcut) Warm your milk to about 105-115°F (40-46°C). It should feel warm to the touch, but not hot. Pour the warm milk into the bowl of a stand mixer fitted with a dough hook (or a large mixing bowl if kneading by hand). Sprinkle the active dry yeast and 1 teaspoon of the sugar over the milk. Let it sit for 5-10 minutes until foamy. If it doesn't foam, your yeast might be old or the milk too hot/cold; start again with fresh yeast. If using instant yeast, you can skip blooming and add it directly with the dry ingredients.
- Mix + Knead Until “Smooth, Elastic, Slightly Tacky” To the foamy yeast mixture, add the remaining sugar, salt, cardamom, egg, and cooled melted butter. Mix until well combined. Gradually add the flour, starting with 3 cups, mixing on low speed until a shaggy dough forms. Increase speed to medium-low and knead for 8-10 minutes (or 12-15 minutes by hand). The dough should become smooth, elastic, and slightly tacky, pulling away from the sides of the bowl. It will look shiny and should pass the windowpane test (stretch a small piece thin enough to see light through it without tearing). If the dough is too sticky, resist adding too much flour; instead, let it rest for 10-15 minutes, then continue kneading. A little tackiness is good!
- First Rise (Proof) Lightly grease a large bowl. Transfer the dough to the bowl, turning once to coat. Cover the bowl tightly with plastic wrap or a damp kitchen towel. Place it in a warm, draft-free spot (like a slightly warm oven that's been turned off, or a microwave). Let the dough rise until doubled in size and airy, about 1 to 1 ½ hours.
- Shape Buns (The Easiest Method That Works) Once the dough has doubled, gently punch it down to release the air. Turn the dough out onto a lightly floured surface. Divide the dough into 12 equal pieces. For consistent sizing, you can weigh each piece (about 60-70g each) or aim for pieces roughly the size of a large egg. Roll each piece into a smooth, tight ball by cupping it with your hand and rolling it against the counter. This creates surface tension for a nice rise.
- Final Proof Line a large baking sheet with parchment paper. Arrange the shaped buns about 2 inches apart on the prepared sheet. Cover loosely with plastic wrap or a clean kitchen towel. Let them rise again in a warm, draft-free spot for another 30-45 minutes, or until visibly puffy and almost doubled. To check if they’re ready, gently indent a bun with your finger; if the indentation springs back slowly, they're ready to bake.
- Bake Preheat your oven to 375°F (190°C). While the oven preheats, whisk together the egg wash ingredients (1 egg + 1 tablespoon water). Lightly brush the tops of the proofed buns with the egg wash. Bake for 12-15 minutes, or until the tops are golden brown. For an optional check, an instant-read thermometer inserted into the center of a bun should read around 200-210°F (93-99°C). Immediately after baking, cover the hot buns with a clean kitchen towel for about 5-10 minutes. This traps steam and helps soften the tops, preventing them from tearing when you cut them for filling. Let the buns cool completely on a wire rack before filling.
- Whip the Cream + Fill In a cold bowl with cold beaters, whip the heavy cream, powdered sugar, and vanilla extract on high speed until stiff peaks form, but the cream still looks smooth and not grainy. Don't overmix! Using a serrated knife, carefully cut a "lid" (a small cap) off the top of each cooled bun. Gently hollow out a little bit of the soft interior from the bottom part of the bun – this creates a perfect pocket for the filling. You can discard the removed dough or snack on it! Transfer the whipped cream to a piping bag fitted with a star tip (or a zip-top bag with a corner snipped off). Pipe a generous amount of whipped cream into the hollowed-out bun. If using, add a tiny swirl of lingonberry or cowberry jam before or after the cream. Place the bun "lid" back on top, often slightly askew, and dust with a little extra powdered sugar for a snowy finish. Serve immediately!
You may also like


Hey there! I’m just someone who seriously loves good food and believes that cooking doesn’t have to be complicated to be amazing. Whether it’s a quick weeknight dinner or a cozy weekend meal, I’m all about sharing easy, tasty recipes that actually work.


