Make Faroese Breyðmatur Bread - Easy Rye Loaf Recipe
Make Faroese Breyðmatur Bread - Easy Rye Loaf Recipe
- Serves: 12 People
- Prepare Time: 20 minutes
- Cooking Time: 40 minutes
- Calories: -
- Difficulty: Easy
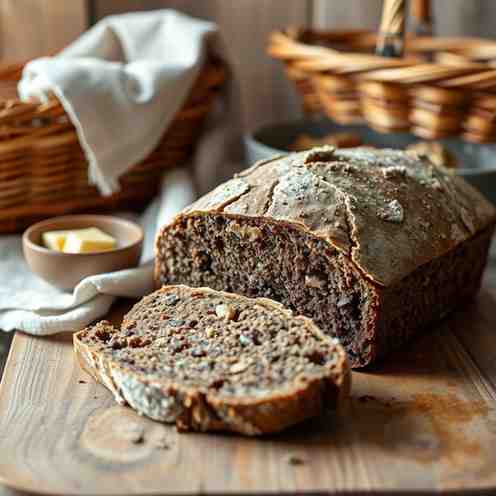
Ever dreamt of baking your own homemade bread that's not just delicious but also steeped in tradition? You're in the right place! Today, we're diving into the heartwarming world of Faroese Breyðmatur bread – a simple, sturdy rye loaf perfect for beginners. Forget complicated techniques; we’re going to show you bread how to make this incredible bread with ease. This isn't just any easy bread dough recipe; it's a taste of the Faroe Islands, designed to be crusty on the outside, tender on the inside, and absolutely perfect for building hearty open-faced sandwiches. Get ready to enjoy the incredible aroma and satisfaction of home baked bread right from your kitchen!
Alright, let's talk Breyðmatur! In plain English, "Breyðmatur" (pronounced "Broy-mah-toor") simply means "bread food" or "bread meal" in Faroese. It’s all about open-faced sandwiches, a staple in Nordic cuisine. Think of it as a delicious canvas for all sorts of toppings – fish, cheese, meats, eggs, and more. The bread itself is super important here. You need a sturdy, robust loaf that can hold up to generous toppings without getting soggy or falling apart. This isn't the time for a delicate, cake-y bread; you want something with substance that slices clean and offers a satisfying chew. That's exactly what our Faroese-inspired rye loaf delivers!
Good news! You don't need a professional bakery setup to master this beginner bread making recipe. Here’s what will make your life easy:
Dutch oven / cast iron pot with lid (primary): This is our secret weapon for that amazing crust! The lid traps steam, creating a perfect environment for baking.
Large mixing bowl: For getting all your ingredients for homemade bread combined.
Kitchen scale or measuring cups: A scale is more accurate for baking, especially with flour, but cups will work.
Bench scraper (optional but handy): Great for handling sticky dough and cleaning your workspace.
Parchment paper: Makes transferring the dough into the hot Dutch oven much safer and easier.
Instant-read thermometer (optional): A nice tool for beginners to confirm your bread is fully cooked (aim for 200-210°F / 93-99°C internal temperature).
Ingredients
Directions
- Mix the dough In your large mixing bowl, combine the warm water, yeast, and optional sweetener. Let it sit for 5-10 minutes until foamy (this means your yeast is active!). If it doesn't foam, your yeast might be old, or your water wasn't the right temperature.
- Stir in the salt, then add the rye flour and bread flour. Mix with a sturdy spoon or your hands until a shaggy, cohesive dough forms. It'll be sticky, but all the flour should be hydrated. "Stop when it looks like a shaggy, somewhat sticky ball with no dry flour left." Cover the bowl with plastic wrap or a damp towel.
- First rise Let the dough rise in a warm spot for about 1 to 1.5 hours, or until "doubled" in size. What "doubled" actually means is it should look significantly puffier and lighter. If you gently poke it with a floured finger, it should spring back slowly. A good temperature guidance is a room that's around 70-75°F (21-24°C).
- Shape (simple shaping for beginners) Lightly flour your work surface and gently turn out the dough. Fold the edges of the dough towards the center a few times, gently pulling and tucking to create a somewhat round, tight ball. You want to create some surface tension without deflating all the air. "How tight to shape without overthinking it": Imagine you're gently pulling a tablecloth towards the center from all sides – that's the kind of tension you're aiming for.
- Second rise Place your shaped dough onto a piece of parchment paper (this will make it easy to transfer later). Cover it loosely with plastic wrap or a light towel. Let it rise for another 30-45 minutes. To check if it's ready, do the "poke test": gently poke the dough with a floured finger. If the indentation springs back slowly and doesn't disappear completely, it's ready. If it springs back quickly, it needs more time. If it collapses, it's over-proofed.
- Preheat Dutch oven / cast iron About 30 minutes before the second rise is done, place your empty Dutch oven (with the lid on) into your oven. Preheat the oven to 450°F (230°C). "Why preheat matters": Getting the Dutch oven screaming hot helps create that incredible crust and ensures an initial burst of steam. "Safety tips for handling hot cast iron": ALWAYS use thick oven mitts. The pot will be extremely hot. Be careful!
- Bake (lid on, then lid off)
- Once the oven and Dutch oven are preheated, carefully remove the hot pot. Gently lift the dough by the parchment paper and carefully lower it into the hot Dutch oven. Score the top of the loaf with a sharp knife or razor blade (a simple cross or a few slashes will do).
- Place the lid back on and bake for 30 minutes.
- After 30 minutes, carefully remove the lid. Lower the oven temperature to 400°F (200°C) and bake for another 10-15 minutes, or until the crust is a deep golden brown and sounds hollow when tapped on the bottom. "What you’re looking for: crust color, sound, internal temp cue": A dark golden-brown crust is ideal. Tap the bottom – it should sound hollow. For ultimate certainty, an internal temperature of 200-210°F (93-99°C) means it's fully cooked.
- Cool completely (don’t skip) This is crucial, especially for rye bread! Carefully remove the loaf from the Dutch oven and place it on a wire rack to cool completely. "Why slicing early makes rye loaves gummy": Rye flour has different properties than wheat flour, and the starches need time to set after baking. Slicing it while warm traps moisture and results in a gummy, dense texture. Let it cool for at least 2 hours, ideally longer, before slicing. We know, it's hard to wait!
Make Faroese Breyðmatur Bread - Easy Rye Loaf Recipe
- Serves: 12 People
- Prepare Time: 20 minutes
- Cooking Time: 40 minutes
- Calories: -
- Difficulty: Easy
Ever dreamt of baking your own homemade bread that's not just delicious but also steeped in tradition? You're in the right place! Today, we're diving into the heartwarming world of Faroese Breyðmatur bread – a simple, sturdy rye loaf perfect for beginners. Forget complicated techniques; we’re going to show you bread how to make this incredible bread with ease. This isn't just any easy bread dough recipe; it's a taste of the Faroe Islands, designed to be crusty on the outside, tender on the inside, and absolutely perfect for building hearty open-faced sandwiches. Get ready to enjoy the incredible aroma and satisfaction of home baked bread right from your kitchen!
Alright, let's talk Breyðmatur! In plain English, "Breyðmatur" (pronounced "Broy-mah-toor") simply means "bread food" or "bread meal" in Faroese. It’s all about open-faced sandwiches, a staple in Nordic cuisine. Think of it as a delicious canvas for all sorts of toppings – fish, cheese, meats, eggs, and more. The bread itself is super important here. You need a sturdy, robust loaf that can hold up to generous toppings without getting soggy or falling apart. This isn't the time for a delicate, cake-y bread; you want something with substance that slices clean and offers a satisfying chew. That's exactly what our Faroese-inspired rye loaf delivers!
Good news! You don't need a professional bakery setup to master this beginner bread making recipe. Here’s what will make your life easy:
Dutch oven / cast iron pot with lid (primary): This is our secret weapon for that amazing crust! The lid traps steam, creating a perfect environment for baking.
Large mixing bowl: For getting all your ingredients for homemade bread combined.
Kitchen scale or measuring cups: A scale is more accurate for baking, especially with flour, but cups will work.
Bench scraper (optional but handy): Great for handling sticky dough and cleaning your workspace.
Parchment paper: Makes transferring the dough into the hot Dutch oven much safer and easier.
Instant-read thermometer (optional): A nice tool for beginners to confirm your bread is fully cooked (aim for 200-210°F / 93-99°C internal temperature).
Ingredients
Directions
- Mix the dough In your large mixing bowl, combine the warm water, yeast, and optional sweetener. Let it sit for 5-10 minutes until foamy (this means your yeast is active!). If it doesn't foam, your yeast might be old, or your water wasn't the right temperature.
- Stir in the salt, then add the rye flour and bread flour. Mix with a sturdy spoon or your hands until a shaggy, cohesive dough forms. It'll be sticky, but all the flour should be hydrated. "Stop when it looks like a shaggy, somewhat sticky ball with no dry flour left." Cover the bowl with plastic wrap or a damp towel.
- First rise Let the dough rise in a warm spot for about 1 to 1.5 hours, or until "doubled" in size. What "doubled" actually means is it should look significantly puffier and lighter. If you gently poke it with a floured finger, it should spring back slowly. A good temperature guidance is a room that's around 70-75°F (21-24°C).
- Shape (simple shaping for beginners) Lightly flour your work surface and gently turn out the dough. Fold the edges of the dough towards the center a few times, gently pulling and tucking to create a somewhat round, tight ball. You want to create some surface tension without deflating all the air. "How tight to shape without overthinking it": Imagine you're gently pulling a tablecloth towards the center from all sides – that's the kind of tension you're aiming for.
- Second rise Place your shaped dough onto a piece of parchment paper (this will make it easy to transfer later). Cover it loosely with plastic wrap or a light towel. Let it rise for another 30-45 minutes. To check if it's ready, do the "poke test": gently poke the dough with a floured finger. If the indentation springs back slowly and doesn't disappear completely, it's ready. If it springs back quickly, it needs more time. If it collapses, it's over-proofed.
- Preheat Dutch oven / cast iron About 30 minutes before the second rise is done, place your empty Dutch oven (with the lid on) into your oven. Preheat the oven to 450°F (230°C). "Why preheat matters": Getting the Dutch oven screaming hot helps create that incredible crust and ensures an initial burst of steam. "Safety tips for handling hot cast iron": ALWAYS use thick oven mitts. The pot will be extremely hot. Be careful!
- Bake (lid on, then lid off)
- Once the oven and Dutch oven are preheated, carefully remove the hot pot. Gently lift the dough by the parchment paper and carefully lower it into the hot Dutch oven. Score the top of the loaf with a sharp knife or razor blade (a simple cross or a few slashes will do).
- Place the lid back on and bake for 30 minutes.
- After 30 minutes, carefully remove the lid. Lower the oven temperature to 400°F (200°C) and bake for another 10-15 minutes, or until the crust is a deep golden brown and sounds hollow when tapped on the bottom. "What you’re looking for: crust color, sound, internal temp cue": A dark golden-brown crust is ideal. Tap the bottom – it should sound hollow. For ultimate certainty, an internal temperature of 200-210°F (93-99°C) means it's fully cooked.
- Cool completely (don’t skip) This is crucial, especially for rye bread! Carefully remove the loaf from the Dutch oven and place it on a wire rack to cool completely. "Why slicing early makes rye loaves gummy": Rye flour has different properties than wheat flour, and the starches need time to set after baking. Slicing it while warm traps moisture and results in a gummy, dense texture. Let it cool for at least 2 hours, ideally longer, before slicing. We know, it's hard to wait!
You may also like


Hey there! I’m just someone who seriously loves good food and believes that cooking doesn’t have to be complicated to be amazing. Whether it’s a quick weeknight dinner or a cozy weekend meal, I’m all about sharing easy, tasty recipes that actually work.