
Bake Hawaiian Taro Bread - Soft, Sweet & Purple
Bake Hawaiian Taro Bread - Soft, Sweet & Purple
- Serves: 12 People
- Prepare Time: 45 minutes
- Cooking Time: 35 minutes
- Calories: -
- Difficulty: Medium
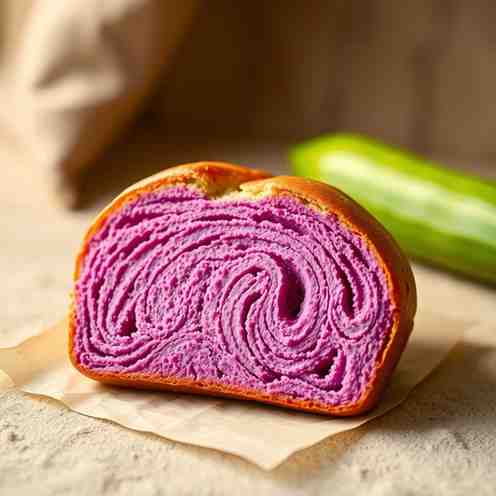
Aloha, bakers! Are you ready to bring a taste of the islands right into your kitchen? Get ready to fall in love with Hawaiian taro bread, also known as kalo sweet bread. This isn't just any ordinary loaf; it's a wonderfully soft, tender, and gently sweet bread with a unique, subtle earthy-nutty flavor that comes from the beloved taro root. Its crumb is incredibly moist, making it perfect for breakfast, a snack, or alongside your favorite meal.
What makes this bread truly "Hawaiian"? It's deeply rooted in local baking traditions and celebrates kalo (taro), a foundational food in Hawaiian culture. While it shares some similarities with other sweet breads, Hawaiian taro bread stands out with its distinct flavor profile and often a beautiful natural purple hue. Forget dry, bland loaves – our reliable recipe is designed to work seamlessly in your home kitchen, promising a delightful Hawaiian sweet bread experience that's both authentic and incredibly delicious. Let's get baking!
Hawaiian taro bread is a traditional sweet bread from Hawaii, made with cooked and pureed taro root (kalo). This staple ingredient gives the bread its characteristic soft, tender texture, a subtle earthy sweetness, and often a beautiful light purple color. It's a comforting and hearty bread, often enjoyed plain or lightly toasted.
It's important to note that Hawaiian taro bread is distinct from other regional sweet breads:
Ube bread: While often purple, ube (purple yam) has a more distinctly sweet, vanilla-like flavor compared to taro's milder, earthier notes.
Okinawan sweet potato bread: Uses Okinawan sweet potato, which is also purple but has a different sweetness and texture profile than taro.
Taro dinner rolls: While our recipe makes a loaf, taro is also famously used to make taro rolls or taro buns, which are simply smaller, individual portions of the same dough. Our recipe can be adapted for rolls with minor shaping adjustments.
Kalo (taro) is far more than just an ingredient in Hawaii; it's a sacred plant, a foundational food, and a symbol of cultural identity. For Hawaiians, kalo represents sustenance, family, and connection to the land. It has been cultivated for centuries and is a primary source of carbohydrates in the traditional Hawaiian diet.
The most famous product of kalo is poi, a paste made from pounded taro corms, which is a staple food. In breadmaking, taro (whether as puree or poi) is prized for its ability to add incredible moisture, tenderness, and a unique, subtle flavor to the dough. It contributes to a soft crumb that stays fresh longer, making it an ideal addition to sweet breads like this one. Using kalo in this bread is a respectful nod to its deep cultural significance and its practical benefits in baking.
Ingredients
Directions
- Cook and Puree the Taro
- Prepare Taro: Peel the taro corm using a vegetable peeler or knife (wear gloves if you have sensitive skin, as raw taro can be irritating). Cut the taro into 1-inch (2.5 cm) chunks.
- Cook Taro: Place the taro chunks in a pot and cover with water. Bring to a boil, then reduce heat and simmer until the taro is completely tender when pierced with a fork, about 20-30 minutes. Alternatively, steam the taro until tender.
- Cool Slightly: Drain the cooked taro and let it cool for about 10-15 minutes.
- Puree Smooth: Transfer the warm taro to a food processor or use a potato masher. Puree until completely smooth, like thick mashed potatoes or a soft paste. If it's too thick to blend, add a tablespoon of the warmed milk from the recipe to help it along. Measure out 1 cup (220g) of puree and set aside.
- Mix the Dough
- Activate Yeast: In the bowl of a stand mixer (or a large mixing bowl if kneading by hand), combine the warmed milk, granulated sugar, and active dry yeast. Stir gently and let it sit for 5-10 minutes until foamy. This shows your yeast is active.
- Add Wet Ingredients: To the yeast mixture, add the cooked taro puree, melted butter, and the egg. If using vanilla extract, add it now. Mix on low speed (or with a spoon) until well combined.
- Add Dry Ingredients: In a separate bowl, whisk together the bread flour and fine sea salt. Gradually add the dry ingredients to the wet ingredients in the mixer bowl, mixing on low speed until a shaggy dough forms. If using optional purple food coloring, add it now and mix until uniformly distributed.
- Knead Until Smooth
- Knead Dough: Attach the dough hook to your stand mixer. Knead on medium-low speed for 8-10 minutes, or until the dough is smooth, elastic, and pulls away from the sides of the bowl.
- Hand Kneading: If kneading by hand, turn the shaggy dough out onto a lightly floured surface. Knead for 12-15 minutes, pushing and folding the dough until it's smooth and elastic.
- Stickiness Guidance: The dough should be slightly sticky but manageable. If it's too sticky to handle, add flour one tablespoon at a time, up to 2-3 tablespoons, until it reaches the right consistency. Avoid adding too much flour, as this can make the bread dense. The taro makes it naturally quite soft.
- First Rise
- Prepare for Rise: Lightly grease a large bowl with a little oil. Transfer the kneaded dough to the bowl, turning it once to coat all sides.
- Create Warm Spot: Cover the bowl tightly with plastic wrap or a clean kitchen towel. Place the bowl in a warm, draft-free spot. A slightly warm oven (turned off, with the light on) or a microwave with a cup of hot water inside are good options.
- First Rise: Let the dough rise for 1.5 to 2 hours, or until it has visibly doubled in size. You can gently poke it with a floured finger; if the indentation remains, it's ready.
- Shape and Pan
- Deflate Dough: Gently punch down the risen dough to release the air.
- Shape Loaf: Turn the dough out onto a lightly floured surface. Gently flatten it into a rectangle. Fold the top third of the dough down to the center, then fold the bottom third up over the top. Pinch the seam closed. Turn the dough seam-side down and gently roll it into a log that is roughly the length of your loaf pan.
- Prepare Pan: Lightly grease a 9x5-inch (23x13 cm) loaf pan.
- Place in Pan: Carefully transfer the shaped dough seam-side down into the prepared loaf pan. It should fill the pan about two-thirds of the way.
- Second Rise
- Cover and Rise: Cover the loaf pan loosely with plastic wrap or a clean kitchen towel. Return it to your warm, draft-free spot for the second rise.
- Watch for Proofing: Let it rise for 45-60 minutes, or until the dough has nearly doubled in size again and crests just above the rim of the pan. Be careful not to under-proof (which leads to dense bread) or over-proof (which can cause the loaf to collapse during baking).
- Bake
- Preheat Oven: About 15 minutes before the second rise is complete, preheat your oven to 350°F (175°C).
- Bake: Place the loaf pan in the preheated oven. Bake for 30-40 minutes, or until the top is deep golden brown and the internal temperature reaches 200-205°F (93-96°C) when measured with an instant-read thermometer.
- Cooling Guidance: Once baked, immediately remove the bread from the pan and transfer it to a wire rack. Let it cool completely for at least 1 hour before slicing. This is crucial for the crumb to set and to keep the bread soft and moist. Slicing too early can result in a gummy texture.
- What It Should Look and Taste Like (Success Checklist)Your perfect Hawaiian taro bread should have:
- Crumb: A soft, tender, and slightly open crumb, not dense or heavy.
- Texture: Incredibly moist and fluffy, almost cloud-like.
- Sweetness Level: Gently sweet, not overly sugary, allowing the subtle earthy notes of the taro to shine through.
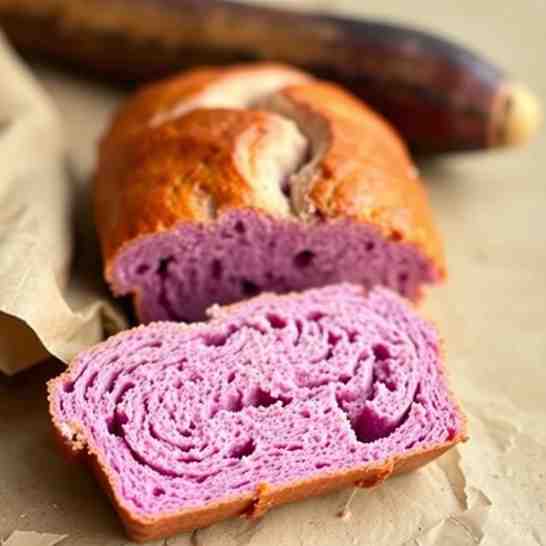
- Color Expectations: The interior color can range from a very pale gray-lavender to a light purple, depending on the taro variety and if you used optional food coloring. The crust should be a beautiful deep golden brown.
Bake Hawaiian Taro Bread - Soft, Sweet & Purple
- Serves: 12 People
- Prepare Time: 45 minutes
- Cooking Time: 35 minutes
- Calories: -
- Difficulty: Medium
Aloha, bakers! Are you ready to bring a taste of the islands right into your kitchen? Get ready to fall in love with Hawaiian taro bread, also known as kalo sweet bread. This isn't just any ordinary loaf; it's a wonderfully soft, tender, and gently sweet bread with a unique, subtle earthy-nutty flavor that comes from the beloved taro root. Its crumb is incredibly moist, making it perfect for breakfast, a snack, or alongside your favorite meal.
What makes this bread truly "Hawaiian"? It's deeply rooted in local baking traditions and celebrates kalo (taro), a foundational food in Hawaiian culture. While it shares some similarities with other sweet breads, Hawaiian taro bread stands out with its distinct flavor profile and often a beautiful natural purple hue. Forget dry, bland loaves – our reliable recipe is designed to work seamlessly in your home kitchen, promising a delightful Hawaiian sweet bread experience that's both authentic and incredibly delicious. Let's get baking!
Hawaiian taro bread is a traditional sweet bread from Hawaii, made with cooked and pureed taro root (kalo). This staple ingredient gives the bread its characteristic soft, tender texture, a subtle earthy sweetness, and often a beautiful light purple color. It's a comforting and hearty bread, often enjoyed plain or lightly toasted.
It's important to note that Hawaiian taro bread is distinct from other regional sweet breads:
Ube bread: While often purple, ube (purple yam) has a more distinctly sweet, vanilla-like flavor compared to taro's milder, earthier notes.
Okinawan sweet potato bread: Uses Okinawan sweet potato, which is also purple but has a different sweetness and texture profile than taro.
Taro dinner rolls: While our recipe makes a loaf, taro is also famously used to make taro rolls or taro buns, which are simply smaller, individual portions of the same dough. Our recipe can be adapted for rolls with minor shaping adjustments.
Kalo (taro) is far more than just an ingredient in Hawaii; it's a sacred plant, a foundational food, and a symbol of cultural identity. For Hawaiians, kalo represents sustenance, family, and connection to the land. It has been cultivated for centuries and is a primary source of carbohydrates in the traditional Hawaiian diet.
The most famous product of kalo is poi, a paste made from pounded taro corms, which is a staple food. In breadmaking, taro (whether as puree or poi) is prized for its ability to add incredible moisture, tenderness, and a unique, subtle flavor to the dough. It contributes to a soft crumb that stays fresh longer, making it an ideal addition to sweet breads like this one. Using kalo in this bread is a respectful nod to its deep cultural significance and its practical benefits in baking.
Ingredients
Directions
- Cook and Puree the Taro
- Prepare Taro: Peel the taro corm using a vegetable peeler or knife (wear gloves if you have sensitive skin, as raw taro can be irritating). Cut the taro into 1-inch (2.5 cm) chunks.
- Cook Taro: Place the taro chunks in a pot and cover with water. Bring to a boil, then reduce heat and simmer until the taro is completely tender when pierced with a fork, about 20-30 minutes. Alternatively, steam the taro until tender.
- Cool Slightly: Drain the cooked taro and let it cool for about 10-15 minutes.
- Puree Smooth: Transfer the warm taro to a food processor or use a potato masher. Puree until completely smooth, like thick mashed potatoes or a soft paste. If it's too thick to blend, add a tablespoon of the warmed milk from the recipe to help it along. Measure out 1 cup (220g) of puree and set aside.
- Mix the Dough
- Activate Yeast: In the bowl of a stand mixer (or a large mixing bowl if kneading by hand), combine the warmed milk, granulated sugar, and active dry yeast. Stir gently and let it sit for 5-10 minutes until foamy. This shows your yeast is active.
- Add Wet Ingredients: To the yeast mixture, add the cooked taro puree, melted butter, and the egg. If using vanilla extract, add it now. Mix on low speed (or with a spoon) until well combined.
- Add Dry Ingredients: In a separate bowl, whisk together the bread flour and fine sea salt. Gradually add the dry ingredients to the wet ingredients in the mixer bowl, mixing on low speed until a shaggy dough forms. If using optional purple food coloring, add it now and mix until uniformly distributed.
- Knead Until Smooth
- Knead Dough: Attach the dough hook to your stand mixer. Knead on medium-low speed for 8-10 minutes, or until the dough is smooth, elastic, and pulls away from the sides of the bowl.
- Hand Kneading: If kneading by hand, turn the shaggy dough out onto a lightly floured surface. Knead for 12-15 minutes, pushing and folding the dough until it's smooth and elastic.
- Stickiness Guidance: The dough should be slightly sticky but manageable. If it's too sticky to handle, add flour one tablespoon at a time, up to 2-3 tablespoons, until it reaches the right consistency. Avoid adding too much flour, as this can make the bread dense. The taro makes it naturally quite soft.
- First Rise
- Prepare for Rise: Lightly grease a large bowl with a little oil. Transfer the kneaded dough to the bowl, turning it once to coat all sides.
- Create Warm Spot: Cover the bowl tightly with plastic wrap or a clean kitchen towel. Place the bowl in a warm, draft-free spot. A slightly warm oven (turned off, with the light on) or a microwave with a cup of hot water inside are good options.
- First Rise: Let the dough rise for 1.5 to 2 hours, or until it has visibly doubled in size. You can gently poke it with a floured finger; if the indentation remains, it's ready.
- Shape and Pan
- Deflate Dough: Gently punch down the risen dough to release the air.
- Shape Loaf: Turn the dough out onto a lightly floured surface. Gently flatten it into a rectangle. Fold the top third of the dough down to the center, then fold the bottom third up over the top. Pinch the seam closed. Turn the dough seam-side down and gently roll it into a log that is roughly the length of your loaf pan.
- Prepare Pan: Lightly grease a 9x5-inch (23x13 cm) loaf pan.
- Place in Pan: Carefully transfer the shaped dough seam-side down into the prepared loaf pan. It should fill the pan about two-thirds of the way.
- Second Rise
- Cover and Rise: Cover the loaf pan loosely with plastic wrap or a clean kitchen towel. Return it to your warm, draft-free spot for the second rise.
- Watch for Proofing: Let it rise for 45-60 minutes, or until the dough has nearly doubled in size again and crests just above the rim of the pan. Be careful not to under-proof (which leads to dense bread) or over-proof (which can cause the loaf to collapse during baking).
- Bake
- Preheat Oven: About 15 minutes before the second rise is complete, preheat your oven to 350°F (175°C).
- Bake: Place the loaf pan in the preheated oven. Bake for 30-40 minutes, or until the top is deep golden brown and the internal temperature reaches 200-205°F (93-96°C) when measured with an instant-read thermometer.
- Cooling Guidance: Once baked, immediately remove the bread from the pan and transfer it to a wire rack. Let it cool completely for at least 1 hour before slicing. This is crucial for the crumb to set and to keep the bread soft and moist. Slicing too early can result in a gummy texture.
- What It Should Look and Taste Like (Success Checklist)Your perfect Hawaiian taro bread should have:
- Crumb: A soft, tender, and slightly open crumb, not dense or heavy.
- Texture: Incredibly moist and fluffy, almost cloud-like.
- Sweetness Level: Gently sweet, not overly sugary, allowing the subtle earthy notes of the taro to shine through.
- Color Expectations: The interior color can range from a very pale gray-lavender to a light purple, depending on the taro variety and if you used optional food coloring. The crust should be a beautiful deep golden brown.
You may also like


Hey there! I’m just someone who seriously loves good food and believes that cooking doesn’t have to be complicated to be amazing. Whether it’s a quick weeknight dinner or a cozy weekend meal, I’m all about sharing easy, tasty recipes that actually work.


