
Kenyan Samosas - Crispy African Snack Recipe
Kenyan Samosas - Crispy African Snack Recipe

- Serves: 16 People
- Prepare Time: 45 minutes
- Cooking Time: 25 minutes
- Calories: -
- Difficulty: Medium
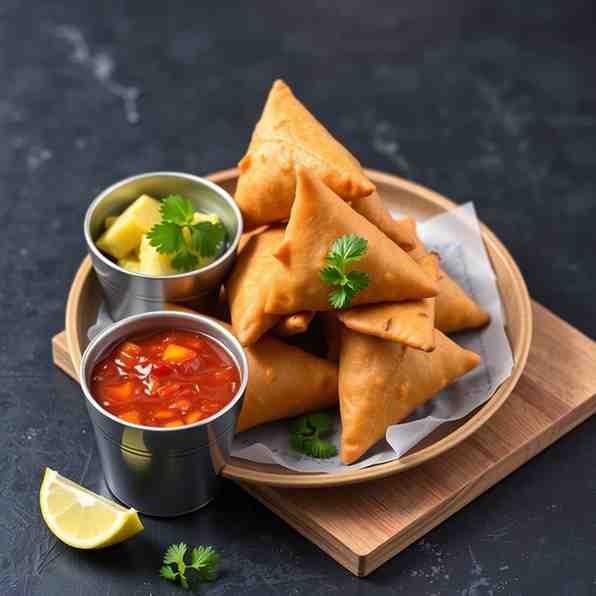
Get ready to embark on a culinary adventure that will tantalize your taste buds and impress your friends! Today, we're diving into the heart of East African cuisine to bring you the ultimate recipe for Kenyan Samosas, also known as Sambusas. These crispy, savory parcels of warmly spiced beef are more than just a snack; they're a celebration, a party starter, and a true African food recipe delight. While they share a lineage with their Indian and Middle Eastern cousins, Kenyan samosas have a distinct charm that makes them incredibly popular across East Africa, often enjoyed with a cup of tea or as a vibrant street snack.
Forget everything you thought you knew about making samosas. This isn't just another recipe; it's your definitive guide to achieving samosa perfection. We'll walk you through crystal-clear instructions for folding these beauties like a pro, ensuring your wrappers stay intact and your filling is perfectly encased. We'll also demystify the art of deep-frying, helping you control the temperature for that coveted golden-brown crispness without a hint of greasiness. Plus, we'll show you how to make these easy yummy snacks ahead of time, so you're always ready for an impromptu gathering or a delightful treat. Get ready to master one of the most beloved african cuisine recipes!
Ingredients
Directions
- Make the Beef Filling:
- Heat a large frying pan for deep frying or a heavy-bottomed pot over medium-high heat. Add the ground beef and cook, breaking it up with a spoon, until it's browned and all the liquid has evaporated. This step is crucial for a dry-ish filling, which prevents soggy wrappers. Drain any excess fat if necessary.
- Add the finely diced onion, minced garlic, and minced chili to the pan. Sauté until the onion is softened and translucent, about 5-7 minutes.
- Stir in the ground coriander, cumin, and optional garam masala. Cook for another 1-2 minutes until fragrant.
- Add the thawed crispy green peas and cook for 2-3 minutes, just to warm them through.
- Remove the pan from the heat. Stir in the fresh cilantro, salt, and black pepper. Taste and adjust seasoning as needed.
- Cool the filling completely (this is vital!). Transfer it to a plate or shallow bowl and spread it out to cool quickly. Cooling prevents steam from forming inside the samosa, which can lead to tears in the wrapper during frying.
- Set Up Wrappers & Sealing Paste:
- While the filling cools, prepare your workspace. Unpack the spring roll wrappers carefully. Keep them covered with a damp cloth to prevent them from drying out, as dry wrappers can tear easily.
- In a small bowl, whisk together the flour and water to create a thick paste, similar in consistency to school glue. This will be your "samosa glue."
- Fold into a Cone (The Samosa Art!):
- Take one spring roll sheet and lay it flat on a clean surface. If using square wrappers, cut them into three equal strips lengthwise (if they aren't already strips).
- Fold #1 (Triangle): Take one strip and fold one corner up to meet the opposite long edge, forming a small triangle pocket. Press firmly along the fold. This creates your first side.
- Fold #2 (Cone): Now, take the bottom point of that triangle and fold it upwards again, aligning it with the top edge of the previous fold. You should now have a perfect cone-shaped pocket. This is where your filling will go!
- Seal the seam of your cone by applying a little flour-water paste along the open edge and pressing gently.
- Fill & Close:
- Hold the cone in one hand and spoon about 1-1.5 tablespoons of the cooled beef filling into the pocket. Don't overfill!
- Gently press out any air from around the filling. This prevents bursting during frying.
- Apply sealing paste along the remaining open top edge of the wrapper.
- Fold the top flap down over the filling, sealing it tightly. Pinch the corners to ensure a secure, triangular shape.
- Place the assembled samosa on a sheet pan lined with parchment paper. Repeat with the remaining filling and wrappers.
- Deep-Fry for Crisp, Non-Greasy Sambusas:
- Pour enough neutral frying oil into a heavy pot or deep skillet (or a deep fried deep fryer) so that it's at least 3-4 inches deep. Heat the oil over medium-high heat.
- Recommendation: Use a thermometer to monitor the oil temperature. The target temperature range is 325-350°F (160-175°C). This is key for crispy and non-greasy samosas.
- Once the oil is at the correct temperature, carefully lower a small batch size of samosas into the oil. Do not overcrowd the pot, as this will lower the oil temperature and lead to greasy samosas. Fry only 3-4 samosas at a time, depending on your pot size.
- Fry for 3-5 minutes per batch, turning occasionally, until the samosas are golden brown and perfectly crisp.
- Using a slotted spoon, carefully remove the fried samosas and place them on a wire rack set over a baking sheet lined with paper towels. This allows excess oil to drain off and keeps them crisp.
- Let them rest for 2 minutes before serving.
Kenyan Samosas - Crispy African Snack Recipe

- Serves: 16 People
- Prepare Time: 45 minutes
- Cooking Time: 25 minutes
- Calories: -
- Difficulty: Medium
Get ready to embark on a culinary adventure that will tantalize your taste buds and impress your friends! Today, we're diving into the heart of East African cuisine to bring you the ultimate recipe for Kenyan Samosas, also known as Sambusas. These crispy, savory parcels of warmly spiced beef are more than just a snack; they're a celebration, a party starter, and a true African food recipe delight. While they share a lineage with their Indian and Middle Eastern cousins, Kenyan samosas have a distinct charm that makes them incredibly popular across East Africa, often enjoyed with a cup of tea or as a vibrant street snack.
Forget everything you thought you knew about making samosas. This isn't just another recipe; it's your definitive guide to achieving samosa perfection. We'll walk you through crystal-clear instructions for folding these beauties like a pro, ensuring your wrappers stay intact and your filling is perfectly encased. We'll also demystify the art of deep-frying, helping you control the temperature for that coveted golden-brown crispness without a hint of greasiness. Plus, we'll show you how to make these easy yummy snacks ahead of time, so you're always ready for an impromptu gathering or a delightful treat. Get ready to master one of the most beloved african cuisine recipes!
Ingredients
Directions
- Make the Beef Filling:
- Heat a large frying pan for deep frying or a heavy-bottomed pot over medium-high heat. Add the ground beef and cook, breaking it up with a spoon, until it's browned and all the liquid has evaporated. This step is crucial for a dry-ish filling, which prevents soggy wrappers. Drain any excess fat if necessary.
- Add the finely diced onion, minced garlic, and minced chili to the pan. Sauté until the onion is softened and translucent, about 5-7 minutes.
- Stir in the ground coriander, cumin, and optional garam masala. Cook for another 1-2 minutes until fragrant.
- Add the thawed crispy green peas and cook for 2-3 minutes, just to warm them through.
- Remove the pan from the heat. Stir in the fresh cilantro, salt, and black pepper. Taste and adjust seasoning as needed.
- Cool the filling completely (this is vital!). Transfer it to a plate or shallow bowl and spread it out to cool quickly. Cooling prevents steam from forming inside the samosa, which can lead to tears in the wrapper during frying.
- Set Up Wrappers & Sealing Paste:
- While the filling cools, prepare your workspace. Unpack the spring roll wrappers carefully. Keep them covered with a damp cloth to prevent them from drying out, as dry wrappers can tear easily.
- In a small bowl, whisk together the flour and water to create a thick paste, similar in consistency to school glue. This will be your "samosa glue."
- Fold into a Cone (The Samosa Art!):
- Take one spring roll sheet and lay it flat on a clean surface. If using square wrappers, cut them into three equal strips lengthwise (if they aren't already strips).
- Fold #1 (Triangle): Take one strip and fold one corner up to meet the opposite long edge, forming a small triangle pocket. Press firmly along the fold. This creates your first side.
- Fold #2 (Cone): Now, take the bottom point of that triangle and fold it upwards again, aligning it with the top edge of the previous fold. You should now have a perfect cone-shaped pocket. This is where your filling will go!
- Seal the seam of your cone by applying a little flour-water paste along the open edge and pressing gently.
- Fill & Close:
- Hold the cone in one hand and spoon about 1-1.5 tablespoons of the cooled beef filling into the pocket. Don't overfill!
- Gently press out any air from around the filling. This prevents bursting during frying.
- Apply sealing paste along the remaining open top edge of the wrapper.
- Fold the top flap down over the filling, sealing it tightly. Pinch the corners to ensure a secure, triangular shape.
- Place the assembled samosa on a sheet pan lined with parchment paper. Repeat with the remaining filling and wrappers.
- Deep-Fry for Crisp, Non-Greasy Sambusas:
- Pour enough neutral frying oil into a heavy pot or deep skillet (or a deep fried deep fryer) so that it's at least 3-4 inches deep. Heat the oil over medium-high heat.
- Recommendation: Use a thermometer to monitor the oil temperature. The target temperature range is 325-350°F (160-175°C). This is key for crispy and non-greasy samosas.
- Once the oil is at the correct temperature, carefully lower a small batch size of samosas into the oil. Do not overcrowd the pot, as this will lower the oil temperature and lead to greasy samosas. Fry only 3-4 samosas at a time, depending on your pot size.
- Fry for 3-5 minutes per batch, turning occasionally, until the samosas are golden brown and perfectly crisp.
- Using a slotted spoon, carefully remove the fried samosas and place them on a wire rack set over a baking sheet lined with paper towels. This allows excess oil to drain off and keeps them crisp.
- Let them rest for 2 minutes before serving.
You may also like


Hey there! I’m just someone who seriously loves good food and believes that cooking doesn’t have to be complicated to be amazing. Whether it’s a quick weeknight dinner or a cozy weekend meal, I’m all about sharing easy, tasty recipes that actually work.


