
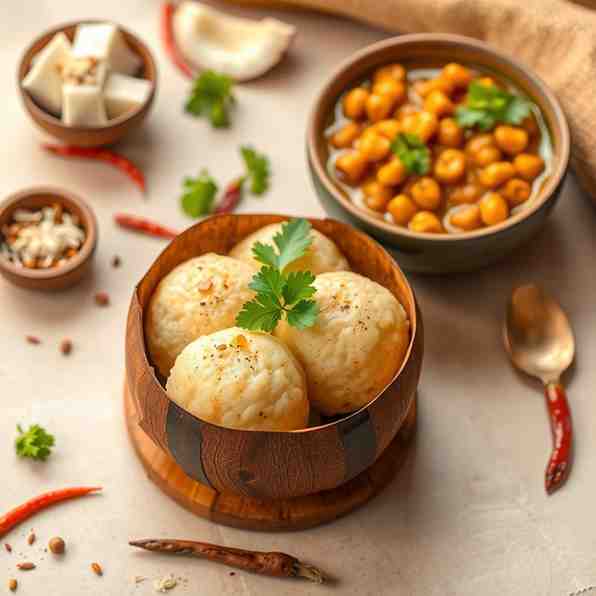
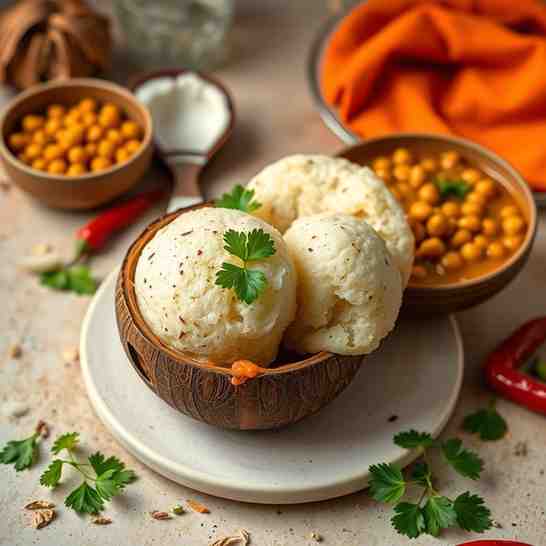
Kerala Puttu & Kadala - Curry Chickpeas Recipe
Kerala Puttu & Kadala - Curry Chickpeas Recipe
- Serves: 4 People
- Prepare Time: 30 minutes
- Cooking Time: 60 minutes
- Calories: -
- Difficulty: Medium
Ever wonder what makes a South Indian breakfast truly special? Look no further than Kerala Puttu and Kadala Curry! This isn't just any curry chickpeas recipe; it's a taste of authentic Kerala, a breakfast combo that's hearty, flavorful, and incredibly satisfying. Imagine soft, steamed rice cakes (Puttu) paired with a rich, aromatic black chickpea curry (Kadala Curry) – it's a match made in culinary heaven.
What gives this dish its distinctive "Kerala style"? It’s all about the unique blend of fresh grated coconut, aromatic curry leaf curry, and the magic of coconut oil tempering. These elements come together to create a depth of flavor that's both comforting and exotic.
In this guide, you'll learn everything you need to know to whip up both the Puttu and the Kadala Curry right in your own kitchen. We'll walk you through US-friendly timings, essential troubleshooting tips, and all the secrets to mastering this traditional rice and curry breakfast. Get ready to dive into the vibrant flavors of South India and make this incredible curry chickpeas recipe a staple in your home!
Key Tools: Puttu maker (or a steamer setup), a pressure cooker (or Instant Pot), blender/grinder.
Spice Level: Medium. Easily adjustable to your preference!
Black Chickpeas (Kala Chana): These are smaller and darker than regular chickpeas and have a firmer texture and nuttier flavor crucial for authentic Kadala Curry. You'll find them in Indian grocery stores or the international aisle of larger supermarkets. Soaking them overnight (8-12 hours) is non-negotiable for proper cooking and digestion.
Coconut: Fresh grated coconut is truly the best for flavor and texture, especially for roasting. You can find it frozen in most Indian or Asian markets. If fresh/frozen isn't available, unsweetened desiccated coconut can work in a pinch, but rehydrate it first and adjust roasting time carefully to prevent burning. Coconut milk is only a small add-in, not a substitute for the grated coconut.
Curry Leaves & Coconut Oil: These are the heart and soul of Kerala tempering! Curry leaves provide a unique, aromatic, slightly citrusy flavor. Look for them in Indian grocery stores. If you absolutely can't find them, a very tiny pinch of dried fenugreek leaves (kasuri methi) can offer a hint of similar aroma, but it's not a direct substitute. Coconut oil is essential for that authentic flavor; don't swap it for other oils if you want the real deal.
Puttu Flour (Puttu Podi): This is a specific coarse rice flour blend, often pre-steamed, designed for Puttu. It's usually labeled "Puttu Podi" or "Puttu Flour" and is available in Indian grocery stores. Regular rice flour won't give you the same fluffy texture.
(A single recipe card for a unified method and serving.)
Ingredients
Directions
- Part 1 — Soak & Cook the Chickpeas
- Soak: Rinse the black chickpeas thoroughly. Place them in a large bowl and cover with plenty of water (at least 3-4 inches above the chickpeas). Soak for 8-12 hours, or overnight.
- Quick Soak Option: If you forget to soak, rinse chickpeas, place in a pot, cover with water, bring to a boil, then remove from heat, cover, and let sit for 1 hour. Drain and proceed.
- Cook: Drain the soaked chickpeas.
- Stovetop Pressure Cooker: Add drained chickpeas to the cooker with 2 cups of fresh water and ½ teaspoon salt. Cook on high heat for 5-6 whistles, then reduce heat to low and cook for another 10-15 minutes. Let the pressure release naturally. The chickpeas should be tender but still hold their shape.
- Instant Pot: Add drained chickpeas to the Instant Pot with 2 cups of fresh water and ½ teaspoon salt. Pressure cook on High for 20 minutes, then allow a Natural Pressure Release (NPR) for 10 minutes before quick-releasing any remaining pressure.
- Canned Chickpeas (Substitution Note): While fresh/dried are best, you can use two 15-oz cans of drained black chickpeas (or regular chickpeas). Skip soaking and cooking. You'll lose some flavor and the rich cooking liquid, so you might need to add a bit more water or vegetable broth to the curry later.
- Save Liquid: Once cooked, drain the chickpeas, but reserve the cooking liquid. This liquid is packed with flavor and starch, perfect for thickening the curry.
- Part 2 — Roast Coconut & Build the Kerala Masala Base
- Roast Coconut: Heat a heavy skillet over medium-low heat. Add ¼ cup grated coconut. Dry roast, stirring constantly, until it turns golden brown and fragrant. Be careful not to burn it, as this will make the curry bitter. Remove from pan and set aside.
- Spice Bloom (Optional but Recommended): In the same skillet (no oil), lightly toast the coriander powder, spicy chilli powder, turmeric powder, black pepper powder, and garam masala powder for 30-60 seconds until fragrant. This deepens their flavor. Add to the roasted coconut.
- Grind to Paste: Let the roasted coconut and spices cool slightly. Transfer to a blender or grinder. Add about ¼ cup of the reserved chickpea cooking liquid (or plain water) and grind into a smooth, thick paste. The texture should be fine, but not completely watery.
- Part 3 — Build the Curry
- Temper: Heat 2 tablespoons of coconut oil in a heavy-bottomed pan or pot over medium heat. Once hot, add the mustard seeds. Let them splutter.
- Aromatics: Immediately add the fresh curry leaves and slit green chiles. Sauté for 30 seconds until fragrant.
- Sauté Onion & Ginger: Add the finely chopped onion (or shallots) and sauté until translucent and lightly golden, about 5-7 minutes. Stir in the ginger garlic paste (or freshly ground ginger and garlic) and cook for another 1-2 minutes until the raw smell disappears.
- Cook the Paste: Reduce heat to low. Add the ground coconut-spice paste to the pan. Cook, stirring continuously, for 5-7 minutes. This step is crucial for cooking out the raw flavor of the paste and allowing the flavors to meld. The paste should darken slightly and the oil should start to separate.
- Simmer the Curry: Add the cooked black chickpeas and the remaining reserved chickpea cooking liquid (or water) to the pan. Stir well to combine. Bring the mixture to a gentle simmer.
- Thicken & Adjust: Cook for 10-15 minutes, allowing the curry to thicken to your desired consistency. It should be rich but still pourable.
- Final Check: Taste and adjust salt if needed. If you like a little tang, a tiny squeeze of lime juice at the end can brighten the flavors.
- Part 4 — Make Puttu (Step-by-Step)
- Hydrate Flour: In a large bowl, combine the Puttu flour and salt. Gradually sprinkle in the warm water, mixing with your fingertips. You want the flour to be moist and crumbly, like "wet sand." It should hold its shape when squeezed but break apart easily. Be careful not to add too much water, as this will make the Puttu gummy. Let it rest for 5-10 minutes.
- Layering: If using a Puttu maker, place the bottom disc in the Puttu cylinder. Add a tablespoon of grated coconut at the bottom. Then, loosely spoon in 2-3 tablespoons of the hydrated Puttu flour. Lightly press down (do NOT compact tightly). Add another layer of grated coconut, then another layer of flour. Repeat until the cylinder is almost full, ending with a layer of coconut on top.
- Steaming: Place the Puttu cylinder onto the steamer base (or use your steamer setup). Ensure water is boiling vigorously in the bottom pot. Steam for 7-10 minutes.
- Doneness: You'll know it's done when steam starts escaping from the top of the Puttu maker, and the aroma of cooked rice flour fills the air.
- Unmolding & Keeping Warm: Carefully remove the Puttu cylinder from the steamer. Using the Puttu maker's rod, gently push the steamed Puttu out onto a plate. Repeat with the remaining flour and coconut. Keep the Puttu warm while you finish making the curry.
- Part 5 — Serve
- Plate: Serve the hot, fluffy Puttu immediately with generous ladles of the flavorful Kadala Curry.
- Optional Add-ons: For a truly traditional experience, serve with ripe bananas, crispy papad, or a small bowl of sugar on the side. A squeeze of fresh lime juice can also add a nice zing if you enjoy a tangy note.
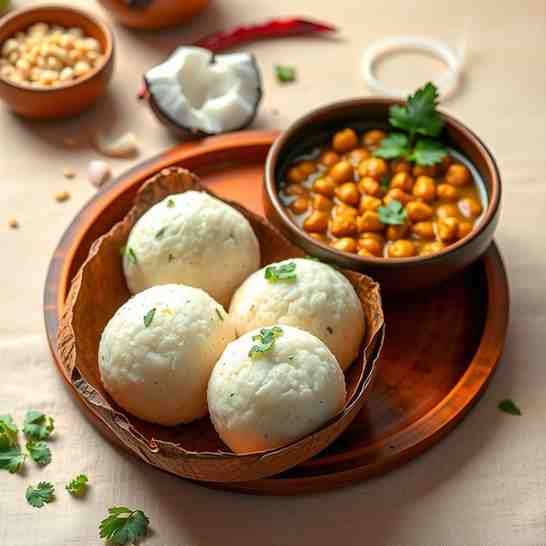
You may also like


Hey there! I’m just someone who seriously loves good food and believes that cooking doesn’t have to be complicated to be amazing. Whether it’s a quick weeknight dinner or a cozy weekend meal, I’m all about sharing easy, tasty recipes that actually work.


