Hungary's Kürtőskalács - Easy Yeasted Dough Recipe for Home
Hungary's Kürtőskalács - Easy Yeasted Dough Recipe for Home
- Serves: 6 People
- Prepare Time: 30 minutes
- Cooking Time: 20-25 minut
- Calories: -
- Difficulty: Medium
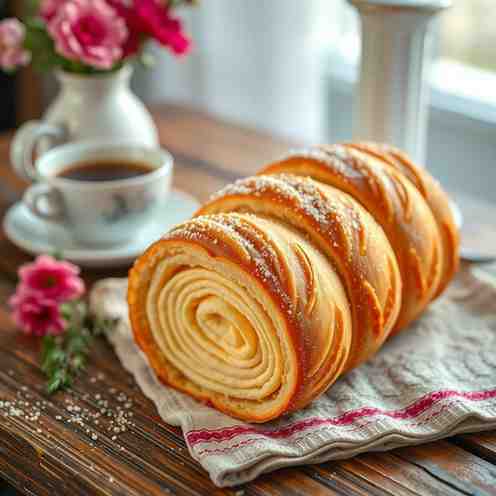
Welcome to the enchanting world of Kürtőskalács, Hungary's beloved "Chimney Cake"! Imagine a homemade sweet treat with a crisp, caramelized sugar crust that shatters delightfully, giving way to a soft, fluffy yeasted dough interior. It's a truly unique sweet baked good that looks as impressive as it tastes. The name "chimney cake" comes from the steam that rises from the hollow center as it bakes, making it look like a little smoking chimney!
Traditionally, these delicious baking recipes are made by spit-roasting the dough over an open flame, giving them that signature golden-brown exterior. But don't worry, you don't need a bonfire in your backyard! We've adapted this incredible recipe with dough to work perfectly in your chimney cake oven at home, ensuring you get that authentic taste and feel without any special outdoor equipment. Get ready to create some truly yummy baked recipes and discover one of the best dessert recipes baked right in your own kitchen. This easy oven recipe is your ticket to making these amazing sweet treats to bake and adding a touch of Hungarian magic to your baked goods to make repertoire!
Ingredients
Directions
- Make the Dough
- If using active dry yeast: In a large mixing bowl, combine the warm milk, 1 teaspoon of the sugar, and the active dry yeast. Stir gently and let it sit for 5-10 minutes until foamy. This is called "blooming" the yeast and confirms it's alive and ready to work!
- If using instant yeast: You can skip the blooming step and simply mix the instant yeast directly with the flour and other dry ingredients.
- Once your yeast is bloomed (or if using instant), add the remaining sugar, eggs (or egg and yolks), softened butter, and salt to the bowl. If using, add the optional lemon zest or vanilla extract now.
- Gradually add the flour, mixing with a wooden spoon or a stand mixer with a dough hook until a shaggy dough forms.
- Knead the dough: Turn the dough out onto a lightly floured surface (or continue with the dough hook). Knead for 8-10 minutes until the dough is smooth, elastic, and no longer sticky. A simple checkpoint: when you press your finger into the dough, it should spring back slowly. It should feel soft and pliable.
- First Rise
- Lightly grease a clean large bowl with a little oil. Place the kneaded dough in the bowl, turning it once to coat the top.
- Cover the bowl tightly with plastic wrap or a clean kitchen towel.
- Let the dough rise in a warm, draft-free place for 1 to 1.5 hours, or until it has roughly doubled in size.
- Cold-kitchen hack: If your kitchen is chilly, you can use your oven! Turn your oven light on (but don't turn on the heat). The warmth from the light bulb creates a cozy environment perfect for rising dough. Place the covered bowl inside.
- Prep the Molds and Setup
- While the dough is rising, prepare your molds. If using wooden dowels, simply grease them well with butter or cooking spray.
- For cans or DIY foil molds: Wrap them tightly and smoothly with heavy-duty aluminum foil, ensuring no sharp edges. Grease the foil-wrapped molds generously with butter or cooking spray.
- How to suspend molds: Position an oven rack in the middle of your oven. You'll need to create a way for your molds to hang without touching the baking sheet below. The easiest way is to place a second, empty oven rack on the level below your main rack, or even use a few sturdy oven-safe metal skewers or long wooden spoons resting across the main rack, creating a gap. The molds will rest on these supports, allowing the dough to bake evenly without sticking to a flat surface.
- Place a baking sheet on the very bottom rack of your oven to catch any drips.
- Safety/spacing checklist: Ensure your molds are evenly spaced and won't touch each other or the oven walls during baking. Make sure your suspension method is stable.
- Shape the Chimney Cakes
- Once the dough has doubled, gently punch it down to release the air.
- Turn the dough out onto a lightly floured surface. Roll the dough into a large rectangle, about ¼-inch thick.
- Using a sharp knife or pizza cutter, cut the dough into strips about ¾-inch to 1-inch wide and 10-12 inches long (adjust length based on your mold size).
- Take one strip of dough and starting from one end of your greased mold, wrap the dough around it in a spiral, slightly overlapping each turn (about half the width of the strip).
- Gently pinch the seams where the dough overlaps to seal them.
- Once the mold is covered, gently roll the dough-wrapped mold on your counter to further fuse the seams and create a smooth, even surface. Repeat for all molds.
- Coat and Bake
- Preheat your oven to 375°F (190°C).
- In a small, shallow dish, combine the granulated sugar, ground cinnamon, and finely chopped walnuts (if using).
- Brush the dough-wrapped molds generously with the melted butter.
- Roll each buttered mold in the sugar/cinnamon/walnut mixture, pressing gently to ensure an even and thick coating.
- Carefully place the coated molds onto your prepared suspension setup in the oven, ensuring they hang freely.
- Bake for 15-20 minutes, or until deeply golden brown and caramelized.
- Rotate schedule: Set a timer for every 5-7 minutes and rotate the molds (or turn them if they are hanging) to ensure even browning and caramelization on all sides. This is crucial for that perfect crisp crust!
- Once baked to a beautiful golden color, carefully remove the molds from the oven.
- Second quick sugar coat (optional but traditional-feeling): While the Kürtőskalács are still piping hot, you can brush them again with a little melted butter and roll them in any remaining sugar mixture for an extra-crisp, sweet layer.
- To release, gently stand the mold upright on a cutting board or clean surface. Carefully slide the Kürtőskalács off the mold. Sometimes a gentle twist and pull is all it takes. Be careful not to tear the delicate, crisp crust.
- Best serving moment: Kürtőskalács are absolutely best eaten warm, right after they're made! The contrast of the hot, crisp exterior and soft, steamy interior is heavenly.
Hungary's Kürtőskalács - Easy Yeasted Dough Recipe for Home

- Serves: 6 People
- Prepare Time: 30 minutes
- Cooking Time: 20-25 minut
- Calories: -
- Difficulty: Medium
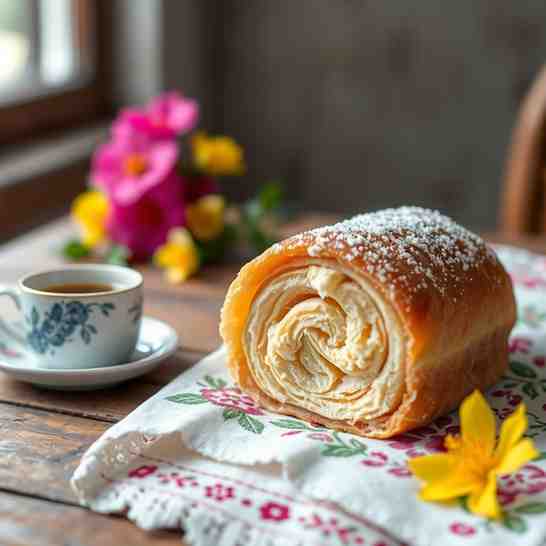
Welcome to the enchanting world of Kürtőskalács, Hungary's beloved "Chimney Cake"! Imagine a homemade sweet treat with a crisp, caramelized sugar crust that shatters delightfully, giving way to a soft, fluffy yeasted dough interior. It's a truly unique sweet baked good that looks as impressive as it tastes. The name "chimney cake" comes from the steam that rises from the hollow center as it bakes, making it look like a little smoking chimney!
Traditionally, these delicious baking recipes are made by spit-roasting the dough over an open flame, giving them that signature golden-brown exterior. But don't worry, you don't need a bonfire in your backyard! We've adapted this incredible recipe with dough to work perfectly in your chimney cake oven at home, ensuring you get that authentic taste and feel without any special outdoor equipment. Get ready to create some truly yummy baked recipes and discover one of the best dessert recipes baked right in your own kitchen. This easy oven recipe is your ticket to making these amazing sweet treats to bake and adding a touch of Hungarian magic to your baked goods to make repertoire!
Ingredients
Directions
- Make the Dough
- If using active dry yeast: In a large mixing bowl, combine the warm milk, 1 teaspoon of the sugar, and the active dry yeast. Stir gently and let it sit for 5-10 minutes until foamy. This is called "blooming" the yeast and confirms it's alive and ready to work!
- If using instant yeast: You can skip the blooming step and simply mix the instant yeast directly with the flour and other dry ingredients.
- Once your yeast is bloomed (or if using instant), add the remaining sugar, eggs (or egg and yolks), softened butter, and salt to the bowl. If using, add the optional lemon zest or vanilla extract now.
- Gradually add the flour, mixing with a wooden spoon or a stand mixer with a dough hook until a shaggy dough forms.
- Knead the dough: Turn the dough out onto a lightly floured surface (or continue with the dough hook). Knead for 8-10 minutes until the dough is smooth, elastic, and no longer sticky. A simple checkpoint: when you press your finger into the dough, it should spring back slowly. It should feel soft and pliable.
- First Rise
- Lightly grease a clean large bowl with a little oil. Place the kneaded dough in the bowl, turning it once to coat the top.
- Cover the bowl tightly with plastic wrap or a clean kitchen towel.
- Let the dough rise in a warm, draft-free place for 1 to 1.5 hours, or until it has roughly doubled in size.
- Cold-kitchen hack: If your kitchen is chilly, you can use your oven! Turn your oven light on (but don't turn on the heat). The warmth from the light bulb creates a cozy environment perfect for rising dough. Place the covered bowl inside.
- Prep the Molds and Setup
- While the dough is rising, prepare your molds. If using wooden dowels, simply grease them well with butter or cooking spray.
- For cans or DIY foil molds: Wrap them tightly and smoothly with heavy-duty aluminum foil, ensuring no sharp edges. Grease the foil-wrapped molds generously with butter or cooking spray.
- How to suspend molds: Position an oven rack in the middle of your oven. You'll need to create a way for your molds to hang without touching the baking sheet below. The easiest way is to place a second, empty oven rack on the level below your main rack, or even use a few sturdy oven-safe metal skewers or long wooden spoons resting across the main rack, creating a gap. The molds will rest on these supports, allowing the dough to bake evenly without sticking to a flat surface.
- Place a baking sheet on the very bottom rack of your oven to catch any drips.
- Safety/spacing checklist: Ensure your molds are evenly spaced and won't touch each other or the oven walls during baking. Make sure your suspension method is stable.
- Shape the Chimney Cakes
- Once the dough has doubled, gently punch it down to release the air.
- Turn the dough out onto a lightly floured surface. Roll the dough into a large rectangle, about ¼-inch thick.
- Using a sharp knife or pizza cutter, cut the dough into strips about ¾-inch to 1-inch wide and 10-12 inches long (adjust length based on your mold size).
- Take one strip of dough and starting from one end of your greased mold, wrap the dough around it in a spiral, slightly overlapping each turn (about half the width of the strip).
- Gently pinch the seams where the dough overlaps to seal them.
- Once the mold is covered, gently roll the dough-wrapped mold on your counter to further fuse the seams and create a smooth, even surface. Repeat for all molds.
- Coat and Bake
- Preheat your oven to 375°F (190°C).
- In a small, shallow dish, combine the granulated sugar, ground cinnamon, and finely chopped walnuts (if using).
- Brush the dough-wrapped molds generously with the melted butter.
- Roll each buttered mold in the sugar/cinnamon/walnut mixture, pressing gently to ensure an even and thick coating.
- Carefully place the coated molds onto your prepared suspension setup in the oven, ensuring they hang freely.
- Bake for 15-20 minutes, or until deeply golden brown and caramelized.
- Rotate schedule: Set a timer for every 5-7 minutes and rotate the molds (or turn them if they are hanging) to ensure even browning and caramelization on all sides. This is crucial for that perfect crisp crust!
- Once baked to a beautiful golden color, carefully remove the molds from the oven.
- Second quick sugar coat (optional but traditional-feeling): While the Kürtőskalács are still piping hot, you can brush them again with a little melted butter and roll them in any remaining sugar mixture for an extra-crisp, sweet layer.
- To release, gently stand the mold upright on a cutting board or clean surface. Carefully slide the Kürtőskalács off the mold. Sometimes a gentle twist and pull is all it takes. Be careful not to tear the delicate, crisp crust.
- Best serving moment: Kürtőskalács are absolutely best eaten warm, right after they're made! The contrast of the hot, crisp exterior and soft, steamy interior is heavenly.
You may also like


Hey there! I’m just someone who seriously loves good food and believes that cooking doesn’t have to be complicated to be amazing. Whether it’s a quick weeknight dinner or a cozy weekend meal, I’m all about sharing easy, tasty recipes that actually work.