Easy Laplap - Asian Desserts Recipe
Easy Laplap - Asian Desserts Recipe

- Serves: 2 People
- Prepare Time: 20 minutes
- Cooking Time: 45-55 minut
- Calories: -
- Difficulty: Easy
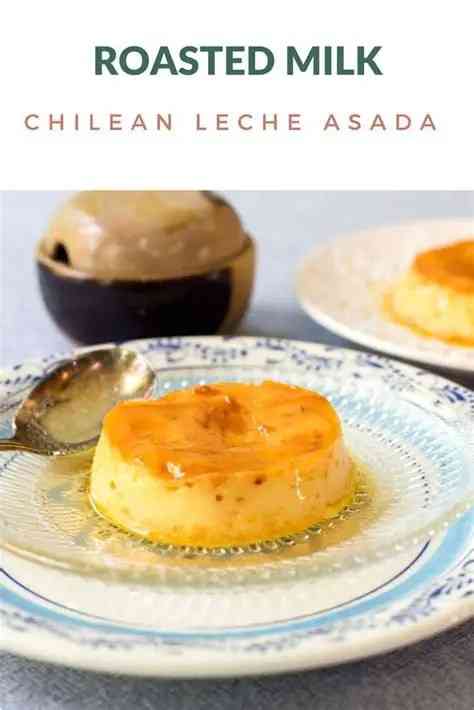
Ever dreamt of a cozy, creamy dessert that’s naturally gluten free delicious desserts? Get ready to discover Laplap, a delightful Asian desserts recipe inspired by the Pacific Islands! This single-serve treat is like a warm, pudding-cake hug, blending the earthy goodness of taro and cassava with the rich, sweet embrace of coconut cream. It’s perfect for coconut lovers, anyone looking for a small, satisfying baked good recipes treat, or curious foodies eager to explore new flavors. Forget dry cakes; this version delivers a wonderfully moist, melt-in-your-mouth texture that’s pure bliss. Plus, it’s a fantastic dessert gluten free option, making it a crowd-pleaser for everyone at your table.
Ingredients
Directions
- Prep the Wraps & Preheat: If using banana leaves, soften them as described in "Key Prep Notes." Line your ramekins with the softened banana leaves, or use two layers of parchment paper topped with foil for each ramekin, creating a "cup" to hold the mixture. Preheat your oven to 350°F (175°C).
- Mix the Batter: In a medium bowl, combine the grated taro, grated cassava, 1/2 cup full-fat coconut cream, sugar (start with 2 tablespoons), and salt. Mix thoroughly until the texture is uniform and resembles thick oatmeal. Stir in the 2 tablespoons of fresh shredded coconut. Taste and adjust sugar if needed.
- Pack & Wrap: Divide the mixture evenly between your prepared ramekins. Don't pack it down too tightly. If using banana leaves, fold the leaf edges over the top of the mixture to enclose it. If using parchment and foil, bring the edges of the parchment together and then wrap tightly with foil to create a sealed packet.
- Set Up Water Bath & Bake: Place the wrapped ramekins into your larger 9x13 inch baking pan or roasting pan. Carefully pour hot water into the larger pan until it comes halfway up the sides of the ramekins. This water bath (bain-marie) mimics a gentle steaming environment, preventing the Laplap from drying out and ensuring a custardy texture. Bake for 45-55 minutes.
- Rest & Cool: Once baked, carefully remove the ramekins from the water bath (the water will be hot!). Let them rest on a wire rack for at least 15-20 minutes. This resting period is crucial for the Laplap to set properly and achieve a sliceable (or spoonable) pudding-like texture. It will continue to firm up as it cools.
- Serve: Unwrap your Laplap. Serve warm with an extra spoonful of coconut cream and a sprinkle of fresh shredded coconut on top. Enjoy your delicious dessert food recipes creation!
- How to Tell When It’s DoneKnowing when your Laplap is perfectly cooked is key to avoiding a gummy center or a dry exterior. Here’s what to look for:
- Visual Cues: The center of the Laplap should transition from an opaque, raw look to a slightly translucent, glossy appearance. The edges will look more set and firm.
- Texture Cues: Gently jiggle a ramekin. The center should have a slight, gentle wobble, similar to a very soft jello or firm custard, but it shouldn't be liquid. The edges will feel firm to the touch.
- What "Underdone" Looks Like: If the center is still very jiggly, opaque, or looks raw and wet, it needs more time. Continue baking in the water bath for another 5-10 minutes, checking frequently. A common mistake is pulling it out too early, resulting in a gummy, unset center.
Easy Laplap - Asian Desserts Recipe
- Serves: 2 People
- Prepare Time: 20 minutes
- Cooking Time: 45-55 minut
- Calories: -
- Difficulty: Easy
Ever dreamt of a cozy, creamy dessert that’s naturally gluten free delicious desserts? Get ready to discover Laplap, a delightful Asian desserts recipe inspired by the Pacific Islands! This single-serve treat is like a warm, pudding-cake hug, blending the earthy goodness of taro and cassava with the rich, sweet embrace of coconut cream. It’s perfect for coconut lovers, anyone looking for a small, satisfying baked good recipes treat, or curious foodies eager to explore new flavors. Forget dry cakes; this version delivers a wonderfully moist, melt-in-your-mouth texture that’s pure bliss. Plus, it’s a fantastic dessert gluten free option, making it a crowd-pleaser for everyone at your table.
Ingredients
Directions
- Prep the Wraps & Preheat: If using banana leaves, soften them as described in "Key Prep Notes." Line your ramekins with the softened banana leaves, or use two layers of parchment paper topped with foil for each ramekin, creating a "cup" to hold the mixture. Preheat your oven to 350°F (175°C).
- Mix the Batter: In a medium bowl, combine the grated taro, grated cassava, 1/2 cup full-fat coconut cream, sugar (start with 2 tablespoons), and salt. Mix thoroughly until the texture is uniform and resembles thick oatmeal. Stir in the 2 tablespoons of fresh shredded coconut. Taste and adjust sugar if needed.
- Pack & Wrap: Divide the mixture evenly between your prepared ramekins. Don't pack it down too tightly. If using banana leaves, fold the leaf edges over the top of the mixture to enclose it. If using parchment and foil, bring the edges of the parchment together and then wrap tightly with foil to create a sealed packet.
- Set Up Water Bath & Bake: Place the wrapped ramekins into your larger 9x13 inch baking pan or roasting pan. Carefully pour hot water into the larger pan until it comes halfway up the sides of the ramekins. This water bath (bain-marie) mimics a gentle steaming environment, preventing the Laplap from drying out and ensuring a custardy texture. Bake for 45-55 minutes.
- Rest & Cool: Once baked, carefully remove the ramekins from the water bath (the water will be hot!). Let them rest on a wire rack for at least 15-20 minutes. This resting period is crucial for the Laplap to set properly and achieve a sliceable (or spoonable) pudding-like texture. It will continue to firm up as it cools.
- Serve: Unwrap your Laplap. Serve warm with an extra spoonful of coconut cream and a sprinkle of fresh shredded coconut on top. Enjoy your delicious dessert food recipes creation!
- How to Tell When It’s DoneKnowing when your Laplap is perfectly cooked is key to avoiding a gummy center or a dry exterior. Here’s what to look for:
- Visual Cues: The center of the Laplap should transition from an opaque, raw look to a slightly translucent, glossy appearance. The edges will look more set and firm.
- Texture Cues: Gently jiggle a ramekin. The center should have a slight, gentle wobble, similar to a very soft jello or firm custard, but it shouldn't be liquid. The edges will feel firm to the touch.
- What "Underdone" Looks Like: If the center is still very jiggly, opaque, or looks raw and wet, it needs more time. Continue baking in the water bath for another 5-10 minutes, checking frequently. A common mistake is pulling it out too early, resulting in a gummy, unset center.
You may also like


Hey there! I’m just someone who seriously loves good food and believes that cooking doesn’t have to be complicated to be amazing. Whether it’s a quick weeknight dinner or a cozy weekend meal, I’m all about sharing easy, tasty recipes that actually work.