
Learn to Bake Melonpan - Sweet Japanese Bread
Learn to Bake Melonpan - Sweet Japanese Bread
- Serves: 8 People
- Prepare Time: 60 minutes
- Cooking Time: 18 minutes
- Calories: -
- Difficulty: Medium
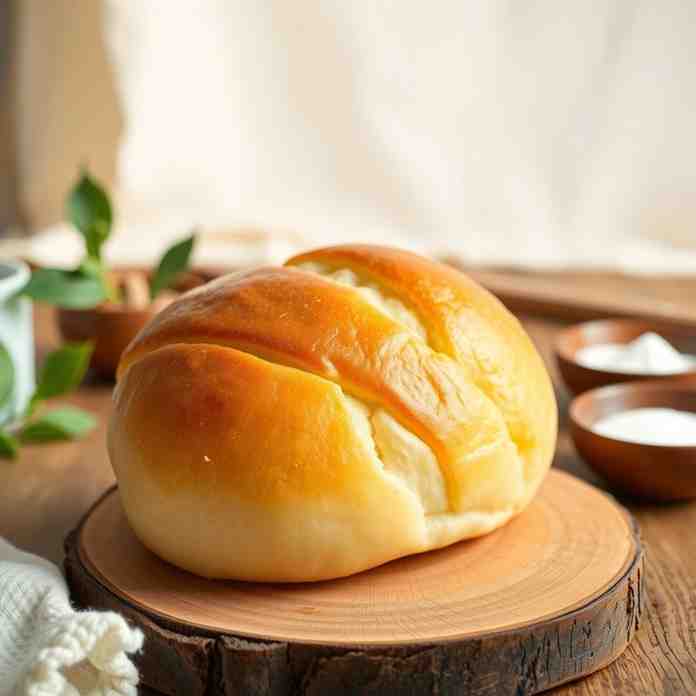
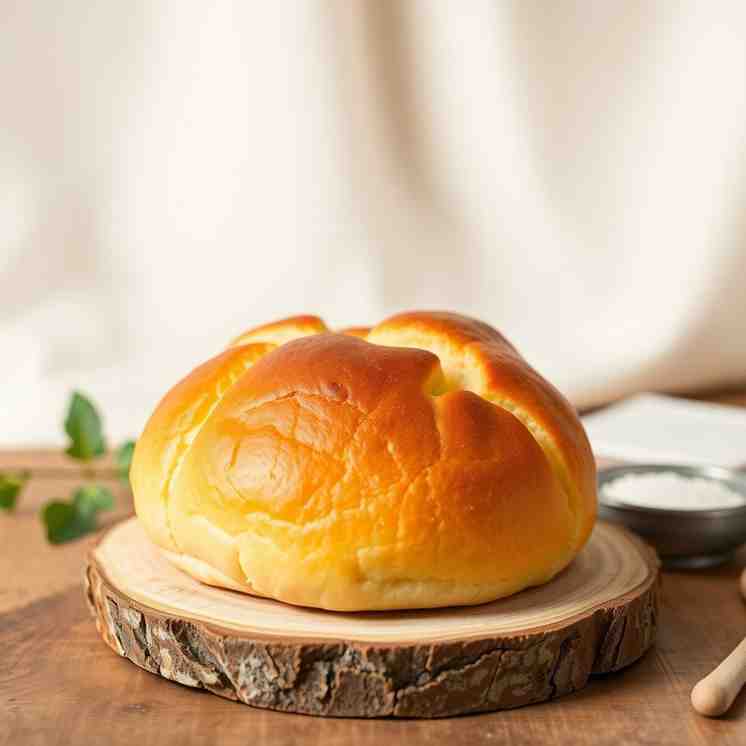
Welcome to the delightful world of Melonpan! If you're looking to learn to bake bread that's truly unique and incredibly satisfying, you've come to the right place. Melonpan, often called "melon bread," is a beloved Japanese bakery staple known for its soft, fluffy bun crowned with a thin, crisp, sweet cookie crust and a distinctive grid pattern. Despite its name, it doesn't taste like melon at all (we'll explain why later!), but rather offers a comforting sweetness and a delightful textural contrast that makes it utterly irresistible.
This recipe is your ultimate guide to mastering fresh baked bread from the comfort of your kitchen. We've crafted it specifically for those who want to learn to bake authentic Japanese home cooking and bring a taste of Japan at home to their table. What makes our Melonpan recipe stand out? We focus on predictability. You'll find clear checkpoints at every stage, comprehensive troubleshooting advice for common baking woes, and even expert tips on how to store your buns to maintain that coveted crisp crust. Get ready to add this amazing sweet bun to your Japanese meal plan and impress everyone with your newfound baking skills!
Ingredients
Directions
- Make the bread dough
- Mix order: In a large mixing bowl (or the bowl of a stand mixer), combine the warm milk, 1 teaspoon of sugar, and active dry yeast. Let it sit for 5-10 minutes until foamy, indicating the yeast is active. If it doesn't foam, your yeast might be old or the milk temperature was off – start again with fresh yeast.
- Add the remaining sugar, egg, and bread flour to the yeast mixture. Mix on low speed with a dough hook (or by hand with a sturdy spoon) until a shaggy dough forms.
- Add the softened butter and salt. Continue mixing/kneading.
- Knead until you hit the checkpoint: Knead on medium speed for 8-10 minutes (or 15-20 minutes by hand) until the dough is smooth, elastic, and pulls away from the sides of the bowl.
- Checkpoint: To check if your dough is ready, perform the "windowpane test." Pinch off a small piece of dough and gently stretch it. If you can stretch it thin enough to see light through it without tearing, it's perfect! It should also feel smooth and elastic.
- First rise (bulk fermentation)
- Lightly grease a large bowl. Place the dough in the bowl, turning once to coat. Cover tightly with plastic wrap or a damp towel.
- Proofing setup options: For a warm environment, you can place the bowl in a slightly warm (but turned off) oven, a microwave with a cup of hot water, or simply on your kitchen counter if it's warm enough. Aim for a room temperature around 75-80°F (24-27°C).
- Let the dough rise in a warm place for 60-90 minutes, or until doubled in size.
- Checkpoint: To confirm it's ready, gently poke the dough with a floured finger. If the indentation remains, it's doubled and ready. If it springs back immediately, it needs more time.
- Make the cookie crust dough
- While the bread dough is rising, prepare the cookie crust. In a medium bowl, cream together the softened butter and granulated sugar until light and fluffy.
- Creaming/mixing order: Beat in the egg yolk and vanilla extract until well combined.
- In a separate bowl, whisk together the all-purpose flour, baking powder, and pinch of salt. Gradually add the dry ingredients to the wet ingredients, mixing until just combined and a soft dough forms. Do not overmix.
- Divide the cookie dough into 8-10 equal portions (matching your expected bun count). Shape each portion into a flat disc or ball.
- Chill so it’s easy to wrap: Wrap each disc individually in plastic wrap and refrigerate for at least 30 minutes. This makes the dough firm enough to handle and wrap around the bread buns.
- Checkpoint: The dough should be firm but pliable, not sticky or crumbly.
- Divide and shape
- Once the bread dough has doubled, gently punch it down to release the air.
- Turn the dough out onto a lightly floured surface. Divide the dough into 8-10 equal pieces (around 70-80g each for medium buns).
- Portioning tips for even baking: Using a kitchen scale here is highly recommended for consistent size and even baking.
- Gently shape each piece into a smooth, tight ball by cupping your hand over the dough and rolling it against the counter.
- Rest before wrapping: Cover the shaped bread dough balls with plastic wrap or a damp towel and let them rest for 10-15 minutes. This relaxes the gluten, making them easier to wrap.
- Wrap buns with cookie crust + sugar coat
- Take one chilled cookie dough disc from the fridge. Place it between two pieces of plastic wrap or parchment paper. Roll it out into a thin circle, large enough to cover the top and sides of one bread bun.
- Carefully peel off one side of the plastic wrap. Place a bread dough ball onto the center of the cookie dough.
- Coverage rule: Gently bring the edges of the cookie dough up and around the bread bun, covering the top and sides. Pinch the edges together at the bottom to seal the seam. The seam MUST stay on the bottom.
- Place about ¼ cup of granulated sugar in a shallow dish. Roll the top and sides of the wrapped bun in the sugar to coat it evenly. This adds extra crunch and sparkle.
- Place the sugar-coated bun on a parchment-lined baking sheet, seam-side down. Repeat with the remaining buns.
- Score the grid pattern
- What tool to use: Use a bench scraper, a sharp knife, or a melonpan cutter (if you have one) to score the grid pattern on the cookie crust.
- How deep to cut: Make crisscross cuts about halfway through the cookie crust, being careful not to cut all the way through to the bread dough. You want visible lines that will expand during baking, but not deep gashes.
- Checkpoint: The cuts should be clean and clearly visible, creating a diamond or square pattern, but they shouldn't break through to the soft bread dough underneath.
- Second proof
- Loosely cover the baking sheet with plastic wrap or a light kitchen towel.
- Let the buns rise in a warm place for another 45-60 minutes, or until they look visibly puffy and slightly larger. They won't double in size like the first rise, but they should feel light.
- What “ready to bake” looks like: Gently press a finger into the side of a bun. If the indentation slowly springs back, it's ready. If it springs back quickly, it needs more time. If it collapses, it's over-proofed.
- Preheat your oven to 350°F (175°C) towards the end of the second proof.
- Bake and cool
- Rack position: Place the baking sheet on the middle rack of your preheated oven.
- Bake for 15-18 minutes, or until the cookie crust is golden brown and the buns sound hollow when tapped on the bottom.
- Doneness cues: The crust should be a rich golden color, and the internal temperature of the bread bun should reach about 190-200°F (88-93°C) if you use an instant-read thermometer.
- Cool on rack to protect crispness: Immediately transfer the baked Melonpan to a wire rack to cool completely. Cooling on a rack prevents the bottom from becoming soggy, preserving that crucial crisp cookie crust.
Learn to Bake Melonpan - Sweet Japanese Bread

- Serves: 8 People
- Prepare Time: 60 minutes
- Cooking Time: 18 minutes
- Calories: -
- Difficulty: Medium
Welcome to the delightful world of Melonpan! If you're looking to learn to bake bread that's truly unique and incredibly satisfying, you've come to the right place. Melonpan, often called "melon bread," is a beloved Japanese bakery staple known for its soft, fluffy bun crowned with a thin, crisp, sweet cookie crust and a distinctive grid pattern. Despite its name, it doesn't taste like melon at all (we'll explain why later!), but rather offers a comforting sweetness and a delightful textural contrast that makes it utterly irresistible.
This recipe is your ultimate guide to mastering fresh baked bread from the comfort of your kitchen. We've crafted it specifically for those who want to learn to bake authentic Japanese home cooking and bring a taste of Japan at home to their table. What makes our Melonpan recipe stand out? We focus on predictability. You'll find clear checkpoints at every stage, comprehensive troubleshooting advice for common baking woes, and even expert tips on how to store your buns to maintain that coveted crisp crust. Get ready to add this amazing sweet bun to your Japanese meal plan and impress everyone with your newfound baking skills!
Ingredients
Directions
- Make the bread dough
- Mix order: In a large mixing bowl (or the bowl of a stand mixer), combine the warm milk, 1 teaspoon of sugar, and active dry yeast. Let it sit for 5-10 minutes until foamy, indicating the yeast is active. If it doesn't foam, your yeast might be old or the milk temperature was off – start again with fresh yeast.
- Add the remaining sugar, egg, and bread flour to the yeast mixture. Mix on low speed with a dough hook (or by hand with a sturdy spoon) until a shaggy dough forms.
- Add the softened butter and salt. Continue mixing/kneading.
- Knead until you hit the checkpoint: Knead on medium speed for 8-10 minutes (or 15-20 minutes by hand) until the dough is smooth, elastic, and pulls away from the sides of the bowl.
- Checkpoint: To check if your dough is ready, perform the "windowpane test." Pinch off a small piece of dough and gently stretch it. If you can stretch it thin enough to see light through it without tearing, it's perfect! It should also feel smooth and elastic.
- First rise (bulk fermentation)
- Lightly grease a large bowl. Place the dough in the bowl, turning once to coat. Cover tightly with plastic wrap or a damp towel.
- Proofing setup options: For a warm environment, you can place the bowl in a slightly warm (but turned off) oven, a microwave with a cup of hot water, or simply on your kitchen counter if it's warm enough. Aim for a room temperature around 75-80°F (24-27°C).
- Let the dough rise in a warm place for 60-90 minutes, or until doubled in size.
- Checkpoint: To confirm it's ready, gently poke the dough with a floured finger. If the indentation remains, it's doubled and ready. If it springs back immediately, it needs more time.
- Make the cookie crust dough
- While the bread dough is rising, prepare the cookie crust. In a medium bowl, cream together the softened butter and granulated sugar until light and fluffy.
- Creaming/mixing order: Beat in the egg yolk and vanilla extract until well combined.
- In a separate bowl, whisk together the all-purpose flour, baking powder, and pinch of salt. Gradually add the dry ingredients to the wet ingredients, mixing until just combined and a soft dough forms. Do not overmix.
- Divide the cookie dough into 8-10 equal portions (matching your expected bun count). Shape each portion into a flat disc or ball.
- Chill so it’s easy to wrap: Wrap each disc individually in plastic wrap and refrigerate for at least 30 minutes. This makes the dough firm enough to handle and wrap around the bread buns.
- Checkpoint: The dough should be firm but pliable, not sticky or crumbly.
- Divide and shape
- Once the bread dough has doubled, gently punch it down to release the air.
- Turn the dough out onto a lightly floured surface. Divide the dough into 8-10 equal pieces (around 70-80g each for medium buns).
- Portioning tips for even baking: Using a kitchen scale here is highly recommended for consistent size and even baking.
- Gently shape each piece into a smooth, tight ball by cupping your hand over the dough and rolling it against the counter.
- Rest before wrapping: Cover the shaped bread dough balls with plastic wrap or a damp towel and let them rest for 10-15 minutes. This relaxes the gluten, making them easier to wrap.
- Wrap buns with cookie crust + sugar coat
- Take one chilled cookie dough disc from the fridge. Place it between two pieces of plastic wrap or parchment paper. Roll it out into a thin circle, large enough to cover the top and sides of one bread bun.
- Carefully peel off one side of the plastic wrap. Place a bread dough ball onto the center of the cookie dough.
- Coverage rule: Gently bring the edges of the cookie dough up and around the bread bun, covering the top and sides. Pinch the edges together at the bottom to seal the seam. The seam MUST stay on the bottom.
- Place about ¼ cup of granulated sugar in a shallow dish. Roll the top and sides of the wrapped bun in the sugar to coat it evenly. This adds extra crunch and sparkle.
- Place the sugar-coated bun on a parchment-lined baking sheet, seam-side down. Repeat with the remaining buns.
- Score the grid pattern
- What tool to use: Use a bench scraper, a sharp knife, or a melonpan cutter (if you have one) to score the grid pattern on the cookie crust.
- How deep to cut: Make crisscross cuts about halfway through the cookie crust, being careful not to cut all the way through to the bread dough. You want visible lines that will expand during baking, but not deep gashes.
- Checkpoint: The cuts should be clean and clearly visible, creating a diamond or square pattern, but they shouldn't break through to the soft bread dough underneath.
- Second proof
- Loosely cover the baking sheet with plastic wrap or a light kitchen towel.
- Let the buns rise in a warm place for another 45-60 minutes, or until they look visibly puffy and slightly larger. They won't double in size like the first rise, but they should feel light.
- What “ready to bake” looks like: Gently press a finger into the side of a bun. If the indentation slowly springs back, it's ready. If it springs back quickly, it needs more time. If it collapses, it's over-proofed.
- Preheat your oven to 350°F (175°C) towards the end of the second proof.
- Bake and cool
- Rack position: Place the baking sheet on the middle rack of your preheated oven.
- Bake for 15-18 minutes, or until the cookie crust is golden brown and the buns sound hollow when tapped on the bottom.
- Doneness cues: The crust should be a rich golden color, and the internal temperature of the bread bun should reach about 190-200°F (88-93°C) if you use an instant-read thermometer.
- Cool on rack to protect crispness: Immediately transfer the baked Melonpan to a wire rack to cool completely. Cooling on a rack prevents the bottom from becoming soggy, preserving that crucial crisp cookie crust.
You may also like


Hey there! I’m just someone who seriously loves good food and believes that cooking doesn’t have to be complicated to be amazing. Whether it’s a quick weeknight dinner or a cozy weekend meal, I’m all about sharing easy, tasty recipes that actually work.


