
Mhadjeb - Spicy Semolina Flatbread Recipe
Mhadjeb - Spicy Semolina Flatbread Recipe


- Serves: 8 People
- Prepare Time: 45 minutes
- Cooking Time: 30 minutes
- Calories: -
- Difficulty: Medium
Hey there, food explorers! Get ready to dive into the vibrant, flavorful world of Mhadjeb, Algeria's beloved spicy stuffed flatbread. Imagine a warm, flaky, pan-toasted semolina flatbread, generously filled with a rich, spicy tomato and onion mixture, then folded into a neat, portable "hot pocket" shape. This isn't just any flatbread; it's a street-food sensation that promises a delightful dance of textures and tastes with every bite.
What makes Mhadjeb truly special? It's a trifecta of unique techniques: the incredible elasticity of its oil-stretched dough, the deeply flavorful, jammy filling that’s thick enough to never leak, and that signature, perfectly folded square shape. While it does require a bit of patience, mainly for the dough to rest and become wonderfully pliable, we promise the steps themselves are super easy to follow. You'll be making these filling vegan meals like a pro in no time!
Pronunciation & Alternate Spellings: Mhadjeb (m'HAD-jeb) is also known as Mhajeb, Mahjouba, or Mahdjouba.
Is it spicy? Yes, traditionally! But you are in control of the heat level with the harissa.
Is it vegan? Absolutely! This recipe is 100% vegan plant based and utterly delicious.
Time & Difficulty: Expect about 45 minutes of active prep, 30 minutes of cooking, plus a crucial dough resting time. It’s a medium-difficulty recipe, but totally achievable for beginners.
Mhadjeb embodies the heart of North African street food – it's designed to be cooked fresh on a hot griddle or iron pan for cooking, then served piping hot, often right into your hands. People adore it for its incredible contrast: a wonderfully flaky, slightly crispy exterior gives way to a soft, chewy interior, all cradling that intensely flavorful, spicy-sweet tomato and onion filling. It’s comforting, satisfying, and utterly addictive, making it a perfect filling vegan meal.
Ingredients
Directions
- Part 1: Semolina Dough 101 (Make It Stretchy, Not Cranky)
- Picking the Right Semolina: For the best results, fine semolina is key. If you only have coarse semolina, you can pulse it in a food processor for about 30-60 seconds to achieve a finer texture.
- Mixing the Dough: In a large bowl, combine the fine semolina, all-purpose flour, and salt. Gradually add the warm water, mixing with your hands until a shaggy dough forms.
- Kneading (with checkpoints):
- Transfer the shaggy dough to a lightly floured surface. Knead for 2 minutes – it will still look rough.
- Continue kneading. Around minute 8, the dough will start to look smoother and come together.
- By minute 12-15 of consistent kneading, your dough should be smooth, elastic, and stretch without snapping back hard. It shouldn't be sticky on dry hands.
- Resting (the non-negotiable step): Divide the dough into 8 equal balls. Lightly coat each ball with neutral oil or olive oil and place them on an oiled tray. Cover tightly with plastic wrap and let them rest at room temperature for at least 1-2 hours. Longer resting (up to 4 hours) makes the dough even more pliable and easier to stretch. This step is crucial for developing gluten and relaxing the dough, preventing tearing.
- Troubleshooting Dough (fast fixes):
- Too sticky: Lightly dust your hands and surface with a tiny bit of flour, or rub with a little oil. Don't add too much flour to the dough itself.
- Too tight/tearing: It needs more rest! Cover it again and let it sit for another 30-60 minutes.
- Won’t stretch thin: Again, more rest! The gluten isn't relaxed enough. Ensure your hands and surface are well-oiled, not floured, for stretching.
- Part 2: Spicy Tomato-Onion Filling (Thick Enough to Not Leak)
- The Goal Texture: You're aiming for a "jammy" consistency – thick enough that if you drag a spoon through it, it leaves a clear path for a few seconds. This prevents leaks!
- How to Cook It:
- Heat the extra virgin olive oil for cooking in a large skillet or pan over medium heat. Add the diced onion and cook, stirring occasionally, until it's very soft and translucent, about 8-10 minutes.
- Stir in the minced garlic and canned tomato paste. Cook for 2-3 minutes, stirring constantly, allowing the tomato paste to deepen in color and flavor.
- Add the harissa, cumin, paprika, black pepper, and salt. Cook for another minute until fragrant.
- Pour in the diced tomatoes (undrained). Bring the mixture to a simmer, then reduce the heat to low.
- Reduce: Cook, stirring occasionally, for 15-20 minutes, or until the sauce has thickened significantly to that "jammy" consistency.
- Spice Control (harissa varies): Harissa can vary greatly in heat. Start with 1 tablespoon for a milder kick and taste. You can always add more during cooking or even a pinch of cayenne pepper if you like it extra hot tomato sauce.
- Cool It Fast: It's absolutely essential that the filling is completely cool before you use it. Hot filling will make your dough tear and become impossible to work with. Transfer the filling to a shallow bowl or plate to help it cool down quickly. You can even pop it in the fridge for 15-20 minutes.
- Part 3: How to Shape and Stuff Mhadjeb (Step-by-Step)
- Set Up Your Station: Have a bowl of neutral oil nearby, your tray of rested dough balls, the completely cooled filling, and your cast iron skillet frying or griddle ready to preheat.
- Stretch the Dough (the “paper-thin” technique):
- Lightly oil your hands and a clean, spacious work surface (marble, granite, or a large cutting board works well).
- Take one dough ball and flatten it slightly. Using your oiled hands, gently stretch and pull the dough outwards from the center. Work quickly and evenly, aiming for a very thin, almost transparent rectangle or square. You should be able to see through it, like paper!
- What to do if small holes happen: Don't panic! Small holes are fine. Just gently pull and stretch the surrounding dough over the hole to patch it up, or leave it – the folding will usually cover it.
- Fill + Fold (one clear fold order):
- Spoon 2-3 tablespoons of the cooled filling onto the center of the stretched dough. Spread it into a thin, even layer, leaving about a 1-inch border all around.
- Fold one side of the dough over the filling to meet the center.
- Fold the opposite side over, overlapping the first fold slightly, creating a long rectangle.
- Now, fold the bottom edge up over the filling.
- Finally, fold the top edge down, creating a neat square "hot pocket." Gently press the edges to seal them and prevent leaks.
- Transfer Without Tearing: This is the trickiest part!
- Plate method: Carefully slide a large, lightly oiled plate or cutting board under the folded mhadjeb.
- Spatula method: Use a wide, thin spatula (or two) to gently lift and transfer the mhadjeb.
- Part 4: Cook the Flatbreads (North African Flatbread Technique)
- Pan Heat That Works: Place your cast iron skillet frying or a heavy-bottomed non-stick pan over medium-high heat. Let it preheat for a good 5-7 minutes. A quick test: flick a tiny drop of water onto the pan – if it sizzles and evaporates immediately, it's ready.
- Cook Time + Visual Cues: Carefully place one mhadjeb into the hot, dry pan (no extra oil needed, as the dough is already oiled). Cook for 3-5 minutes per side. You're looking for beautiful dark golden spots and a slightly puffed-up appearance. Don't let it burn!
- Flip Timing: Once the first side is golden brown, carefully flip it with a spatula and cook the other side until evenly golden.
- Keep Them Soft: As each mhadjeb finishes cooking, transfer it to a plate and immediately stack it under a clean kitchen towel. The towel traps the steam, keeping your flatbreads soft and pliable, just like they should be.
- Serving Ideas
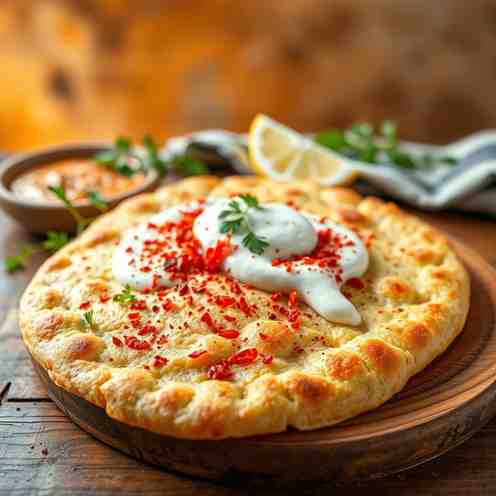
- >Mhadjeb is often enjoyed simply, hot and fresh, right off the pan. It's the ultimate street-food experience! For common pairings, you might see it served alongside a refreshing glass of mint tea, a simple green salad, or a cooling yogurt sauce to balance the spice. It makes for a fantastic filling vegan meal on its own!
Mhadjeb - Spicy Semolina Flatbread Recipe
- Serves: 8 People
- Prepare Time: 45 minutes
- Cooking Time: 30 minutes
- Calories: -
- Difficulty: Medium
Hey there, food explorers! Get ready to dive into the vibrant, flavorful world of Mhadjeb, Algeria's beloved spicy stuffed flatbread. Imagine a warm, flaky, pan-toasted semolina flatbread, generously filled with a rich, spicy tomato and onion mixture, then folded into a neat, portable "hot pocket" shape. This isn't just any flatbread; it's a street-food sensation that promises a delightful dance of textures and tastes with every bite.
What makes Mhadjeb truly special? It's a trifecta of unique techniques: the incredible elasticity of its oil-stretched dough, the deeply flavorful, jammy filling that’s thick enough to never leak, and that signature, perfectly folded square shape. While it does require a bit of patience, mainly for the dough to rest and become wonderfully pliable, we promise the steps themselves are super easy to follow. You'll be making these filling vegan meals like a pro in no time!
Pronunciation & Alternate Spellings: Mhadjeb (m'HAD-jeb) is also known as Mhajeb, Mahjouba, or Mahdjouba.
Is it spicy? Yes, traditionally! But you are in control of the heat level with the harissa.
Is it vegan? Absolutely! This recipe is 100% vegan plant based and utterly delicious.
Time & Difficulty: Expect about 45 minutes of active prep, 30 minutes of cooking, plus a crucial dough resting time. It’s a medium-difficulty recipe, but totally achievable for beginners.
Mhadjeb embodies the heart of North African street food – it's designed to be cooked fresh on a hot griddle or iron pan for cooking, then served piping hot, often right into your hands. People adore it for its incredible contrast: a wonderfully flaky, slightly crispy exterior gives way to a soft, chewy interior, all cradling that intensely flavorful, spicy-sweet tomato and onion filling. It’s comforting, satisfying, and utterly addictive, making it a perfect filling vegan meal.
Ingredients
Directions
- Part 1: Semolina Dough 101 (Make It Stretchy, Not Cranky)
- Picking the Right Semolina: For the best results, fine semolina is key. If you only have coarse semolina, you can pulse it in a food processor for about 30-60 seconds to achieve a finer texture.
- Mixing the Dough: In a large bowl, combine the fine semolina, all-purpose flour, and salt. Gradually add the warm water, mixing with your hands until a shaggy dough forms.
- Kneading (with checkpoints):
- Transfer the shaggy dough to a lightly floured surface. Knead for 2 minutes – it will still look rough.
- Continue kneading. Around minute 8, the dough will start to look smoother and come together.
- By minute 12-15 of consistent kneading, your dough should be smooth, elastic, and stretch without snapping back hard. It shouldn't be sticky on dry hands.
- Resting (the non-negotiable step): Divide the dough into 8 equal balls. Lightly coat each ball with neutral oil or olive oil and place them on an oiled tray. Cover tightly with plastic wrap and let them rest at room temperature for at least 1-2 hours. Longer resting (up to 4 hours) makes the dough even more pliable and easier to stretch. This step is crucial for developing gluten and relaxing the dough, preventing tearing.
- Troubleshooting Dough (fast fixes):
- Too sticky: Lightly dust your hands and surface with a tiny bit of flour, or rub with a little oil. Don't add too much flour to the dough itself.
- Too tight/tearing: It needs more rest! Cover it again and let it sit for another 30-60 minutes.
- Won’t stretch thin: Again, more rest! The gluten isn't relaxed enough. Ensure your hands and surface are well-oiled, not floured, for stretching.
- Part 2: Spicy Tomato-Onion Filling (Thick Enough to Not Leak)
- The Goal Texture: You're aiming for a "jammy" consistency – thick enough that if you drag a spoon through it, it leaves a clear path for a few seconds. This prevents leaks!
- How to Cook It:
- Heat the extra virgin olive oil for cooking in a large skillet or pan over medium heat. Add the diced onion and cook, stirring occasionally, until it's very soft and translucent, about 8-10 minutes.
- Stir in the minced garlic and canned tomato paste. Cook for 2-3 minutes, stirring constantly, allowing the tomato paste to deepen in color and flavor.
- Add the harissa, cumin, paprika, black pepper, and salt. Cook for another minute until fragrant.
- Pour in the diced tomatoes (undrained). Bring the mixture to a simmer, then reduce the heat to low.
- Reduce: Cook, stirring occasionally, for 15-20 minutes, or until the sauce has thickened significantly to that "jammy" consistency.
- Spice Control (harissa varies): Harissa can vary greatly in heat. Start with 1 tablespoon for a milder kick and taste. You can always add more during cooking or even a pinch of cayenne pepper if you like it extra hot tomato sauce.
- Cool It Fast: It's absolutely essential that the filling is completely cool before you use it. Hot filling will make your dough tear and become impossible to work with. Transfer the filling to a shallow bowl or plate to help it cool down quickly. You can even pop it in the fridge for 15-20 minutes.
- Part 3: How to Shape and Stuff Mhadjeb (Step-by-Step)
- Set Up Your Station: Have a bowl of neutral oil nearby, your tray of rested dough balls, the completely cooled filling, and your cast iron skillet frying or griddle ready to preheat.
- Stretch the Dough (the “paper-thin” technique):
- Lightly oil your hands and a clean, spacious work surface (marble, granite, or a large cutting board works well).
- Take one dough ball and flatten it slightly. Using your oiled hands, gently stretch and pull the dough outwards from the center. Work quickly and evenly, aiming for a very thin, almost transparent rectangle or square. You should be able to see through it, like paper!
- What to do if small holes happen: Don't panic! Small holes are fine. Just gently pull and stretch the surrounding dough over the hole to patch it up, or leave it – the folding will usually cover it.
- Fill + Fold (one clear fold order):
- Spoon 2-3 tablespoons of the cooled filling onto the center of the stretched dough. Spread it into a thin, even layer, leaving about a 1-inch border all around.
- Fold one side of the dough over the filling to meet the center.
- Fold the opposite side over, overlapping the first fold slightly, creating a long rectangle.
- Now, fold the bottom edge up over the filling.
- Finally, fold the top edge down, creating a neat square "hot pocket." Gently press the edges to seal them and prevent leaks.
- Transfer Without Tearing: This is the trickiest part!
- Plate method: Carefully slide a large, lightly oiled plate or cutting board under the folded mhadjeb.
- Spatula method: Use a wide, thin spatula (or two) to gently lift and transfer the mhadjeb.
- Part 4: Cook the Flatbreads (North African Flatbread Technique)
- Pan Heat That Works: Place your cast iron skillet frying or a heavy-bottomed non-stick pan over medium-high heat. Let it preheat for a good 5-7 minutes. A quick test: flick a tiny drop of water onto the pan – if it sizzles and evaporates immediately, it's ready.
- Cook Time + Visual Cues: Carefully place one mhadjeb into the hot, dry pan (no extra oil needed, as the dough is already oiled). Cook for 3-5 minutes per side. You're looking for beautiful dark golden spots and a slightly puffed-up appearance. Don't let it burn!
- Flip Timing: Once the first side is golden brown, carefully flip it with a spatula and cook the other side until evenly golden.
- Keep Them Soft: As each mhadjeb finishes cooking, transfer it to a plate and immediately stack it under a clean kitchen towel. The towel traps the steam, keeping your flatbreads soft and pliable, just like they should be.
- Serving Ideas
- >Mhadjeb is often enjoyed simply, hot and fresh, right off the pan. It's the ultimate street-food experience! For common pairings, you might see it served alongside a refreshing glass of mint tea, a simple green salad, or a cooling yogurt sauce to balance the spice. It makes for a fantastic filling vegan meal on its own!
You may also like


Hey there! I’m just someone who seriously loves good food and believes that cooking doesn’t have to be complicated to be amazing. Whether it’s a quick weeknight dinner or a cozy weekend meal, I’m all about sharing easy, tasty recipes that actually work.


