
Easy Pan Amasado - Home Bread Recipe
Easy Pan Amasado - Home Bread Recipe
- Serves: 10 People
- Prepare Time: 15 minutes
- Cooking Time: 30 minutes
- Calories: -
- Difficulty: Easy
Craving the comforting aroma of freshly baked bread right from your own oven? Get ready to dive into the wonderful world of Chilean Pan Amasado! This isn't just any home baked bread recipe; it's a taste of tradition, a rustic kneaded roll that’s a staple in Chilean homes. Picture this: slightly flattened, with charming fork-pricked tops, served warm with vibrant pebre (a fresh tomato-cilantro salsa), or simply slathered with butter for breakfast. Chileans absolutely adore their bread, consuming an impressive amount each year, and Pan Amasado is often found warm at restaurants, during "once" (Chilean teatime), or enjoyed on vacation by the lake or beach.
This simple, step-by-step Pan Amasado recipe to make bread at home gives you soft, rustic Chilean rolls using basic pantry ingredients and a regular home oven. We've grounded this version in traditional Chilean methods, but meticulously tested it for common US all-purpose flour and standard home ovens. Whether you're a complete beginner eager to learn bread how to make or an experienced baker looking for an authentic South American treat, this guide offers clear cues, troubleshooting tips, and small tweaks to ensure you can bake fresh bread with confidence. Get ready to enjoy this savory delight of traditional Chilean cuisine!
Before you dive into mixing, let's cover a few bread-making fundamentals that will set you up for success.
Yeast 101: Yeast is a living thing, and it needs just the right conditions to wake up! "Lukewarm" water for yeast activation should feel like a warm bath, not hot or cold. A simple wrist test works: if it feels warm but not scalding, you're good. Ideally, aim for 105-115°F (40-46°C). To proof yeast, mix it with warm water and a pinch of sugar, then let it sit for 8-10 minutes. If it doesn't get foamy and bubbly, your yeast might be dead (or your water was too hot/cold), so it's best to start over.
Dough Texture & Kneading Cues: Properly kneaded dough should feel smooth, elastic, and slightly tacky, but not sticky. It should spring back slowly when poked. A quick windowpane test involves gently stretching a small piece of dough. If you can stretch it thin enough to see light through it without tearing, your gluten is well-developed, and you've nailed the kneading!
Rising Conditions: Yeast loves a warm, draft-free spot for proofing. The ideal temperature range is generally 75-85°F (24-29°C). An easy trick to create a cozy "sauna" for your dough is to place the covered bowl in an oven that's turned off, with a bowl of hot water on a lower rack. The steam and warmth will help your dough rise beautifully.
Timing Overview: Here’s a general timeline for your Pan Amasado journey:
Prep & Yeast Activation: 10–15 minutes
Kneading: 8–10 minutes (by hand) or ~5–7 minutes (in a mixer)
First Rise: 60–90 minutes
Shaping & Second Rise: 10–15 minutes shaping, then 30–45 minutes for the second rise
Baking: 25–30 minutes
Ingredients
Directions
- Activate the YeastIn your large mixing bowl, combine the warm water and 1 teaspoon of the granulated sugar. Sprinkle the active dry yeast over the top. Give it a gentle stir, then let it sit for 8-10 minutes until it becomes foamy and bubbly. This shows your yeast is alive and ready to work! If it doesn’t foam, check your water temperature and yeast freshness, and restart.
- Make the DoughIn a separate medium bowl, whisk together the flour and the remaining 2 teaspoons of granulated sugar. Keep the salt aside for now. Once your yeast mixture is foamy, add the melted butter (or other fat) to it. Pour this wet mixture into the bowl with the flour. Stir with a sturdy spoon or spatula until a shaggy, somewhat cohesive dough forms. Now, sprinkle in the salt and mix until it’s fully incorporated.
- KneadThis is where the magic happens!
- By Hand: Turn the shaggy dough out onto a lightly floured surface. Knead for 8-10 minutes. This involves folding the dough over itself, pushing it away with the heel of your hand, rotating it, and repeating. You'll notice the dough transform from rough to smooth, elastic, and slightly tacky. If it feels too dry, add a teaspoon of water at a time; if too sticky, dust with a tiny bit more flour.
- By Stand Mixer: Attach the dough hook to your stand mixer. Knead the dough on low to medium speed for 5-7 minutes. The dough should gather around the hook and pull away from the sides of the bowl. Finish with a quick hand-knead on a lightly floured surface for a minute or two to check the texture.
- First RiseShape the kneaded dough into a smooth ball. Lightly oil your mixing bowl, place the dough in it, and turn it once to coat. Cover the bowl with a clean kitchen towel or plastic wrap and place it in a warm, draft-free spot (like your "oven sauna" trick). Let it rise until it has doubled in size, which usually takes about 60-90 minutes, depending on your room temperature. To check if it’s ready, gently poke it with a floured finger; if the indentation remains, it's done.
- Divide & ShapeOnce the dough has doubled, gently turn it out onto a lightly floured surface. Lightly press out any excess gas (don't punch it down aggressively). Form the dough into a log and divide it into 10-12 even pieces. If you're using a kitchen scale, aim for pieces around 70-80 grams each. Shape each piece into a smooth ball, then gently flatten it into a thick disc, about 3-4 inches wide.
- Second RiseLine a baking sheet with parchment paper. Arrange the flattened dough discs on the sheet, making sure to leave some space between them as they will expand. Cover them loosely with a clean kitchen towel and let them puff up slightly for another 30-45 minutes in a warm spot.
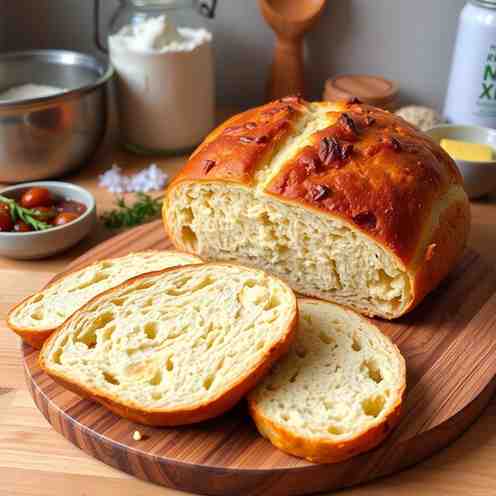
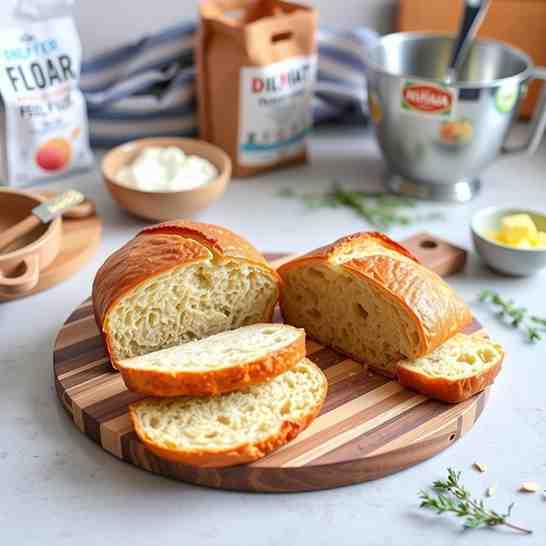
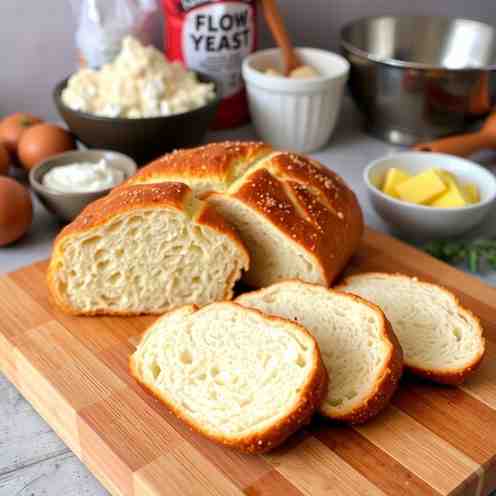
- Prepare and BakeWhile your rolls are on their second rise, preheat your oven to 350°F (180°C). Once the rolls have puffed, gently brush the tops with milk (or beaten egg if you're using that variation). Then, use a fork to prick the tops of each roll in a traditional cross pattern or any design you like. This helps prevent them from puffing up too much and gives them their characteristic look. Bake for 25-30 minutes, or until they are lightly golden brown and sound hollow when tapped on the underside.
- Cool and ServeTransfer the baked Pan Amasado rolls to a wire rack to cool briefly. While they're best served warm for the ultimate soft texture and flavor, letting them cool for about 10-15 minutes allows the crumb to set properly. Enjoy your delicious homemade bread recipe!
Easy Pan Amasado - Home Bread Recipe
- Serves: 10 People
- Prepare Time: 15 minutes
- Cooking Time: 30 minutes
- Calories: -
- Difficulty: Easy
Craving the comforting aroma of freshly baked bread right from your own oven? Get ready to dive into the wonderful world of Chilean Pan Amasado! This isn't just any home baked bread recipe; it's a taste of tradition, a rustic kneaded roll that’s a staple in Chilean homes. Picture this: slightly flattened, with charming fork-pricked tops, served warm with vibrant pebre (a fresh tomato-cilantro salsa), or simply slathered with butter for breakfast. Chileans absolutely adore their bread, consuming an impressive amount each year, and Pan Amasado is often found warm at restaurants, during "once" (Chilean teatime), or enjoyed on vacation by the lake or beach.
This simple, step-by-step Pan Amasado recipe to make bread at home gives you soft, rustic Chilean rolls using basic pantry ingredients and a regular home oven. We've grounded this version in traditional Chilean methods, but meticulously tested it for common US all-purpose flour and standard home ovens. Whether you're a complete beginner eager to learn bread how to make or an experienced baker looking for an authentic South American treat, this guide offers clear cues, troubleshooting tips, and small tweaks to ensure you can bake fresh bread with confidence. Get ready to enjoy this savory delight of traditional Chilean cuisine!
Before you dive into mixing, let's cover a few bread-making fundamentals that will set you up for success.
Yeast 101: Yeast is a living thing, and it needs just the right conditions to wake up! "Lukewarm" water for yeast activation should feel like a warm bath, not hot or cold. A simple wrist test works: if it feels warm but not scalding, you're good. Ideally, aim for 105-115°F (40-46°C). To proof yeast, mix it with warm water and a pinch of sugar, then let it sit for 8-10 minutes. If it doesn't get foamy and bubbly, your yeast might be dead (or your water was too hot/cold), so it's best to start over.
Dough Texture & Kneading Cues: Properly kneaded dough should feel smooth, elastic, and slightly tacky, but not sticky. It should spring back slowly when poked. A quick windowpane test involves gently stretching a small piece of dough. If you can stretch it thin enough to see light through it without tearing, your gluten is well-developed, and you've nailed the kneading!
Rising Conditions: Yeast loves a warm, draft-free spot for proofing. The ideal temperature range is generally 75-85°F (24-29°C). An easy trick to create a cozy "sauna" for your dough is to place the covered bowl in an oven that's turned off, with a bowl of hot water on a lower rack. The steam and warmth will help your dough rise beautifully.
Timing Overview: Here’s a general timeline for your Pan Amasado journey:
Prep & Yeast Activation: 10–15 minutes
Kneading: 8–10 minutes (by hand) or ~5–7 minutes (in a mixer)
First Rise: 60–90 minutes
Shaping & Second Rise: 10–15 minutes shaping, then 30–45 minutes for the second rise
Baking: 25–30 minutes
Ingredients
Directions
- Activate the YeastIn your large mixing bowl, combine the warm water and 1 teaspoon of the granulated sugar. Sprinkle the active dry yeast over the top. Give it a gentle stir, then let it sit for 8-10 minutes until it becomes foamy and bubbly. This shows your yeast is alive and ready to work! If it doesn’t foam, check your water temperature and yeast freshness, and restart.
- Make the DoughIn a separate medium bowl, whisk together the flour and the remaining 2 teaspoons of granulated sugar. Keep the salt aside for now. Once your yeast mixture is foamy, add the melted butter (or other fat) to it. Pour this wet mixture into the bowl with the flour. Stir with a sturdy spoon or spatula until a shaggy, somewhat cohesive dough forms. Now, sprinkle in the salt and mix until it’s fully incorporated.
- KneadThis is where the magic happens!
- By Hand: Turn the shaggy dough out onto a lightly floured surface. Knead for 8-10 minutes. This involves folding the dough over itself, pushing it away with the heel of your hand, rotating it, and repeating. You'll notice the dough transform from rough to smooth, elastic, and slightly tacky. If it feels too dry, add a teaspoon of water at a time; if too sticky, dust with a tiny bit more flour.
- By Stand Mixer: Attach the dough hook to your stand mixer. Knead the dough on low to medium speed for 5-7 minutes. The dough should gather around the hook and pull away from the sides of the bowl. Finish with a quick hand-knead on a lightly floured surface for a minute or two to check the texture.
- First RiseShape the kneaded dough into a smooth ball. Lightly oil your mixing bowl, place the dough in it, and turn it once to coat. Cover the bowl with a clean kitchen towel or plastic wrap and place it in a warm, draft-free spot (like your "oven sauna" trick). Let it rise until it has doubled in size, which usually takes about 60-90 minutes, depending on your room temperature. To check if it’s ready, gently poke it with a floured finger; if the indentation remains, it's done.
- Divide & ShapeOnce the dough has doubled, gently turn it out onto a lightly floured surface. Lightly press out any excess gas (don't punch it down aggressively). Form the dough into a log and divide it into 10-12 even pieces. If you're using a kitchen scale, aim for pieces around 70-80 grams each. Shape each piece into a smooth ball, then gently flatten it into a thick disc, about 3-4 inches wide.
- Second RiseLine a baking sheet with parchment paper. Arrange the flattened dough discs on the sheet, making sure to leave some space between them as they will expand. Cover them loosely with a clean kitchen towel and let them puff up slightly for another 30-45 minutes in a warm spot.
- Prepare and BakeWhile your rolls are on their second rise, preheat your oven to 350°F (180°C). Once the rolls have puffed, gently brush the tops with milk (or beaten egg if you're using that variation). Then, use a fork to prick the tops of each roll in a traditional cross pattern or any design you like. This helps prevent them from puffing up too much and gives them their characteristic look. Bake for 25-30 minutes, or until they are lightly golden brown and sound hollow when tapped on the underside.
- Cool and ServeTransfer the baked Pan Amasado rolls to a wire rack to cool briefly. While they're best served warm for the ultimate soft texture and flavor, letting them cool for about 10-15 minutes allows the crumb to set properly. Enjoy your delicious homemade bread recipe!
You may also like


Hey there! I’m just someone who seriously loves good food and believes that cooking doesn’t have to be complicated to be amazing. Whether it’s a quick weeknight dinner or a cozy weekend meal, I’m all about sharing easy, tasty recipes that actually work.


