
Bake a Princess Birthday Cake - Prinsesstårta Guide
Bake a Princess Birthday Cake - Prinsesstårta Guide
- Serves: 10 People
- Prepare Time: 1 hour 30 m
- Cooking Time: 20 minutes
- Calories: -
- Difficulty: Hard
Get ready to bake a show-stopping centerpiece that's as delicious as it is beautiful! We're talking about Prinsesstårta, the iconic Swedish Princess Cake. This isn't just any vanilla birthday cake; it's a dreamy, elegant confection that's perfect for any celebration, especially when you're looking for an unforgettable princess birthday cake. In plain English, Prinsesstårta is a light and airy sponge cake layered with sweet raspberry jam, rich vanilla pastry cream, and a generous dome of whipped cream, all lovingly encased in a vibrant green marzipan blanket and topped with a delicate marzipan rose.
What makes it so special? Beyond its stunning, instantly recognizable look, it’s the delightful contrast of textures and flavors – the soft sponge, the fruity tang of raspberry, the silky cream, and the almondy marzipan. This classic 3 layer cake is a true labor of love, but every step of this baking recipes from scratch adventure is worth it for that incredible "wow" factor. Forget searching for "princess cake near me" – with our guide, you'll master this traditional whipped icing cake right in your own kitchen. It's truly the ultimate raspberry vanilla cake experience!
Ingredients
Directions
- Make the Sponge (Ribbon Stage + Folding Cues)
- Prep Your Pan: Preheat oven to 350°F (175°C). Grease an 8-inch (20cm) round cake pan and line the bottom with parchment paper. Lightly flour the sides.
- Ribbon Stage: In a large bowl, combine eggs, granulated sugar, and vanilla extract. Using an electric mixer (handheld or stand mixer with whisk attachment), beat on high speed for 8-10 minutes until the mixture is very pale, thick, and has tripled in volume. When you lift the whisk, the batter should fall back into the bowl in a "ribbon" that holds its shape on the surface for a few seconds before disappearing. This is crucial for a light sponge!
- Dry Ingredients: In a separate bowl, whisk together the sifted flour, baking powder, and salt.
- Fold Gently: Sift about one-third of the dry ingredients over the egg mixture and gently fold in with a spatula until just combined. Repeat with the remaining dry ingredients in two additions, being careful not to deflate the airy egg mixture. Overmixing will lead to a dense sponge.
- Liquids: In a small bowl, whisk together the melted butter and milk. Take about ½ cup of the cake batter and fold it into the butter-milk mixture to lighten it. Then, gently fold this mixture back into the main cake batter until just combined.
- Bake: Pour the batter into your prepared cake pan. Bake for 30-35 minutes, or until a wooden skewer inserted into the center comes out clean. The top should be golden brown and spring back when lightly touched.
- Cooling & Slicing Plan: Let the cake cool in the pan for 10 minutes before inverting it onto a wire rack to cool completely. Once fully cooled (this is important!), use a long serrated knife or a cake leveler to carefully slice the cake horizontally into three even layers.
- Make the Pastry Cream (Smooth, Thick, Not Scrambled)
- Whisk Yolks & Sugar: In a medium saucepan (off the heat), whisk together egg yolks, granulated sugar, and cornstarch until smooth and pale.
- Heat Milk: In a separate small saucepan, gently heat the milk over medium heat until it just begins to simmer around the edges (don't boil).
- Temper: Slowly pour about half of the hot milk into the egg yolk mixture while continuously whisking vigorously. This "tempers" the eggs, preventing them from scrambling.
- Cook Cream: Pour the tempered egg mixture back into the saucepan with the remaining hot milk. Place over medium-low heat and cook, whisking constantly, for 5-7 minutes until the cream thickens considerably and comes to a gentle boil for 1 minute (to activate the cornstarch). It should be smooth and glossy.
- Finish: Remove from heat and stir in the vanilla extract and butter until melted and fully incorporated.
- Cool Without a Skin: Pour the hot pastry cream into a clean, shallow bowl. Immediately press plastic wrap directly onto the surface of the cream to prevent a skin from forming. Chill in the refrigerator for at least 2-3 hours, or until completely cold and firm.
- Whip the Cream (Dome-Ready)
- Chill Bowl & Whisk: For best results, chill your mixing bowl and whisk attachment in the freezer for 10-15 minutes before starting.
- Whip: Pour the very cold heavy cream into the chilled bowl. Start whipping on medium speed, gradually increasing to high.
- Add Sweeteners: Once the cream starts to thicken (soft peaks form), add the powdered sugar and vanilla extract. Continue whipping until "stiff peaks" form – when you lift the whisk, the cream should hold its shape firmly and not droop.
- Avoid Overwhipping: Be careful not to overwhipping, as it can turn grainy and separate. Stop just as stiff peaks are achieved.
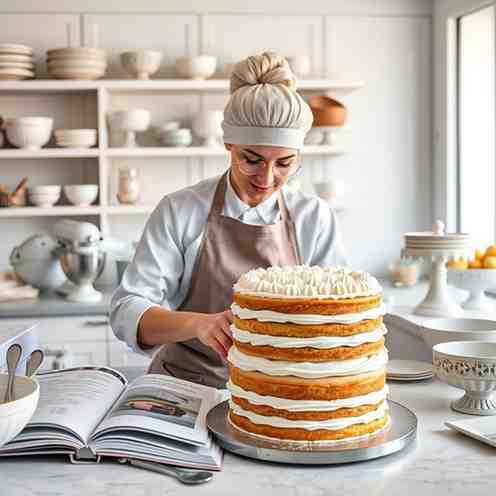
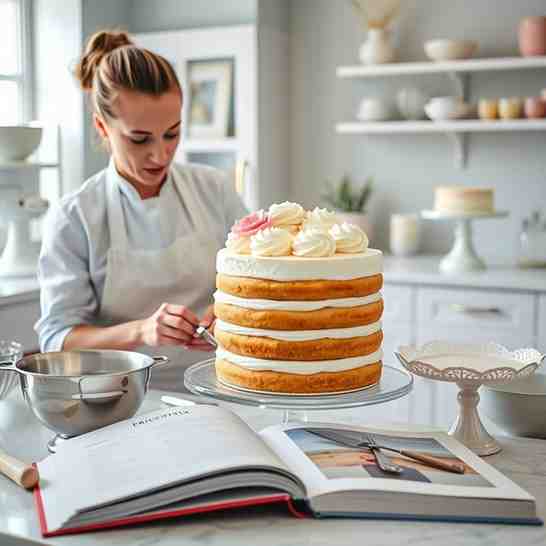
- Assemble the Layers (Clean, Stable Stack)
- Base Layer: Place one sponge cake layer on your serving plate or cake stand. If desired, you can place strips of parchment paper under the edges of the cake to keep the plate clean during assembly.
- Raspberry Jam: Spread a thin, even layer of raspberry jam over the first sponge layer, leaving a small border around the edge.
- Pastry Cream: Retrieve your chilled pastry cream. Give it a quick whisk to loosen it slightly. Spread all of the pastry cream evenly over the jam layer, again leaving a small border.
- Second Sponge: Carefully place the second sponge layer on top of the pastry cream.
- Whipped Cream Dome: Spread about one-third of the whipped cream evenly over the second sponge layer. Then, mound the remaining whipped cream in the center, shaping it into a smooth, high dome. Use an offset spatula or the back of a spoon to create a beautiful, even dome shape. This forms the iconic structure!
- Top Sponge: Gently place the third sponge layer on top of the whipped cream dome. Press down very lightly, just enough to secure it without squishing the dome too much.
- Chill Checkpoint: Cover the cake loosely with plastic wrap and chill in the refrigerator for at least 30 minutes to 1 hour. This helps firm up the cream dome and makes the cake much more stable for marzipan draping.
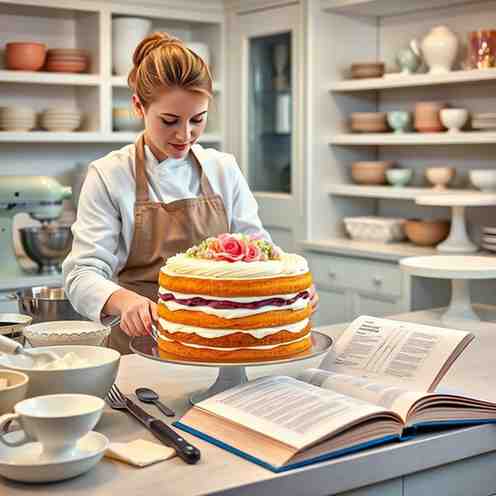
- Tint, Roll, and Drape the Marzipan
- Tint (if needed): If your marzipan isn't already green, knead in a small amount of gel food coloring until you achieve your desired classic green hue.
- Prep Surface: Lightly dust your clean work surface (or a large silicone mat) with powdered sugar. Too much powdered sugar will dry out the marzipan and make it prone to cracking.
- Roll Thin: Roll out the marzipan into a large, thin circle, about 1/8-inch (3mm) thick. You'll need a circle significantly larger than your cake – aim for about 16-18 inches (40-45cm) in diameter to ensure it can cover the dome.
- Drape: Carefully lift the rolled marzipan (you can roll it gently onto your rolling pin to help with this) and center it over the chilled cake. Gently drape it over the dome, smoothing it down the sides with your hands or a fondant smoother.
- Smooth & Trim: Work quickly but gently to smooth out any wrinkles or air bubbles. Trim the excess marzipan neatly around the base of the cake using a sharp knife or pizza cutter. You can use the trimmed excess to make leaves later.
- Decorate + Final Chill
- Rose (Simple Method): Take a small piece of pink marzipan (or tinted green marzipan). Roll out a tiny ball for the base of the rose. Then, roll out several very thin, small circles for petals. Overlap and gently press the circles around the base, shaping them to resemble a rose.
- Leaves: Use a small piece of green marzipan to shape a couple of simple leaves.
- Placement: Place the marzipan rose elegantly on top of your cake, usually slightly off-center, with the leaves beside it.
- Powdered Sugar Timing: If you want to dust the cake with powdered sugar, do so just before serving to avoid it melting into the marzipan.
- Final Chill: Chill the decorated Prinsesstårta for at least 1-2 hours to allow everything to set fully.
Bake a Princess Birthday Cake - Prinsesstårta Guide
- Serves: 10 People
- Prepare Time: 1 hour 30 m
- Cooking Time: 20 minutes
- Calories: -
- Difficulty: Hard
Get ready to bake a show-stopping centerpiece that's as delicious as it is beautiful! We're talking about Prinsesstårta, the iconic Swedish Princess Cake. This isn't just any vanilla birthday cake; it's a dreamy, elegant confection that's perfect for any celebration, especially when you're looking for an unforgettable princess birthday cake. In plain English, Prinsesstårta is a light and airy sponge cake layered with sweet raspberry jam, rich vanilla pastry cream, and a generous dome of whipped cream, all lovingly encased in a vibrant green marzipan blanket and topped with a delicate marzipan rose.
What makes it so special? Beyond its stunning, instantly recognizable look, it’s the delightful contrast of textures and flavors – the soft sponge, the fruity tang of raspberry, the silky cream, and the almondy marzipan. This classic 3 layer cake is a true labor of love, but every step of this baking recipes from scratch adventure is worth it for that incredible "wow" factor. Forget searching for "princess cake near me" – with our guide, you'll master this traditional whipped icing cake right in your own kitchen. It's truly the ultimate raspberry vanilla cake experience!
Ingredients
Directions
- Make the Sponge (Ribbon Stage + Folding Cues)
- Prep Your Pan: Preheat oven to 350°F (175°C). Grease an 8-inch (20cm) round cake pan and line the bottom with parchment paper. Lightly flour the sides.
- Ribbon Stage: In a large bowl, combine eggs, granulated sugar, and vanilla extract. Using an electric mixer (handheld or stand mixer with whisk attachment), beat on high speed for 8-10 minutes until the mixture is very pale, thick, and has tripled in volume. When you lift the whisk, the batter should fall back into the bowl in a "ribbon" that holds its shape on the surface for a few seconds before disappearing. This is crucial for a light sponge!
- Dry Ingredients: In a separate bowl, whisk together the sifted flour, baking powder, and salt.
- Fold Gently: Sift about one-third of the dry ingredients over the egg mixture and gently fold in with a spatula until just combined. Repeat with the remaining dry ingredients in two additions, being careful not to deflate the airy egg mixture. Overmixing will lead to a dense sponge.
- Liquids: In a small bowl, whisk together the melted butter and milk. Take about ½ cup of the cake batter and fold it into the butter-milk mixture to lighten it. Then, gently fold this mixture back into the main cake batter until just combined.
- Bake: Pour the batter into your prepared cake pan. Bake for 30-35 minutes, or until a wooden skewer inserted into the center comes out clean. The top should be golden brown and spring back when lightly touched.
- Cooling & Slicing Plan: Let the cake cool in the pan for 10 minutes before inverting it onto a wire rack to cool completely. Once fully cooled (this is important!), use a long serrated knife or a cake leveler to carefully slice the cake horizontally into three even layers.
- Make the Pastry Cream (Smooth, Thick, Not Scrambled)
- Whisk Yolks & Sugar: In a medium saucepan (off the heat), whisk together egg yolks, granulated sugar, and cornstarch until smooth and pale.
- Heat Milk: In a separate small saucepan, gently heat the milk over medium heat until it just begins to simmer around the edges (don't boil).
- Temper: Slowly pour about half of the hot milk into the egg yolk mixture while continuously whisking vigorously. This "tempers" the eggs, preventing them from scrambling.
- Cook Cream: Pour the tempered egg mixture back into the saucepan with the remaining hot milk. Place over medium-low heat and cook, whisking constantly, for 5-7 minutes until the cream thickens considerably and comes to a gentle boil for 1 minute (to activate the cornstarch). It should be smooth and glossy.
- Finish: Remove from heat and stir in the vanilla extract and butter until melted and fully incorporated.
- Cool Without a Skin: Pour the hot pastry cream into a clean, shallow bowl. Immediately press plastic wrap directly onto the surface of the cream to prevent a skin from forming. Chill in the refrigerator for at least 2-3 hours, or until completely cold and firm.
- Whip the Cream (Dome-Ready)
- Chill Bowl & Whisk: For best results, chill your mixing bowl and whisk attachment in the freezer for 10-15 minutes before starting.
- Whip: Pour the very cold heavy cream into the chilled bowl. Start whipping on medium speed, gradually increasing to high.
- Add Sweeteners: Once the cream starts to thicken (soft peaks form), add the powdered sugar and vanilla extract. Continue whipping until "stiff peaks" form – when you lift the whisk, the cream should hold its shape firmly and not droop.
- Avoid Overwhipping: Be careful not to overwhipping, as it can turn grainy and separate. Stop just as stiff peaks are achieved.
- Assemble the Layers (Clean, Stable Stack)
- Base Layer: Place one sponge cake layer on your serving plate or cake stand. If desired, you can place strips of parchment paper under the edges of the cake to keep the plate clean during assembly.
- Raspberry Jam: Spread a thin, even layer of raspberry jam over the first sponge layer, leaving a small border around the edge.
- Pastry Cream: Retrieve your chilled pastry cream. Give it a quick whisk to loosen it slightly. Spread all of the pastry cream evenly over the jam layer, again leaving a small border.
- Second Sponge: Carefully place the second sponge layer on top of the pastry cream.
- Whipped Cream Dome: Spread about one-third of the whipped cream evenly over the second sponge layer. Then, mound the remaining whipped cream in the center, shaping it into a smooth, high dome. Use an offset spatula or the back of a spoon to create a beautiful, even dome shape. This forms the iconic structure!
- Top Sponge: Gently place the third sponge layer on top of the whipped cream dome. Press down very lightly, just enough to secure it without squishing the dome too much.
- Chill Checkpoint: Cover the cake loosely with plastic wrap and chill in the refrigerator for at least 30 minutes to 1 hour. This helps firm up the cream dome and makes the cake much more stable for marzipan draping.
- Tint, Roll, and Drape the Marzipan
- Tint (if needed): If your marzipan isn't already green, knead in a small amount of gel food coloring until you achieve your desired classic green hue.
- Prep Surface: Lightly dust your clean work surface (or a large silicone mat) with powdered sugar. Too much powdered sugar will dry out the marzipan and make it prone to cracking.
- Roll Thin: Roll out the marzipan into a large, thin circle, about 1/8-inch (3mm) thick. You'll need a circle significantly larger than your cake – aim for about 16-18 inches (40-45cm) in diameter to ensure it can cover the dome.
- Drape: Carefully lift the rolled marzipan (you can roll it gently onto your rolling pin to help with this) and center it over the chilled cake. Gently drape it over the dome, smoothing it down the sides with your hands or a fondant smoother.
- Smooth & Trim: Work quickly but gently to smooth out any wrinkles or air bubbles. Trim the excess marzipan neatly around the base of the cake using a sharp knife or pizza cutter. You can use the trimmed excess to make leaves later.
- Decorate + Final Chill
- Rose (Simple Method): Take a small piece of pink marzipan (or tinted green marzipan). Roll out a tiny ball for the base of the rose. Then, roll out several very thin, small circles for petals. Overlap and gently press the circles around the base, shaping them to resemble a rose.
- Leaves: Use a small piece of green marzipan to shape a couple of simple leaves.
- Placement: Place the marzipan rose elegantly on top of your cake, usually slightly off-center, with the leaves beside it.
- Powdered Sugar Timing: If you want to dust the cake with powdered sugar, do so just before serving to avoid it melting into the marzipan.
- Final Chill: Chill the decorated Prinsesstårta for at least 1-2 hours to allow everything to set fully.
You may also like


Hey there! I’m just someone who seriously loves good food and believes that cooking doesn’t have to be complicated to be amazing. Whether it’s a quick weeknight dinner or a cozy weekend meal, I’m all about sharing easy, tasty recipes that actually work.


