
Roshogolla Your Next Sweet Treat to Make at Home
Roshogolla Your Next Sweet Treat to Make at Home
- Serves: 15 People
- Prepare Time: 30 minutes
- Cooking Time: 40 minutes
- Calories: -
- Difficulty: Medium
Hey there, fellow dessert lovers! Are you on the hunt for a truly special sweet treat to make at home? Something that's not just delicious but also tells a story? Get ready to explore the magic of Authentic Bangladeshi Roshogolla – a truly divine sweet and dessert that's a symphony of culture and flavor. This isn't just another one of those sweet treat recipes; it's the comprehensive guide designed to help you master one of the best of sweets right in your own kitchen.
We know how frustrating it can be when sweets to make at home don't turn out quite right. That's why we've crafted this recipe to be your ultimate resource, going beyond what you might find elsewhere. We're diving deep into every detail, from perfecting your `chenna` (fresh cheese curd) – the heart of any great Roshogolla – to expert troubleshooting for common pitfalls, and smart storage solutions that most recipes overlook. Whether you're a beginner or an experienced home cook, this guide will ensure your Roshogolla are perfectly spongy, juicy, and bursting with flavor every single time. It's truly one of the most rewarding dessert recipes with milk you can master, making it one of the best treats to make at home. So, grab your apron, because it's time to create some homemade happiness with these incredible home made recipes!
Let's get down to business and make some incredible Roshogolla! This recipe focuses on creating the perfect `chenna` and cooking it just right, so you get those melt-in-your-mouth, spongy sweets every time.
Ingredients
Directions
- Prepare the Chenna:
- Pour the whole milk into a large, heavy-bottomed pot. Place it over medium-high heat and bring it to a rolling boil, stirring occasionally to prevent scorching.
- Once boiling, reduce the heat to low. Slowly add the lemon juice or vinegar, stirring gently. You'll notice the milk beginning to curdle, separating into greenish whey and solid white curds (chenna).
- If it doesn't curdle completely after adding the initial amount, add a little more lemon juice/vinegar, a teaspoon at a time, until the whey is clear and distinct from the chenna. Avoid adding too much, as it can make the chenna tough.
- Remove the pot from heat immediately. Let it sit for 1-2 minutes to allow the curds to fully separate.
- Line a large colander or sieve with a clean cheesecloth or muslin cloth. Place this over a bowl to collect the whey.
- Carefully pour the curdled milk into the cheesecloth-lined colander. Rinse the chenna under cold running water for 2-3 minutes. This step is crucial to wash away any lingering lemon or vinegar taste and to cool down the chenna, preventing further cooking.
- Gather the edges of the cheesecloth and gently squeeze out the excess water. Be firm but not aggressive. The chenna should be crumbly but still moist – not completely dry, and not dripping wet. Aim for a texture where it just holds together when pressed. This is the most critical step for spongy Roshogolla!
- Hang the chenna in the cheesecloth for about 30-45 minutes to drain further. The goal is to remove just enough moisture. If it's too dry, the Roshogolla will be hard; if too wet, they'll break apart during cooking.
- Knead the Chenna:
- Transfer the drained chenna to a large, clean plate or a flat work surface.
- Break it up gently with your fingers. Now, the magic happens! Knead the chenna with the heel of your palm for about 8-10 minutes. You want to make it smooth, free of any granules, and slightly oily. It should form a dough-like consistency. The goal is to release the fats and create a smooth texture that will ensure the Roshogolla don't crack.
- To test if it's ready, take a small piece and roll it into a ball. If it forms a smooth ball without cracks, it's good to go!
- Shape the Roshogolla:
- Divide the kneaded chenna into 15 equal portions.
- Roll each portion gently between your palms to form smooth, crack-free balls. Be gentle but firm enough to ensure they are compact. Keep them covered with a damp cloth to prevent drying while you work.
- Prepare the Sugar Syrup:
- In a large, wide, and deep pot (one that can accommodate the balls swelling), combine the sugar and water.
- Bring the mixture to a boil over high heat, stirring until the sugar dissolves completely.
- Once boiling, add the optional cardamom powder and saffron strands, if using.
- Cook the Roshogolla:
- Once the syrup is at a rapid, rolling boil, gently drop the chenna balls into the syrup, one by one. Do not overcrowd the pot; cook in batches if necessary.
- Cover the pot with a lid and cook on high heat for 10-15 minutes. The steam trapped inside is crucial for them to puff up. Do not lift the lid during this time!
- After 10-15 minutes, gently uncover. You'll notice the Roshogolla have puffed up significantly and doubled in size.
- Reduce the heat to medium and continue to cook, uncovered, for another 15-20 minutes, gently swirling the pot occasionally to ensure even cooking. The Roshogolla should feel light and springy.
- To test for doneness, drop one Roshogolla into a bowl of plain water. If it sinks, it's cooked through. If it floats, it needs a little more time.
- Cool and Serve:
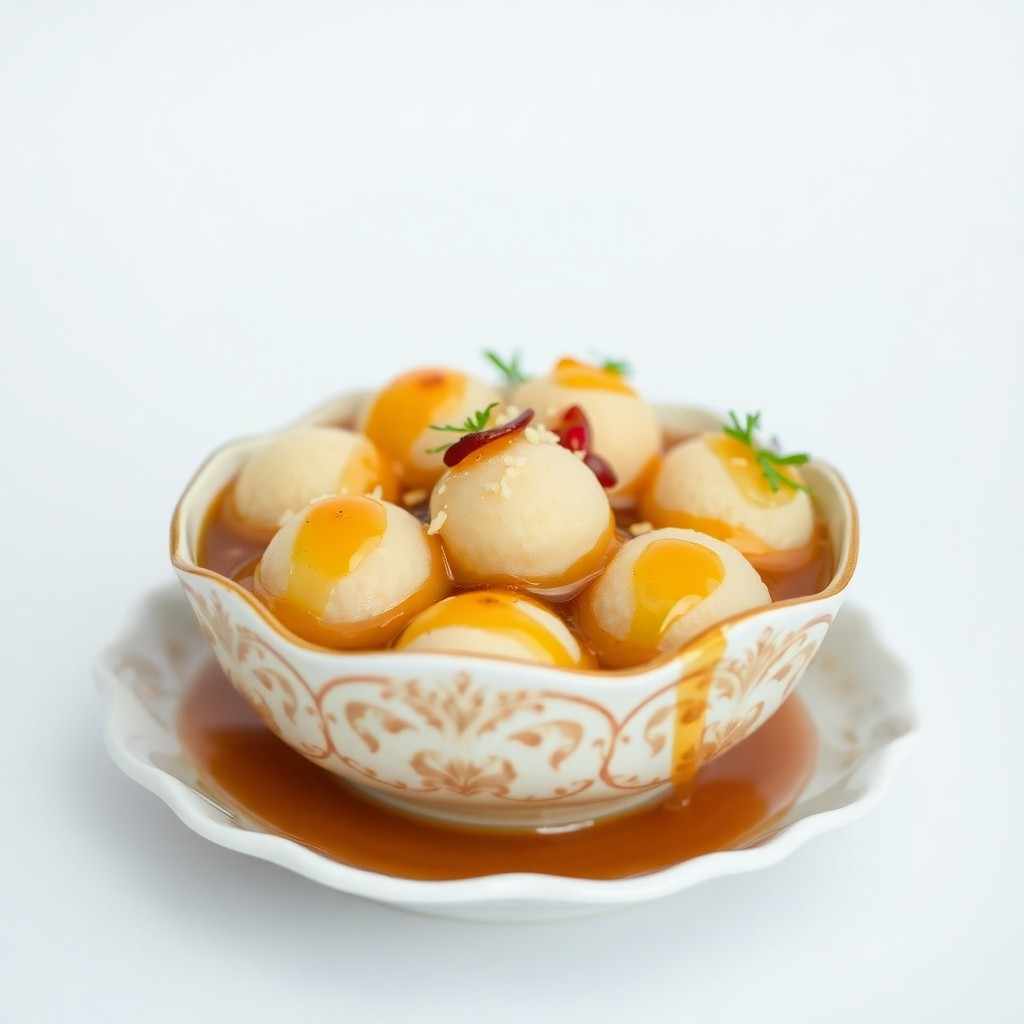
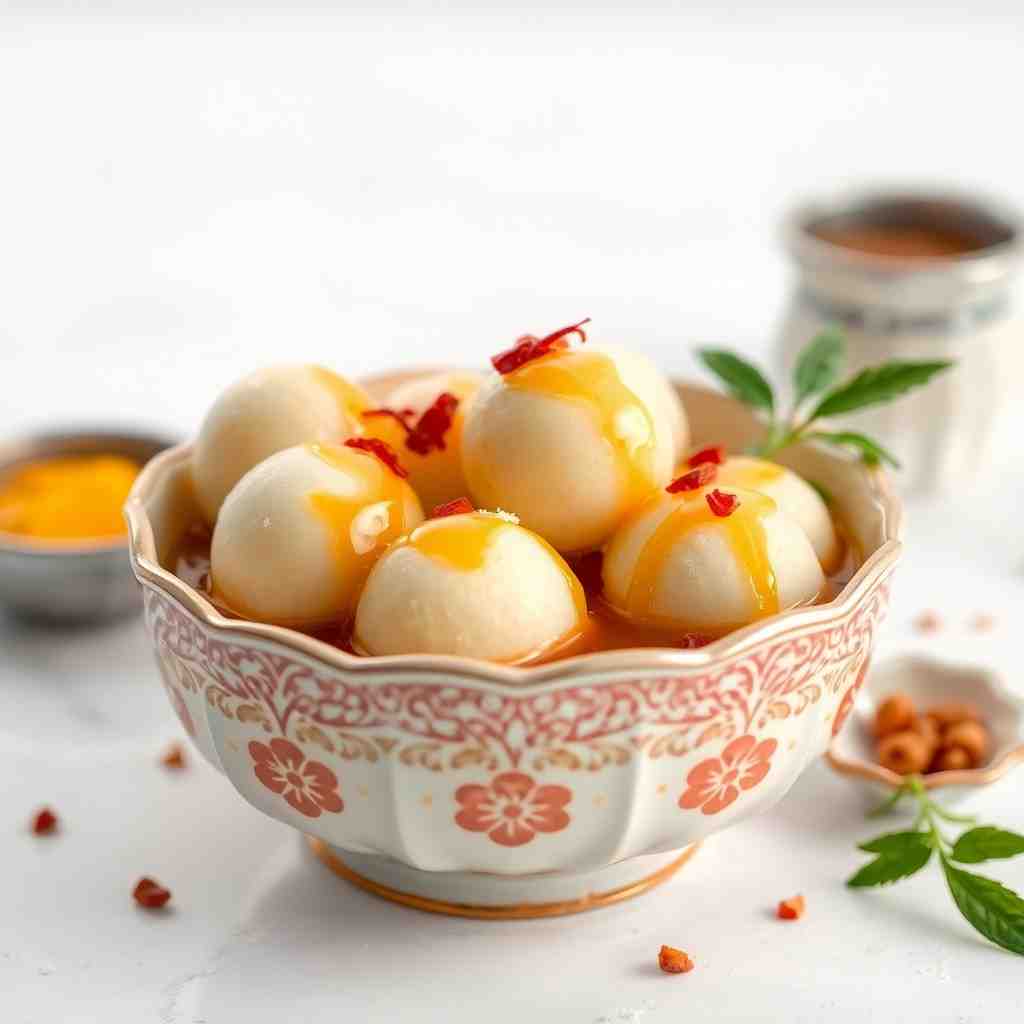
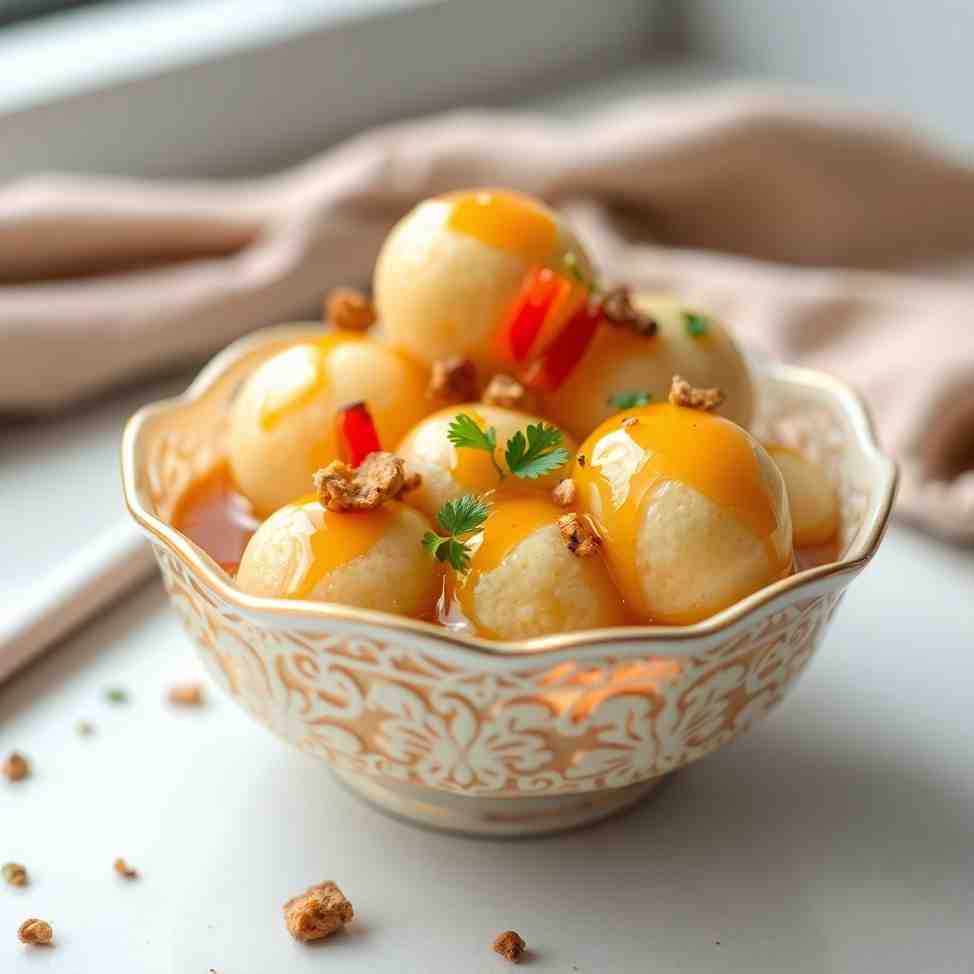
- Once cooked, turn off the heat. Let the Roshogolla cool down completely in the syrup, right in the pot. This allows them to absorb more syrup and become even juicier.
- Transfer to a serving bowl once cool. Chill in the refrigerator for at least 2-3 hours before serving for the best flavor and texture. Enjoy your homemade, spongy Roshogolla!
Roshogolla Your Next Sweet Treat to Make at Home
- Serves: 15 People
- Prepare Time: 30 minutes
- Cooking Time: 40 minutes
- Calories: -
- Difficulty: Medium
Hey there, fellow dessert lovers! Are you on the hunt for a truly special sweet treat to make at home? Something that's not just delicious but also tells a story? Get ready to explore the magic of Authentic Bangladeshi Roshogolla – a truly divine sweet and dessert that's a symphony of culture and flavor. This isn't just another one of those sweet treat recipes; it's the comprehensive guide designed to help you master one of the best of sweets right in your own kitchen.
We know how frustrating it can be when sweets to make at home don't turn out quite right. That's why we've crafted this recipe to be your ultimate resource, going beyond what you might find elsewhere. We're diving deep into every detail, from perfecting your `chenna` (fresh cheese curd) – the heart of any great Roshogolla – to expert troubleshooting for common pitfalls, and smart storage solutions that most recipes overlook. Whether you're a beginner or an experienced home cook, this guide will ensure your Roshogolla are perfectly spongy, juicy, and bursting with flavor every single time. It's truly one of the most rewarding dessert recipes with milk you can master, making it one of the best treats to make at home. So, grab your apron, because it's time to create some homemade happiness with these incredible home made recipes!
Let's get down to business and make some incredible Roshogolla! This recipe focuses on creating the perfect `chenna` and cooking it just right, so you get those melt-in-your-mouth, spongy sweets every time.
Ingredients
Directions
- Prepare the Chenna:
- Pour the whole milk into a large, heavy-bottomed pot. Place it over medium-high heat and bring it to a rolling boil, stirring occasionally to prevent scorching.
- Once boiling, reduce the heat to low. Slowly add the lemon juice or vinegar, stirring gently. You'll notice the milk beginning to curdle, separating into greenish whey and solid white curds (chenna).
- If it doesn't curdle completely after adding the initial amount, add a little more lemon juice/vinegar, a teaspoon at a time, until the whey is clear and distinct from the chenna. Avoid adding too much, as it can make the chenna tough.
- Remove the pot from heat immediately. Let it sit for 1-2 minutes to allow the curds to fully separate.
- Line a large colander or sieve with a clean cheesecloth or muslin cloth. Place this over a bowl to collect the whey.
- Carefully pour the curdled milk into the cheesecloth-lined colander. Rinse the chenna under cold running water for 2-3 minutes. This step is crucial to wash away any lingering lemon or vinegar taste and to cool down the chenna, preventing further cooking.
- Gather the edges of the cheesecloth and gently squeeze out the excess water. Be firm but not aggressive. The chenna should be crumbly but still moist – not completely dry, and not dripping wet. Aim for a texture where it just holds together when pressed. This is the most critical step for spongy Roshogolla!
- Hang the chenna in the cheesecloth for about 30-45 minutes to drain further. The goal is to remove just enough moisture. If it's too dry, the Roshogolla will be hard; if too wet, they'll break apart during cooking.
- Knead the Chenna:
- Transfer the drained chenna to a large, clean plate or a flat work surface.
- Break it up gently with your fingers. Now, the magic happens! Knead the chenna with the heel of your palm for about 8-10 minutes. You want to make it smooth, free of any granules, and slightly oily. It should form a dough-like consistency. The goal is to release the fats and create a smooth texture that will ensure the Roshogolla don't crack.
- To test if it's ready, take a small piece and roll it into a ball. If it forms a smooth ball without cracks, it's good to go!
- Shape the Roshogolla:
- Divide the kneaded chenna into 15 equal portions.
- Roll each portion gently between your palms to form smooth, crack-free balls. Be gentle but firm enough to ensure they are compact. Keep them covered with a damp cloth to prevent drying while you work.
- Prepare the Sugar Syrup:
- In a large, wide, and deep pot (one that can accommodate the balls swelling), combine the sugar and water.
- Bring the mixture to a boil over high heat, stirring until the sugar dissolves completely.
- Once boiling, add the optional cardamom powder and saffron strands, if using.
- Cook the Roshogolla:
- Once the syrup is at a rapid, rolling boil, gently drop the chenna balls into the syrup, one by one. Do not overcrowd the pot; cook in batches if necessary.
- Cover the pot with a lid and cook on high heat for 10-15 minutes. The steam trapped inside is crucial for them to puff up. Do not lift the lid during this time!
- After 10-15 minutes, gently uncover. You'll notice the Roshogolla have puffed up significantly and doubled in size.
- Reduce the heat to medium and continue to cook, uncovered, for another 15-20 minutes, gently swirling the pot occasionally to ensure even cooking. The Roshogolla should feel light and springy.
- To test for doneness, drop one Roshogolla into a bowl of plain water. If it sinks, it's cooked through. If it floats, it needs a little more time.
- Cool and Serve:
- Once cooked, turn off the heat. Let the Roshogolla cool down completely in the syrup, right in the pot. This allows them to absorb more syrup and become even juicier.
- Transfer to a serving bowl once cool. Chill in the refrigerator for at least 2-3 hours before serving for the best flavor and texture. Enjoy your homemade, spongy Roshogolla!
The following nutritional values are per serving (one piece of cake) Calories ~180-220 kcal Carbohydrates ~35-45g Protein ~3-5g Fat ~5-8g Problem: Ever struggled to get all the liquid out of your paneer (chenna) without making a mess or losing precious solids? Problem: Getting that perfect, smooth, and lump-free chenna dough can be tiring if you're doing it all by hand. Problem: Boiling the Roshogolla in syrup can sometimes lead to sticking or uneven cooking, especially if your pot isn't quite right. Click any ingredient for detailed nutritional information:Recipe Nutritional Values
Additional Information
Recipe Success Tips
Recipe Tips
Frequently Asked Questions
Recommended Kitchen Tools
fine-mesh cheesecloth or muslin cloth
Agitate: An improperly drained chenna can lead to crumbly, hard, or misshapen Roshogollas that just don't absorb the syrup properly. It's a common pitfall!
Solution: A fine-mesh cheesecloth or muslin cloth is your best friend here. It allows for efficient, even draining, ensuring your chenna has the perfect consistency – firm but still moist. Just gather the corners, twist, and gently squeeze!food processor
Agitate: Lumps mean uneven texture, and a rough texture means your Roshogollas won't be as soft and spongy as they should be. It's the difference between good and absolutely divine!
Solution: A food processor can cut down your kneading time significantly. Just a few pulses can transform crumbly chenna into a smooth, pliable dough, saving your hands and ensuring consistency. If you don't have one, a good old-fashioned potato masher or even the heel of your palm works wonders with a bit more elbow grease.heavy-bottomed, wide pot with a lid
Agitate: When Roshogollas stick or cook unevenly, they can break apart, deflate, or become tough. All that hard work, potentially wasted!
Solution: A heavy-bottomed, wide pot with a lid is crucial. The heavy bottom ensures even heat distribution, preventing scorching, while the wide base gives your Roshogollas enough room to expand without overcrowding. The lid traps steam, helping them cook thoroughly and puff up beautifully.Calories per Ingredient
Resources & References
You may also like


Hey there! I’m just someone who seriously loves good food and believes that cooking doesn’t have to be complicated to be amazing. Whether it’s a quick weeknight dinner or a cozy weekend meal, I’m all about sharing easy, tasty recipes that actually work.


Newsletter
Sign up to receive email updates on new recipes.
Explore 4,000+ recipes from 192 countries! Join CulinaryCreationss to discover global flavors. The ultimate foodie destination to Explore Recipes worldwide.