
Sel Roti Recipe - Best Nepali Sweet Roti Doughnuts
Sel Roti Recipe - Best Nepali Sweet Roti Doughnuts


- Serves: 12 People
- Prepare Time: 20 minutes
- Cooking Time: 30 minutes
- Calories: -
- Difficulty: Medium
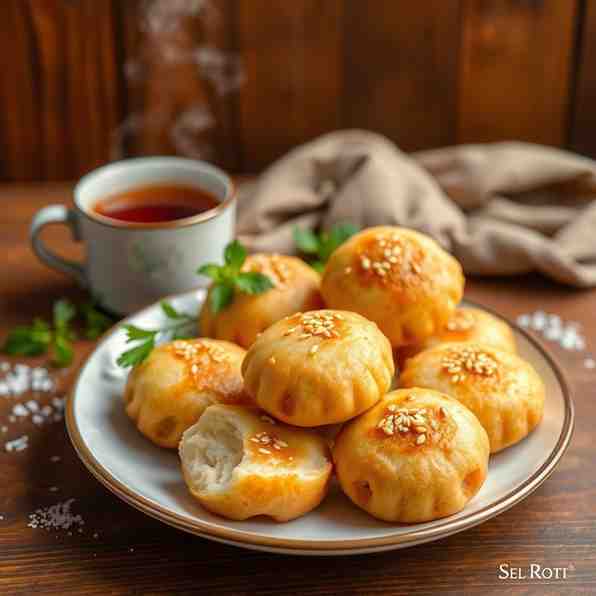
Welcome to the wonderful world of Sel Roti! If you're looking for unique recipes with roti or want to explore the cuisine of Nepal, you've landed in the right spot. Sel Roti is more than just a fried bread recipe; it's a traditional Nepali sweet ring-shaped fried rice bread/doughnut that holds a special place in the hearts (and stomachs!) of many. Often enjoyed during major festivals like Dashain and Tihar in Nepal, Sikkim, and Darjeeling, these crispy-on-the-outside, soft-and-chewy-on-the-inside delights are truly a taste of Nepal.
Forget your average easy doughnut recipe or store-bought doughnut mix recipe. Making Sel Roti at home is a rewarding experience that connects you with a rich cultural tradition. In this guide, we'll walk you through everything you need to know to master this delicious treat. We'll cover the best rice flour rice techniques, ideal fry oil temperature, and plenty of troubleshooting tips so you can create perfect Sel Roti every time. Get ready to impress your friends and family with this incredible breakfast snack recipe or anytime indulgence!
Ingredients
Directions
- Prep Steps
- Soak the Rice (The First Secret to Success!):
- Place the 2 cups of uncooked rice in a large bowl.
- Rinse the rice thoroughly under cold water until the water runs clear.
- Cover the rice with at least 2 inches of fresh, cold water.
- Let the rice soak for a minimum of 4-6 hours, or ideally overnight (8-12 hours). Soaking is crucial because it softens the rice grains, making them easier to grind into a very fine, smooth batter, which is key for Sel Roti's unique texture. It also aids in a slight fermentation, contributing to the flavor and puffiness.
- Drain & Grind the Rice:
- Once soaked, drain the rice completely using a fine-mesh strainer. Let it sit for about 10-15 minutes to remove as much excess water as possible.
- Transfer the drained rice to your grinder or high-powered blender.
- Add ½ cup of water (or a mix of water and milk) to the blender.
- Blend the rice until it forms a very smooth, fine paste. It should have the consistency of a thick pancake batter or a thin milkshake. There should be no grainy bits left. You might need to add a tablespoon or two more water, gradually, to achieve this smoothness, but be careful not to make it too thin!
- Batter Assembly
- Mix in the Sweet & Aromatic Goodness:
- Pour the ground rice batter into a large mixing bowl.
- Stir in the granulated sugar, melted ghee (or oil), cardamom powder, optional clove, and salt.
- Mix everything thoroughly until the sugar is fully dissolved and all ingredients are well combined. The batter should be smooth and pourable, but not watery. It should slowly drip from a spoon.
- Rest Period (Patience is a Virtue):
- Cover the bowl with a clean kitchen towel or plastic wrap.
- Let the batter rest at room temperature for at least 30 minutes, or up to 2-3 hours. This resting period allows the flavors to meld, the rice starch to fully hydrate, and a slight fermentation to begin, which contributes to the Sel Roti's characteristic texture and subtle tang. You'll notice tiny bubbles forming on the surface – that's a good sign!
- Frying
- Heat the Oil to Perfection:
- Pour enough vegetable oil or ghee into your deep pan/kadhai to reach a depth of 2-3 inches.
- Heat the oil over medium-high heat. The ideal fry oil temperature for Sel Roti is around 325-350°F (160-175°C).
- How to Test Heat: If you don't have a thermometer, drop a tiny dollop of batter into the oil. It should sizzle immediately and float to the surface within a few seconds, turning golden. If it browns too quickly, the oil is too hot; if it sinks and doesn't sizzle, it's not hot enough.
- Shaping into Rings (The Fun Part!):
- Carefully pour some batter into your funnel, piping bag, or squeeze bottle.
- Hold the shaping tool about 2-3 inches above the hot oil.
- In a continuous, circular motion, squeeze the batter into the hot oil, forming a ring shape. Aim for rings about 4-5 inches in diameter. You might need a little practice to get the perfect circle! You can fry 2-3 Sel Roti at a time, depending on the size of your pan, without overcrowding.
- Frying Each Side (Watch That Golden Glow!):
- Once the Sel Roti floats to the surface, it will start to puff up.
- Fry for about 1-2 minutes per side, or until it turns a beautiful golden brown color. Use your slotted spoon or a pair of tongs to gently flip them over.
- They should be evenly colored and feel slightly firm when done. This ensures they are crispy on the outside and cooked through on the inside.
- Draining & Cooling:
- Once golden brown, remove the Sel Roti from the oil using your slotted spoon or spider strainer.
- Hold it over the pan for a few seconds to let excess oil drip off.
- Transfer the fried Sel Roti to a plate lined with paper towels or a wire rack to drain further and cool slightly.
- Repeat with the remaining batter, ensuring the oil temperature stays consistent between batches.
Sel Roti Recipe - Best Nepali Sweet Roti Doughnuts
- Serves: 12 People
- Prepare Time: 20 minutes
- Cooking Time: 30 minutes
- Calories: -
- Difficulty: Medium
Welcome to the wonderful world of Sel Roti! If you're looking for unique recipes with roti or want to explore the cuisine of Nepal, you've landed in the right spot. Sel Roti is more than just a fried bread recipe; it's a traditional Nepali sweet ring-shaped fried rice bread/doughnut that holds a special place in the hearts (and stomachs!) of many. Often enjoyed during major festivals like Dashain and Tihar in Nepal, Sikkim, and Darjeeling, these crispy-on-the-outside, soft-and-chewy-on-the-inside delights are truly a taste of Nepal.
Forget your average easy doughnut recipe or store-bought doughnut mix recipe. Making Sel Roti at home is a rewarding experience that connects you with a rich cultural tradition. In this guide, we'll walk you through everything you need to know to master this delicious treat. We'll cover the best rice flour rice techniques, ideal fry oil temperature, and plenty of troubleshooting tips so you can create perfect Sel Roti every time. Get ready to impress your friends and family with this incredible breakfast snack recipe or anytime indulgence!
Ingredients
Directions
- Prep Steps
- Soak the Rice (The First Secret to Success!):
- Place the 2 cups of uncooked rice in a large bowl.
- Rinse the rice thoroughly under cold water until the water runs clear.
- Cover the rice with at least 2 inches of fresh, cold water.
- Let the rice soak for a minimum of 4-6 hours, or ideally overnight (8-12 hours). Soaking is crucial because it softens the rice grains, making them easier to grind into a very fine, smooth batter, which is key for Sel Roti's unique texture. It also aids in a slight fermentation, contributing to the flavor and puffiness.
- Drain & Grind the Rice:
- Once soaked, drain the rice completely using a fine-mesh strainer. Let it sit for about 10-15 minutes to remove as much excess water as possible.
- Transfer the drained rice to your grinder or high-powered blender.
- Add ½ cup of water (or a mix of water and milk) to the blender.
- Blend the rice until it forms a very smooth, fine paste. It should have the consistency of a thick pancake batter or a thin milkshake. There should be no grainy bits left. You might need to add a tablespoon or two more water, gradually, to achieve this smoothness, but be careful not to make it too thin!
- Batter Assembly
- Mix in the Sweet & Aromatic Goodness:
- Pour the ground rice batter into a large mixing bowl.
- Stir in the granulated sugar, melted ghee (or oil), cardamom powder, optional clove, and salt.
- Mix everything thoroughly until the sugar is fully dissolved and all ingredients are well combined. The batter should be smooth and pourable, but not watery. It should slowly drip from a spoon.
- Rest Period (Patience is a Virtue):
- Cover the bowl with a clean kitchen towel or plastic wrap.
- Let the batter rest at room temperature for at least 30 minutes, or up to 2-3 hours. This resting period allows the flavors to meld, the rice starch to fully hydrate, and a slight fermentation to begin, which contributes to the Sel Roti's characteristic texture and subtle tang. You'll notice tiny bubbles forming on the surface – that's a good sign!
- Frying
- Heat the Oil to Perfection:
- Pour enough vegetable oil or ghee into your deep pan/kadhai to reach a depth of 2-3 inches.
- Heat the oil over medium-high heat. The ideal fry oil temperature for Sel Roti is around 325-350°F (160-175°C).
- How to Test Heat: If you don't have a thermometer, drop a tiny dollop of batter into the oil. It should sizzle immediately and float to the surface within a few seconds, turning golden. If it browns too quickly, the oil is too hot; if it sinks and doesn't sizzle, it's not hot enough.
- Shaping into Rings (The Fun Part!):
- Carefully pour some batter into your funnel, piping bag, or squeeze bottle.
- Hold the shaping tool about 2-3 inches above the hot oil.
- In a continuous, circular motion, squeeze the batter into the hot oil, forming a ring shape. Aim for rings about 4-5 inches in diameter. You might need a little practice to get the perfect circle! You can fry 2-3 Sel Roti at a time, depending on the size of your pan, without overcrowding.
- Frying Each Side (Watch That Golden Glow!):
- Once the Sel Roti floats to the surface, it will start to puff up.
- Fry for about 1-2 minutes per side, or until it turns a beautiful golden brown color. Use your slotted spoon or a pair of tongs to gently flip them over.
- They should be evenly colored and feel slightly firm when done. This ensures they are crispy on the outside and cooked through on the inside.
- Draining & Cooling:
- Once golden brown, remove the Sel Roti from the oil using your slotted spoon or spider strainer.
- Hold it over the pan for a few seconds to let excess oil drip off.
- Transfer the fried Sel Roti to a plate lined with paper towels or a wire rack to drain further and cool slightly.
- Repeat with the remaining batter, ensuring the oil temperature stays consistent between batches.
You may also like


Hey there! I’m just someone who seriously loves good food and believes that cooking doesn’t have to be complicated to be amazing. Whether it’s a quick weeknight dinner or a cozy weekend meal, I’m all about sharing easy, tasty recipes that actually work.


