
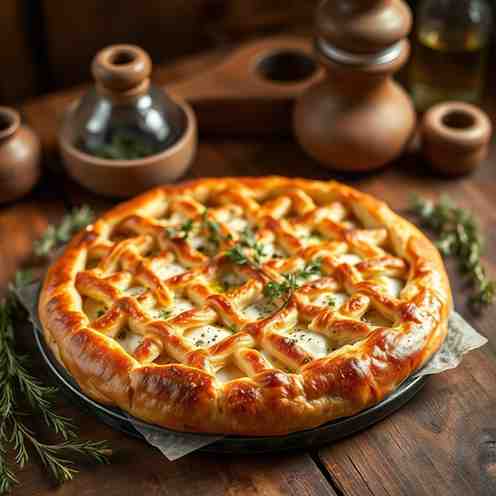
Torta ta' l-Irkotta - Best Vegetarian Ricotta Cheese Recipe!
Torta ta' l-Irkotta - Best Vegetarian Ricotta Cheese Recipe!

- Serves: 8 People
- Prepare Time: 30 minutes
- Cooking Time: 40 minutes
- Calories: -
- Difficulty: Easy
Craving something hearty, wholesome, and wonderfully flavorful? You've landed in the right spot! Get ready to dive into the delightful world of Torta ta' l-Irkotta, a true gem among Maltese best food traditions. This savory Maltese ricotta pie is a fantastic vegetarian recipe using ricotta cheese, baked to golden perfection in a crisp puff pastry shell.
Imagine biting into a slice: the pastry is wonderfully flaky, giving way to a creamy, herby filling that's lightly salty with a sweet hint of spring peas and fava beans. It’s comforting, satisfying, and incredibly versatile. Whether you're looking for an impressive main dish for a vegetarian dinner, a satisfying snack, or a delicious addition to your picnic spread, Torta ta' l-Irkotta fits the bill. It's fantastic served warm, but equally delicious at room temperature, making it one of the easiest and most impressive easy recipes using ricotta cheese you'll add to your repertoire. And with plenty of fresh ricotta cheese and eggs, it's naturally high in protein too!
Ingredients
Directions
- Prep the Oven & Pan: Preheat your oven to 400°F (200°C). Position an oven rack in the middle. Lightly grease a 9x13-inch baking dish (or a similar-volume oval/round dish) or line it with parchment paper for easy removal.
- Prep the Veggies: If using fresh fava beans, you'll need to shell them, then blanch them in boiling water for 1-2 minutes, drain, and peel off their outer skins. If using frozen fava beans, simply thaw them. Thaw the frozen peas as well.
- Drain & Mix the Filling: This is a crucial step for a great texture! Place the fresh ricotta cheese in a colander lined with cheesecloth or paper towels over a bowl. Let it drain for at least 15-30 minutes to remove excess liquid. Once drained, transfer the ricotta to a large mixing bowl. Add the 3 eggs, grated hard cheese, thawed peas, fava beans, chopped parsley, salt, and white black pepper. Mix everything together thoroughly until well combined. The mixture should be thick and scoopable, not watery.
- Line the Dish with Puff Pastry: On a lightly floured surface, carefully unfold one sheet of thawed puff pastry. Gently roll it out slightly larger than your baking dish, ensuring you have enough to create an overhang. Carefully transfer the pastry to your prepared baking dish, pressing it gently into the bottom and up the sides. Let the excess hang over the edges for now.
- Crisp-Bottom Protection Step: To prevent a soggy bottom crust, we'll give it a little head start! Prick the bottom of the puff pastry all over with a fork. You can either bake this empty crust for 5-7 minutes until just set, or brush the bottom lightly with some of the egg wash (from the 'For Finishing' section) to create a moisture barrier.
- Fill & Top: Pour the ricotta filling into the pastry-lined dish, spreading it evenly. Unfold the second sheet of puff pastry and gently roll it out to fit over the top of the tart. Carefully place it over the filling. Trim both the bottom and top pastry edges to leave about a 1-inch overhang. Press the edges together firmly to seal, then crimp them decoratively with a fork or your fingers. Cut a few small slits in the top pastry (venting) to allow steam to escape during baking.
- Bake: Brush the entire top of the tart generously with the remaining egg wash. This will give it that beautiful golden-brown shine. Place the dish in the preheated oven and bake for 35-45 minutes, or until the pastry is deeply golden brown and puffed, and the filling appears set.
- Cool and Slice: Once baked, remove the torta from the oven. It's tempting to slice right away, but letting it cool for at least 15-20 minutes is important. This allows the filling to fully set, ensuring clean, beautiful slices.
You may also like


Hey there! I’m just someone who seriously loves good food and believes that cooking doesn’t have to be complicated to be amazing. Whether it’s a quick weeknight dinner or a cozy weekend meal, I’m all about sharing easy, tasty recipes that actually work.


