
Unusual Dessert Recipe - Kosovo Flia e Mjaltit Honeycomb
Unusual Dessert Recipe - Kosovo Flia e Mjaltit Honeycomb
- Serves: 8 People
- Prepare Time: 30 minutes
- Cooking Time: 1 hour 15 m
- Calories: -
- Difficulty: Medium
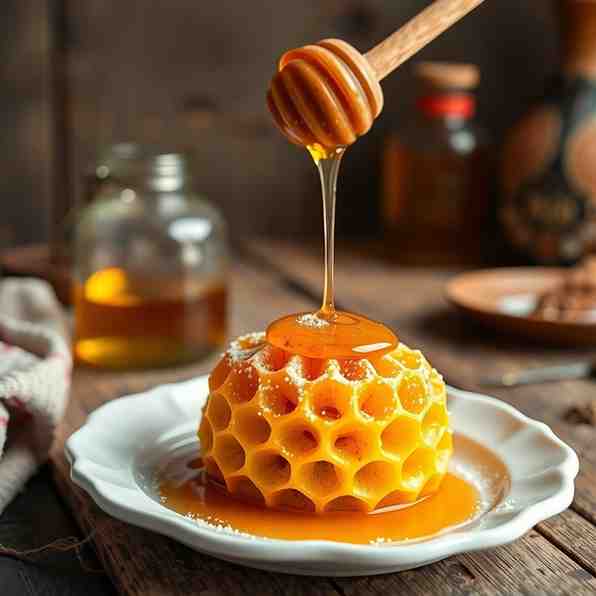
Looking for truly unusual dessert recipes that will wow your friends and family? Get ready to discover Kosovo Flija e Mjaltit, a unique dessert recipe that's as beautiful to look at as it is delicious dessert recipes to eat! This incredible dish, often called a "sun-ray" pancake cake, is one of the best dessert to bake if you're craving something different. Flija e Mjaltit is a layered, broiled pastry that features thin, tender "pancakes" brushed with a rich, creamy topping and finished with a sweet honey drizzle. What makes it so special is the combination of warm honey and cream with those perfectly crispy edges and incredibly tender layers, creating a mesmerizing honeycomb texture. While it might seem like a complex bake dessert recipe, it's actually quite simple to follow—it's just a slow, repetitive process, making it a truly rewarding dessert recipe using cream for anyone who loves good baking recipes and the best recipes to bake at home. So, if you're looking for good recipes for sweets that feel like an award winning dessert recipe, an a good dessert, or even a great dessert, and want to try the best thing to bake that’s truly out of the ordinary, let's dive into making this delightful treat right at home!
Flija (pronounced "flee-yah") is a traditional layered dish from Kosovo and Albania, famous for its distinctive "sun-ray" pattern. While it can be made savory, our recipe focuses on Flija e Mjaltit, the dessert version, which means "honey flija." It's typically served warm, generously drizzled with honey and a rich, creamy topping. You might see it spelled as flia, fli, or flija, and sometimes referred to with "saç/sac," which refers to the traditional dome-shaped metal lid used for baking it over an open fire—but don't worry, we'll be making this modern style in your home oven!
The magic behind flija's honeycomb appearance is all in the unique layering technique. Thin lines of batter are piped in a sun-ray or spoke pattern onto a hot pan, leaving gaps between them. These gaps are crucial: they allow the heat from the broiler to brown the edges of each batter "ray" while keeping the centers tender. In the next layer, you fill the gaps from the previous round, creating an interlocking pattern that gives flija its signature look and incredible texture—crispy where it's browned, soft and tender everywhere else. Imagine it as creating "pizza slices of batter with gaps between" that you fill in on the next pass.
To make Flija e Mjaltit doable and delicious in your US kitchen, here are the essential tools:
Broiler: This is key! You'll be using your oven's broiler for quick, intense heat. Make sure your oven rack is positioned about 6-8 inches from the broiler element for optimal browning without burning.
Best Pan: A 9–10 inch metal cake pan or springform pan is ideal. It MUST be broiler-safe. Avoid glass or ceramic dishes, as they can shatter under direct broiler heat.
Must-Have: A squeeze bottle (like for condiments) makes piping the batter super easy and precise. If you don't have one, a zip-top bag with a corner snipped off works in a pinch. You'll also need a pastry brush for applying the cream layer.
Nice-to-Have: A rotating pizza stone or a heavy-duty sheet pan placed underneath your cake pan can help stabilize the heat and ensure more even cooking, especially if your broiler has hot spots.
Ingredients
Directions
- Mix and Rest the BatterIn a large bowl, whisk together the flour, eggs, milk, salt, and optional sugar until completely smooth and lump-free. The "right thickness" for your batter should be like a very thin pancake batter or thick crepe batter – it should pour easily but not be watery. If it's too thick, add a little water, a tablespoon at a time, until it reaches the right consistency. If it’s too thin, whisk in a tablespoon of flour. Cover the bowl and let the batter rest at room temperature for at least 30 minutes. This resting period is crucial as it allows the flour to fully hydrate, resulting in a smoother batter that spreads more evenly and creates more tender layers.
- Mix the Cream LayerWhile the batter rests, prepare your cream layer. In a separate bowl, whisk together your chosen thick dairy (sour cream, Greek yogurt, or homemade kaymak substitute), the 1/2 cup of melted butter, and the pinch of salt. You want a smooth, brushable consistency—not watery, but easy to spread thinly.
- Set Up Your Broiler StationPosition an oven rack about 6-8 inches from your broiler element. Preheat your broiler to high. Place your 9-10 inch metal cake pan directly under the broiler for 2-3 minutes to preheat it slightly. This optional step helps the first layer cook quickly and evenly. Be careful when handling the hot pan!
- Build the First Layer (the Base)Remove the hot pan from the broiler. Pour about 1/4 cup of batter into the center of the pan. Quickly tilt and rotate the pan to spread the batter into a very thin, even base layer covering the entire bottom. Return the pan to the broiler and broil for 1-2 minutes until the batter is lightly browned and set, but not crispy.
- The Repeatable Layering Loop (This is the missing piece on competitor pages!)This is where the magic happens, and it's repetitive but not hard. Each round should take about 3-5 minutes. You'll repeat this loop until all your batter is gone, aiming for about 15-20 layers.
- Brush Cream: Remove the pan from the broiler. Using your pastry brush, lightly brush a very thin layer of the cream mixture over the entire cooked batter surface.
- Pipe Batter: Using your squeeze bottle (or snipped zip-top bag), pipe thin lines of batter in a "sun-ray" pattern, starting from the center and radiating outwards to the edge of the pan. Make sure to leave small gaps (about 1/4 inch) between each line. Don't pipe too much batter—these lines should be delicate.
- Broil & Rotate: Return the pan to the broiler. Broil for 2-3 minutes until the batter lines are speckled golden with a few deeper brown spots, especially at the edges. The batter should be fully set and lightly puffed.
- Rotate Pan: After each broiling round, carefully rotate the pan 90 degrees. This helps ensure even browning.
- Fill Gaps: For the next pass of batter, pipe your sun-ray lines into the gaps from the previous layer. This creates the interlocking honeycomb effect.
- Repeat: Continue this brush-pipe-broil-rotate-fill-gaps sequence until you've used all your batter and the pan is filled to a good height (typically 15-20 layers for a 9-inch pan).
- Final Crisp + SetOnce all the batter is used, give the entire flija a final short broil for 1-2 minutes to crisp the very top evenly and get a beautiful golden-brown finish. Remove from the oven and let it rest in the pan for at least 15-20 minutes. This rest time is crucial, allowing the layers to set and making it much easier to cut and for slices to hold together without falling apart.
- Honey + Cream ServingTo truly make your flija feel like a dessert:
- Warm Honey-Butter Drizzle: While the flija rests, gently warm the 1/2 cup honey with the 2 tablespoons melted butter in a small saucepan or microwave until fluid and combined.
- Dollop of Cream: Serve slices with an extra dollop of your chosen thick dairy (kaymak-style, clotted cream, or simply whipped cream for an extra treat!).
- How to Serve: Cut the flija like a pie into wedges. You can pull the layers apart with a fork if you want to admire the honeycomb texture, or simply enjoy it as a whole slice.
Unusual Dessert Recipe - Kosovo Flia e Mjaltit Honeycomb

- Serves: 8 People
- Prepare Time: 30 minutes
- Cooking Time: 1 hour 15 m
- Calories: -
- Difficulty: Medium
Looking for truly unusual dessert recipes that will wow your friends and family? Get ready to discover Kosovo Flija e Mjaltit, a unique dessert recipe that's as beautiful to look at as it is delicious dessert recipes to eat! This incredible dish, often called a "sun-ray" pancake cake, is one of the best dessert to bake if you're craving something different. Flija e Mjaltit is a layered, broiled pastry that features thin, tender "pancakes" brushed with a rich, creamy topping and finished with a sweet honey drizzle. What makes it so special is the combination of warm honey and cream with those perfectly crispy edges and incredibly tender layers, creating a mesmerizing honeycomb texture. While it might seem like a complex bake dessert recipe, it's actually quite simple to follow—it's just a slow, repetitive process, making it a truly rewarding dessert recipe using cream for anyone who loves good baking recipes and the best recipes to bake at home. So, if you're looking for good recipes for sweets that feel like an award winning dessert recipe, an a good dessert, or even a great dessert, and want to try the best thing to bake that’s truly out of the ordinary, let's dive into making this delightful treat right at home!
Flija (pronounced "flee-yah") is a traditional layered dish from Kosovo and Albania, famous for its distinctive "sun-ray" pattern. While it can be made savory, our recipe focuses on Flija e Mjaltit, the dessert version, which means "honey flija." It's typically served warm, generously drizzled with honey and a rich, creamy topping. You might see it spelled as flia, fli, or flija, and sometimes referred to with "saç/sac," which refers to the traditional dome-shaped metal lid used for baking it over an open fire—but don't worry, we'll be making this modern style in your home oven!
The magic behind flija's honeycomb appearance is all in the unique layering technique. Thin lines of batter are piped in a sun-ray or spoke pattern onto a hot pan, leaving gaps between them. These gaps are crucial: they allow the heat from the broiler to brown the edges of each batter "ray" while keeping the centers tender. In the next layer, you fill the gaps from the previous round, creating an interlocking pattern that gives flija its signature look and incredible texture—crispy where it's browned, soft and tender everywhere else. Imagine it as creating "pizza slices of batter with gaps between" that you fill in on the next pass.
To make Flija e Mjaltit doable and delicious in your US kitchen, here are the essential tools:
Broiler: This is key! You'll be using your oven's broiler for quick, intense heat. Make sure your oven rack is positioned about 6-8 inches from the broiler element for optimal browning without burning.
Best Pan: A 9–10 inch metal cake pan or springform pan is ideal. It MUST be broiler-safe. Avoid glass or ceramic dishes, as they can shatter under direct broiler heat.
Must-Have: A squeeze bottle (like for condiments) makes piping the batter super easy and precise. If you don't have one, a zip-top bag with a corner snipped off works in a pinch. You'll also need a pastry brush for applying the cream layer.
Nice-to-Have: A rotating pizza stone or a heavy-duty sheet pan placed underneath your cake pan can help stabilize the heat and ensure more even cooking, especially if your broiler has hot spots.
Ingredients
Directions
- Mix and Rest the BatterIn a large bowl, whisk together the flour, eggs, milk, salt, and optional sugar until completely smooth and lump-free. The "right thickness" for your batter should be like a very thin pancake batter or thick crepe batter – it should pour easily but not be watery. If it's too thick, add a little water, a tablespoon at a time, until it reaches the right consistency. If it’s too thin, whisk in a tablespoon of flour. Cover the bowl and let the batter rest at room temperature for at least 30 minutes. This resting period is crucial as it allows the flour to fully hydrate, resulting in a smoother batter that spreads more evenly and creates more tender layers.
- Mix the Cream LayerWhile the batter rests, prepare your cream layer. In a separate bowl, whisk together your chosen thick dairy (sour cream, Greek yogurt, or homemade kaymak substitute), the 1/2 cup of melted butter, and the pinch of salt. You want a smooth, brushable consistency—not watery, but easy to spread thinly.
- Set Up Your Broiler StationPosition an oven rack about 6-8 inches from your broiler element. Preheat your broiler to high. Place your 9-10 inch metal cake pan directly under the broiler for 2-3 minutes to preheat it slightly. This optional step helps the first layer cook quickly and evenly. Be careful when handling the hot pan!
- Build the First Layer (the Base)Remove the hot pan from the broiler. Pour about 1/4 cup of batter into the center of the pan. Quickly tilt and rotate the pan to spread the batter into a very thin, even base layer covering the entire bottom. Return the pan to the broiler and broil for 1-2 minutes until the batter is lightly browned and set, but not crispy.
- The Repeatable Layering Loop (This is the missing piece on competitor pages!)This is where the magic happens, and it's repetitive but not hard. Each round should take about 3-5 minutes. You'll repeat this loop until all your batter is gone, aiming for about 15-20 layers.
- Brush Cream: Remove the pan from the broiler. Using your pastry brush, lightly brush a very thin layer of the cream mixture over the entire cooked batter surface.
- Pipe Batter: Using your squeeze bottle (or snipped zip-top bag), pipe thin lines of batter in a "sun-ray" pattern, starting from the center and radiating outwards to the edge of the pan. Make sure to leave small gaps (about 1/4 inch) between each line. Don't pipe too much batter—these lines should be delicate.
- Broil & Rotate: Return the pan to the broiler. Broil for 2-3 minutes until the batter lines are speckled golden with a few deeper brown spots, especially at the edges. The batter should be fully set and lightly puffed.
- Rotate Pan: After each broiling round, carefully rotate the pan 90 degrees. This helps ensure even browning.
- Fill Gaps: For the next pass of batter, pipe your sun-ray lines into the gaps from the previous layer. This creates the interlocking honeycomb effect.
- Repeat: Continue this brush-pipe-broil-rotate-fill-gaps sequence until you've used all your batter and the pan is filled to a good height (typically 15-20 layers for a 9-inch pan).
- Final Crisp + SetOnce all the batter is used, give the entire flija a final short broil for 1-2 minutes to crisp the very top evenly and get a beautiful golden-brown finish. Remove from the oven and let it rest in the pan for at least 15-20 minutes. This rest time is crucial, allowing the layers to set and making it much easier to cut and for slices to hold together without falling apart.
- Honey + Cream ServingTo truly make your flija feel like a dessert:
- Warm Honey-Butter Drizzle: While the flija rests, gently warm the 1/2 cup honey with the 2 tablespoons melted butter in a small saucepan or microwave until fluid and combined.
- Dollop of Cream: Serve slices with an extra dollop of your chosen thick dairy (kaymak-style, clotted cream, or simply whipped cream for an extra treat!).
- How to Serve: Cut the flija like a pie into wedges. You can pull the layers apart with a fork if you want to admire the honeycomb texture, or simply enjoy it as a whole slice.
You may also like


Hey there! I’m just someone who seriously loves good food and believes that cooking doesn’t have to be complicated to be amazing. Whether it’s a quick weeknight dinner or a cozy weekend meal, I’m all about sharing easy, tasty recipes that actually work.


