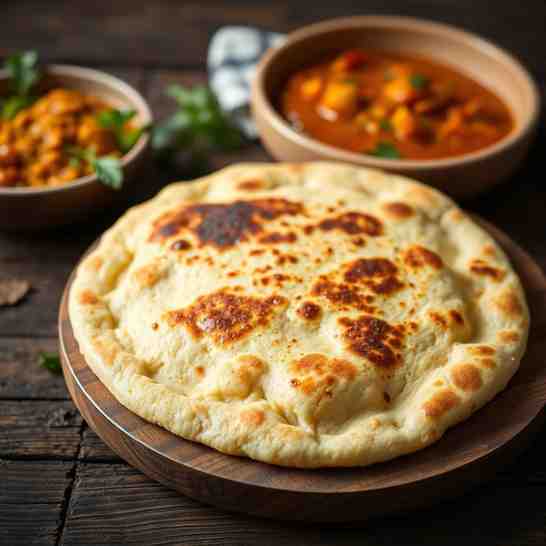
Roti Bread - Easy Homemade Flatbread Recipe
Roti Bread - Easy Homemade Flatbread Recipe
- Serves: 8 People
- Prepare Time: 20 minutes
- Cooking Time: 15 minutes
- Calories: -
- Difficulty: Easy
Welcome to the ultimate guide to making perfect roti bread right in your own kitchen! If you've ever dreamt of soft, pliable, and utterly delicious Indian flatbreads, you're in the right place. Roti, an unleavened Indian flatbread with roots deep in Indian kitchens, has been a staple across generations, cherished for its simplicity and versatility.
This canonical homemade bread recipe will teach you how to create rotis that are not just soft and pliable but also incredibly easy to make, using accessible ingredients like atta (whole wheat flour), water, and optional oil or salt. Whether you're a complete beginner looking for an easy bread recipe or a seasoned home cook aiming to perfect your technique, this recipe is designed to give you flawless results every single time. Get ready to wrap your favorite curried meats and vegetables in the most satisfying roti bread you've ever made!
Ingredients
Directions
- Make the Dough
- Combine Dry Ingredients: In a large mixing bowl, combine the atta (or flour blend) and optional salt. Give it a quick whisk to ensure everything is evenly distributed.
- Add Water Gradually: Make a well in the center of the flour. Gradually pour in about ¾ cup of the warm water, mixing with your hands or a spoon as you go.
- Form a Shaggy Dough: Continue to add more water, a tablespoon at a time, until the flour comes together into a shaggy, somewhat sticky dough. You might not need all the water.
- Knead the Dough: Transfer the dough to a clean, lightly floured surface. Knead for about 5-7 minutes. Use the heel of your hand to push the dough away from you, then fold it back over itself. If using optional oil/ghee, knead it in during the last minute.
- Check for Doneness: The dough is ready when it feels soft, smooth, and elastic. It should spring back slowly when gently poked. It shouldn't be too sticky or too dry.
- Resting the Dough
- Cover and Rest: Form the kneaded dough into a smooth ball. Place it back in the bowl, cover it with a damp cloth or plastic wrap, and let it rest at room temperature for at least 20-30 minutes. This resting period is crucial as it allows the gluten to relax, making the dough easier to roll and the rotis softer.
- Divide & Shape
- Divide Evenly: After resting, gently punch down the dough. Divide it into 8-10 equal portions. You can eyeball it or use a kitchen scale for precision.
- Roll into Balls: Take each portion and roll it between your palms to form a smooth, round ball. Ensure there are no cracks on the surface.
- Rolling
- Prepare Rolling Surface: Lightly dust your rolling pin and a clean, flat surface (like a rolling board or countertop) with a little dry flour.
- Flatten First: Take one dough ball, flatten it slightly with your palm, then place it on the floured surface.
- Roll into a Circle: Using your rolling pin, roll the dough out into a thin, even circle, about 6-7 inches in diameter. Use a gentle, circular motion, rotating the dough occasionally to keep it round. Aim for a consistent thickness; it should be thin but not transparent. Dust with more flour as needed to prevent sticking.
- Cooking on the Skillet
- Preheat Skillet: Heat a heavy-bottomed skillet, tawa (Indian griddle), or cast-iron pan over medium-high heat. It's properly heated when a drop of water sizzles and evaporates quickly.
- First Side Cook: Place a rolled roti onto the hot skillet. Cook for about 30-45 seconds, or until you see small bubbles appearing on the surface and the edges start to look dry.
- Flip and Cook Second Side: Flip the roti over. Cook the second side for another 30-60 seconds, or until you see more bubbles and light brown spots start to form.
- Puffing Technique (Optional): For a puffy roti, you can gently press on the edges of the roti with a clean cloth or spatula during the second side cook. Alternatively, if your stove has an open flame, you can carefully transfer the partially cooked roti directly onto the flame for a few seconds (using tongs) until it puffs up like a balloon. Be quick, as it can burn easily.
- Serve Immediately: Remove the cooked roti from the skillet. You can brush it with a little ghee or butter if desired. Stack them in a clean towel or an insulated container to keep them warm and soft until serving.
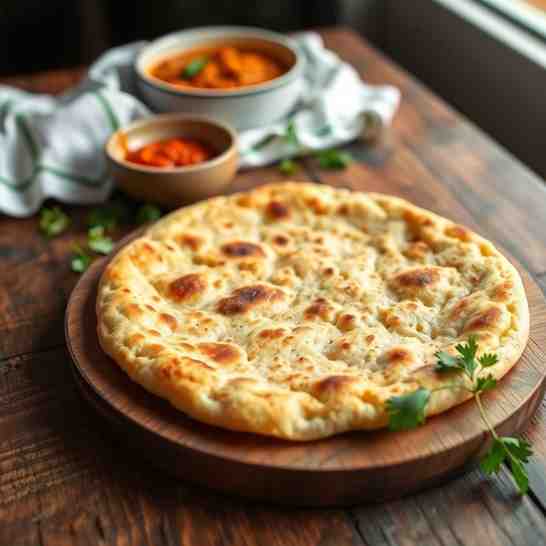
Roti Bread - Easy Homemade Flatbread Recipe

- Serves: 8 People
- Prepare Time: 20 minutes
- Cooking Time: 15 minutes
- Calories: -
- Difficulty: Easy
Welcome to the ultimate guide to making perfect roti bread right in your own kitchen! If you've ever dreamt of soft, pliable, and utterly delicious Indian flatbreads, you're in the right place. Roti, an unleavened Indian flatbread with roots deep in Indian kitchens, has been a staple across generations, cherished for its simplicity and versatility.
This canonical homemade bread recipe will teach you how to create rotis that are not just soft and pliable but also incredibly easy to make, using accessible ingredients like atta (whole wheat flour), water, and optional oil or salt. Whether you're a complete beginner looking for an easy bread recipe or a seasoned home cook aiming to perfect your technique, this recipe is designed to give you flawless results every single time. Get ready to wrap your favorite curried meats and vegetables in the most satisfying roti bread you've ever made!
Ingredients
Directions
- Make the Dough
- Combine Dry Ingredients: In a large mixing bowl, combine the atta (or flour blend) and optional salt. Give it a quick whisk to ensure everything is evenly distributed.
- Add Water Gradually: Make a well in the center of the flour. Gradually pour in about ¾ cup of the warm water, mixing with your hands or a spoon as you go.
- Form a Shaggy Dough: Continue to add more water, a tablespoon at a time, until the flour comes together into a shaggy, somewhat sticky dough. You might not need all the water.
- Knead the Dough: Transfer the dough to a clean, lightly floured surface. Knead for about 5-7 minutes. Use the heel of your hand to push the dough away from you, then fold it back over itself. If using optional oil/ghee, knead it in during the last minute.
- Check for Doneness: The dough is ready when it feels soft, smooth, and elastic. It should spring back slowly when gently poked. It shouldn't be too sticky or too dry.
- Resting the Dough
- Cover and Rest: Form the kneaded dough into a smooth ball. Place it back in the bowl, cover it with a damp cloth or plastic wrap, and let it rest at room temperature for at least 20-30 minutes. This resting period is crucial as it allows the gluten to relax, making the dough easier to roll and the rotis softer.
- Divide & Shape
- Divide Evenly: After resting, gently punch down the dough. Divide it into 8-10 equal portions. You can eyeball it or use a kitchen scale for precision.
- Roll into Balls: Take each portion and roll it between your palms to form a smooth, round ball. Ensure there are no cracks on the surface.
- Rolling
- Prepare Rolling Surface: Lightly dust your rolling pin and a clean, flat surface (like a rolling board or countertop) with a little dry flour.
- Flatten First: Take one dough ball, flatten it slightly with your palm, then place it on the floured surface.
- Roll into a Circle: Using your rolling pin, roll the dough out into a thin, even circle, about 6-7 inches in diameter. Use a gentle, circular motion, rotating the dough occasionally to keep it round. Aim for a consistent thickness; it should be thin but not transparent. Dust with more flour as needed to prevent sticking.
- Cooking on the Skillet
- Preheat Skillet: Heat a heavy-bottomed skillet, tawa (Indian griddle), or cast-iron pan over medium-high heat. It's properly heated when a drop of water sizzles and evaporates quickly.
- First Side Cook: Place a rolled roti onto the hot skillet. Cook for about 30-45 seconds, or until you see small bubbles appearing on the surface and the edges start to look dry.
- Flip and Cook Second Side: Flip the roti over. Cook the second side for another 30-60 seconds, or until you see more bubbles and light brown spots start to form.
- Puffing Technique (Optional): For a puffy roti, you can gently press on the edges of the roti with a clean cloth or spatula during the second side cook. Alternatively, if your stove has an open flame, you can carefully transfer the partially cooked roti directly onto the flame for a few seconds (using tongs) until it puffs up like a balloon. Be quick, as it can burn easily.
- Serve Immediately: Remove the cooked roti from the skillet. You can brush it with a little ghee or butter if desired. Stack them in a clean towel or an insulated container to keep them warm and soft until serving.
You may also like


Hey there! I’m just someone who seriously loves good food and believes that cooking doesn’t have to be complicated to be amazing. Whether it’s a quick weeknight dinner or a cozy weekend meal, I’m all about sharing easy, tasty recipes that actually work.