
Stewed Chicken Thighs - Georgian Chakhokhbili Recipe
Stewed Chicken Thighs - Georgian Chakhokhbili Recipe

- Serves: 6 People
- Prepare Time: 20 minutes
- Cooking Time: 45 minutes
- Calories: -
- Difficulty: Medium
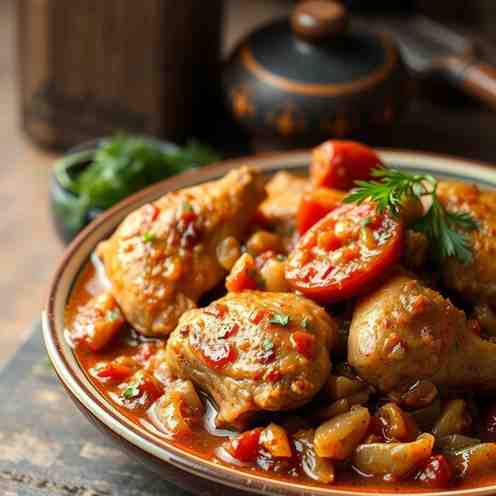
Welcome to the heart of Georgian comfort food! If you're looking for a truly special dish, you've found it: Chakhokhbili. This isn't just any stewed chicken thighs recipe; it's an authentic Georgian chicken stew, rich with a vibrant tomato sauce and fragrant fresh herbs. Forget sifting through countless variations – this guide provides the one, definitive Chakhokhbili recipe that captures the soul of Georgian cuisine while being perfectly practical for your home kitchen. We'll walk you through every step, ensuring you create a dish that's both deeply traditional and incredibly delicious. Get ready to impress your taste buds with layers of flavor, from perfectly seared chicken and sauce to the bright finish of fresh herbs.
Ingredients
Directions
- Dry Sear the Chicken for Maximum Flavor: Pat your chicken thighs thoroughly dry with paper towels. This is a critical step for achieving a beautiful, crispy skin and rendering out excess fat, which builds incredible flavor. Heat the neutral oil in your Dutch oven over medium-high heat. Once hot, add the chicken thighs skin-side down in a single layer, working in batches if necessary to avoid overcrowding. Sear for 8-10 minutes until the skin is deeply golden brown and crispy. Flip and sear for another 3-5 minutes on the other side. Remove the chicken to a plate, leaving the rendered fat in the pot.
- Sweat Aromatics Properly: Reduce the heat to medium. Add the chopped onions to the pot with the rendered chicken fat. Cook, stirring occasionally, for 8-10 minutes until the onions are soft, translucent, and slightly caramelized. This slow sweating extracts their sweetness and forms a foundational layer of flavor for your homemade sauce for chicken. Add the minced garlic and cook for another minute until fragrant, being careful not to burn it.
- Build the Rich Tomato Sauce: Stir in the tomato paste and cook for 2-3 minutes, stirring constantly. This step, known as "cooking off" the tomato paste, deepens its flavor and removes any metallic taste. Pour in the crushed tomatoes and chicken broth, stirring well to combine everything. Add the ground coriander, fenugreek (if using), cayenne pepper, salt, and black pepper. Bring the sauce to cook chicken in to a gentle simmer.
- Simulate Authentic Low-and-Slow Simmer: Return the seared chicken and herbs (along with any accumulated juices) to the Dutch oven, nestling them into the sauce. Ensure the chicken is mostly submerged. Bring the stew back to a gentle simmer, then reduce the heat to low, cover, and cook for 30-35 minutes. The goal is a tender, fall-off-the-bone texture. Check for doneness – the internal temperature of the chicken should reach 165°F (74°C).
- Finish with a Burst of Fresh Herbs: Once the chicken is cooked through and tender, remove the pot from the heat. Stir in the chopped cilantro, parsley, dill, mint, and white wine vinegar. The key here is to add the herbs after cooking to preserve their vibrant color and fresh aroma. Taste and adjust seasoning as needed – you might want a little more salt, pepper, or a touch more vinegar for brightness.
Stewed Chicken Thighs - Georgian Chakhokhbili Recipe

- Serves: 6 People
- Prepare Time: 20 minutes
- Cooking Time: 45 minutes
- Calories: -
- Difficulty: Medium
Welcome to the heart of Georgian comfort food! If you're looking for a truly special dish, you've found it: Chakhokhbili. This isn't just any stewed chicken thighs recipe; it's an authentic Georgian chicken stew, rich with a vibrant tomato sauce and fragrant fresh herbs. Forget sifting through countless variations – this guide provides the one, definitive Chakhokhbili recipe that captures the soul of Georgian cuisine while being perfectly practical for your home kitchen. We'll walk you through every step, ensuring you create a dish that's both deeply traditional and incredibly delicious. Get ready to impress your taste buds with layers of flavor, from perfectly seared chicken and sauce to the bright finish of fresh herbs.
Ingredients
Directions
- Dry Sear the Chicken for Maximum Flavor: Pat your chicken thighs thoroughly dry with paper towels. This is a critical step for achieving a beautiful, crispy skin and rendering out excess fat, which builds incredible flavor. Heat the neutral oil in your Dutch oven over medium-high heat. Once hot, add the chicken thighs skin-side down in a single layer, working in batches if necessary to avoid overcrowding. Sear for 8-10 minutes until the skin is deeply golden brown and crispy. Flip and sear for another 3-5 minutes on the other side. Remove the chicken to a plate, leaving the rendered fat in the pot.
- Sweat Aromatics Properly: Reduce the heat to medium. Add the chopped onions to the pot with the rendered chicken fat. Cook, stirring occasionally, for 8-10 minutes until the onions are soft, translucent, and slightly caramelized. This slow sweating extracts their sweetness and forms a foundational layer of flavor for your homemade sauce for chicken. Add the minced garlic and cook for another minute until fragrant, being careful not to burn it.
- Build the Rich Tomato Sauce: Stir in the tomato paste and cook for 2-3 minutes, stirring constantly. This step, known as "cooking off" the tomato paste, deepens its flavor and removes any metallic taste. Pour in the crushed tomatoes and chicken broth, stirring well to combine everything. Add the ground coriander, fenugreek (if using), cayenne pepper, salt, and black pepper. Bring the sauce to cook chicken in to a gentle simmer.
- Simulate Authentic Low-and-Slow Simmer: Return the seared chicken and herbs (along with any accumulated juices) to the Dutch oven, nestling them into the sauce. Ensure the chicken is mostly submerged. Bring the stew back to a gentle simmer, then reduce the heat to low, cover, and cook for 30-35 minutes. The goal is a tender, fall-off-the-bone texture. Check for doneness – the internal temperature of the chicken should reach 165°F (74°C).
- Finish with a Burst of Fresh Herbs: Once the chicken is cooked through and tender, remove the pot from the heat. Stir in the chopped cilantro, parsley, dill, mint, and white wine vinegar. The key here is to add the herbs after cooking to preserve their vibrant color and fresh aroma. Taste and adjust seasoning as needed – you might want a little more salt, pepper, or a touch more vinegar for brightness.
You may also like


Hey there! I’m just someone who seriously loves good food and believes that cooking doesn’t have to be complicated to be amazing. Whether it’s a quick weeknight dinner or a cozy weekend meal, I’m all about sharing easy, tasty recipes that actually work.


