
Buticha - Vegan Scrambled Egg Alternative
Buticha - Vegan Scrambled Egg Alternative

- Serves: 4 People
- Prepare Time: 20 minutes
- Cooking Time: 25 minutes
- Calories: -
- Difficulty: Easy
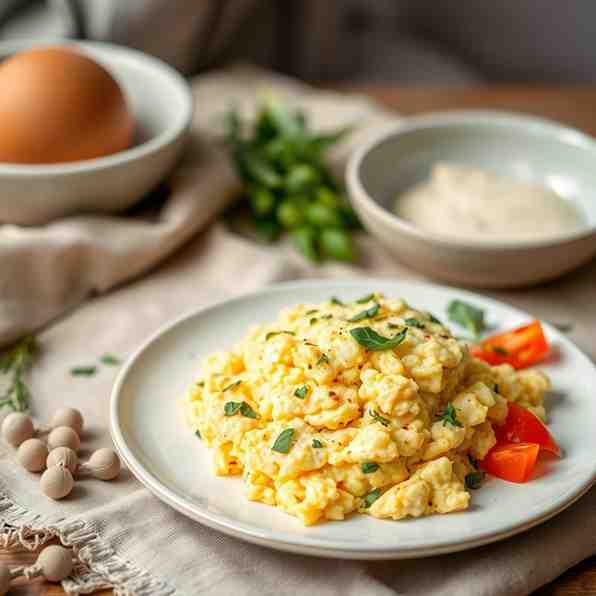
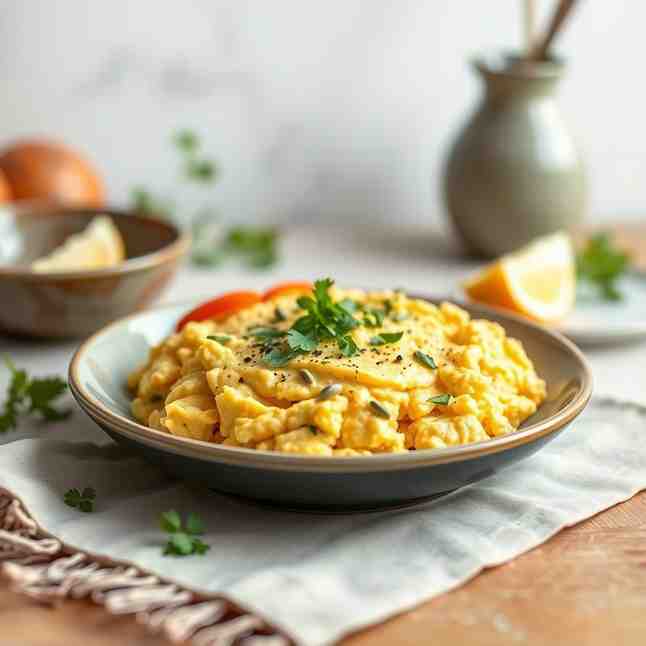
Ready for a game-changer in your kitchen? Meet Buticha (pronounced boo-TEE-chah), an incredible Ethiopian chickpea flour salad that’s quickly becoming a favorite vegan scrambled egg alternative! Imagine a dish that’s creamy, savory, and incredibly satisfying, with a texture that perfectly mimics fluffy scrambled eggs, but without any actual eggs. It’s got a delightful tang from lemon, a gentle warmth from ginger and turmeric, and a lovely crunch from fresh onions and jalapeños. Buticha is beloved in Ethiopia for its versatility and deliciousness, and once you try it, you’ll understand why. It's not just a tasty dip; it's a protein-rich, meatless egg recipe that’s fantastic for meal prep and fits perfectly into any vegan cooking recipe repertoire.
So, what exactly is Buticha? At its heart, it's a vibrant Ethiopian chickpea salad or dip, traditionally served cold. While some folks might compare it to hummus because of its chickpea base, Buticha has a unique texture and flavor profile all its own. Instead of mashed cooked chickpeas, it uses chickpea flour to create a firm, yet tender, base. You'll often find Buticha served alongside injera (a spongy flatbread) or as a complementary side dish to larger Ethiopian meals.
What makes it work so well as a vegan scrambled egg alternative, without trying to be a "fake egg" recipe? It's all about the magic of chickpea flour! When cooked and then chilled, the chickpea base firms up beautifully. A simple mash with a fork then creates those distinct, satisfying "curds" that look and feel just like scrambled eggs. You're in control of the texture too – whether you prefer small, delicate curds or larger, chunkier ones, you can adjust the mashing and even the moisture level to get it just right. The chill time is key here, allowing the mixture to set up perfectly for that ultimate "scrambled" finish. Get ready to dive into one of the most delicious ethiopian meals recipes you'll ever make!
Ingredients
Directions
- Make the Chickpea Base (Smooth, No Lumps) In your medium saucepan, combine the chickpea flour and cool water. Whisk vigorously until you have a completely smooth, lump-free slurry. Place the saucepan over medium-low heat. Continue to whisk or stir constantly as the mixture gently heats and begins to thicken. It will gradually transform from a milky liquid into a thick, glossy paste.
- Cook Out the Raw Flavor Once the mixture has thickened significantly and is pulling away from the sides of the pan, reduce the heat to low. Keep stirring constantly with your silicone spatula or wooden spoon for another 8-10 minutes. This step is crucial and often where other recipes are vague! You're looking for a change in smell – the raw flour aroma will dissipate, replaced by a slightly nutty, cooked scent. The color might deepen slightly, and the mixture will become even more pliable and less sticky. If you have an instant-read thermometer, it should reach about 180-190°F (82-88°C). This ensures the chickpea flour is fully cooked and digestible, preventing any bitter or "raw flour" taste.
- Chill to Firm Once fully cooked, immediately transfer the hot chickpea mixture to a clean mixing bowl. Use your spatula to spread it out evenly, creating a relatively flat surface. This helps it cool faster. Place the bowl in the refrigerator and chill for at least 1-2 hours, or until the mixture is firm enough to scoop and hold its shape. The colder it is, the better the "scramble" texture will be.
- Mash into “Scramble” Texture Once thoroughly chilled and firm, grab a fork. Begin to gently mash the chickpea base in the bowl. You can control the size of your "curds" here: mash more vigorously for smaller, finer curds, or lightly for larger, chunkier pieces, mimicking your favorite scrambled egg how to make style. The goal is a creamy-curdy texture, not a smooth paste.
- Finish + Season Now for the flavor! Add the olive oil, fresh lemon juice, finely chopped onion, seeded and finely chopped jalapeño, optional chopped tomato, ground ginger, ground turmeric, salt, and black pepper to the mashed chickpea base. Fold all the ingredients together gently until everything is well combined. Taste and adjust seasonings as needed. You're aiming for a creamy-curdy texture that's packed with flavor, not watery.
- Serve Your delicious Buticha is ready to enjoy! Traditionally, it's served with injera. However, it's also fantastic as a dip or spread with fresh veggies, pita bread, or crackers. It makes for a wonderful main vegan dish or a healthy side.
Buticha - Vegan Scrambled Egg Alternative
- Serves: 4 People
- Prepare Time: 20 minutes
- Cooking Time: 25 minutes
- Calories: -
- Difficulty: Easy
Ready for a game-changer in your kitchen? Meet Buticha (pronounced boo-TEE-chah), an incredible Ethiopian chickpea flour salad that’s quickly becoming a favorite vegan scrambled egg alternative! Imagine a dish that’s creamy, savory, and incredibly satisfying, with a texture that perfectly mimics fluffy scrambled eggs, but without any actual eggs. It’s got a delightful tang from lemon, a gentle warmth from ginger and turmeric, and a lovely crunch from fresh onions and jalapeños. Buticha is beloved in Ethiopia for its versatility and deliciousness, and once you try it, you’ll understand why. It's not just a tasty dip; it's a protein-rich, meatless egg recipe that’s fantastic for meal prep and fits perfectly into any vegan cooking recipe repertoire.
So, what exactly is Buticha? At its heart, it's a vibrant Ethiopian chickpea salad or dip, traditionally served cold. While some folks might compare it to hummus because of its chickpea base, Buticha has a unique texture and flavor profile all its own. Instead of mashed cooked chickpeas, it uses chickpea flour to create a firm, yet tender, base. You'll often find Buticha served alongside injera (a spongy flatbread) or as a complementary side dish to larger Ethiopian meals.
What makes it work so well as a vegan scrambled egg alternative, without trying to be a "fake egg" recipe? It's all about the magic of chickpea flour! When cooked and then chilled, the chickpea base firms up beautifully. A simple mash with a fork then creates those distinct, satisfying "curds" that look and feel just like scrambled eggs. You're in control of the texture too – whether you prefer small, delicate curds or larger, chunkier ones, you can adjust the mashing and even the moisture level to get it just right. The chill time is key here, allowing the mixture to set up perfectly for that ultimate "scrambled" finish. Get ready to dive into one of the most delicious ethiopian meals recipes you'll ever make!
Ingredients
Directions
- Make the Chickpea Base (Smooth, No Lumps) In your medium saucepan, combine the chickpea flour and cool water. Whisk vigorously until you have a completely smooth, lump-free slurry. Place the saucepan over medium-low heat. Continue to whisk or stir constantly as the mixture gently heats and begins to thicken. It will gradually transform from a milky liquid into a thick, glossy paste.
- Cook Out the Raw Flavor Once the mixture has thickened significantly and is pulling away from the sides of the pan, reduce the heat to low. Keep stirring constantly with your silicone spatula or wooden spoon for another 8-10 minutes. This step is crucial and often where other recipes are vague! You're looking for a change in smell – the raw flour aroma will dissipate, replaced by a slightly nutty, cooked scent. The color might deepen slightly, and the mixture will become even more pliable and less sticky. If you have an instant-read thermometer, it should reach about 180-190°F (82-88°C). This ensures the chickpea flour is fully cooked and digestible, preventing any bitter or "raw flour" taste.
- Chill to Firm Once fully cooked, immediately transfer the hot chickpea mixture to a clean mixing bowl. Use your spatula to spread it out evenly, creating a relatively flat surface. This helps it cool faster. Place the bowl in the refrigerator and chill for at least 1-2 hours, or until the mixture is firm enough to scoop and hold its shape. The colder it is, the better the "scramble" texture will be.
- Mash into “Scramble” Texture Once thoroughly chilled and firm, grab a fork. Begin to gently mash the chickpea base in the bowl. You can control the size of your "curds" here: mash more vigorously for smaller, finer curds, or lightly for larger, chunkier pieces, mimicking your favorite scrambled egg how to make style. The goal is a creamy-curdy texture, not a smooth paste.
- Finish + Season Now for the flavor! Add the olive oil, fresh lemon juice, finely chopped onion, seeded and finely chopped jalapeño, optional chopped tomato, ground ginger, ground turmeric, salt, and black pepper to the mashed chickpea base. Fold all the ingredients together gently until everything is well combined. Taste and adjust seasonings as needed. You're aiming for a creamy-curdy texture that's packed with flavor, not watery.
- Serve Your delicious Buticha is ready to enjoy! Traditionally, it's served with injera. However, it's also fantastic as a dip or spread with fresh veggies, pita bread, or crackers. It makes for a wonderful main vegan dish or a healthy side.
You may also like


Hey there! I’m just someone who seriously loves good food and believes that cooking doesn’t have to be complicated to be amazing. Whether it’s a quick weeknight dinner or a cozy weekend meal, I’m all about sharing easy, tasty recipes that actually work.


