 Today | CulinaryCreationss alt=")
Easy Hawaiian Food - Make ʻUlu Poi (Breadfruit) Today
Easy Hawaiian Food - Make ʻUlu Poi (Breadfruit) Today
- Serves: 6 People
- Prepare Time: 25 minutes
- Cooking Time: 45 minutes
- Calories: -
- Difficulty: Easy
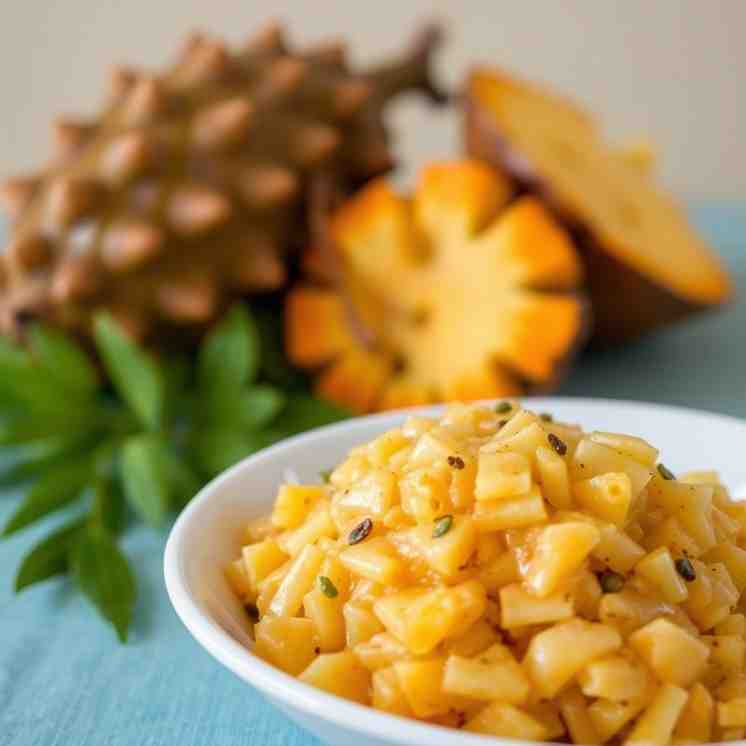
Aloha, friends! Are you ready to dive into the heart of easy Hawaiian food? Today, we're exploring a beloved staple that holds deep cultural significance: poi. While traditionally made from taro (kalo), we're going to guide you through making a delightful, modern twist: ʻUlu Poi, crafted from breadfruit. This isn't just a recipe; it's an invitation to connect with the rich culinary heritage of Hawaiʻi.
Poi is, at its core, a simple yet profoundly important food in Hawaiian culture. Traditionally, it's a paste made from cooked, pounded taro root, thinned with water to various consistencies. Think of it as a smooth, starchy, and subtly tangy paste – a true taste of the islands. Our ʻUlu Poi, on the other hand, uses cooked breadfruit (`ulu` in Hawaiian) to create a similar poi-style starch. It's wonderfully mild, starchy, and incredibly smooth, offering a slightly lighter flavor profile that some describe as a "buttery potato."
This recipe for easy Hawaiian dishes is designed for everyone, from absolute beginners to seasoned home cooks. You'll learn how to transform a humble breadfruit into a versatile, nourishing dish. Get ready to enjoy a taste of Hawaiʻi!
In everyday language, poi is simply cooked starch—most commonly taro—that's been pounded until incredibly smooth, then thinned with water. It's a staple food, much like rice or potatoes are in other cultures, and has been a cornerstone of the Hawaiian diet for centuries. Its mild flavor makes it a perfect accompaniment to savory dishes, balancing richer flavors.
This traditional way of describing poi refers to its thickness:
One-finger poi: Very thick, almost like a soft mashed potato. You'd need one finger to scoop it out of the bowl.
Two-finger poi: A bit looser, spoonable, and forms a slow ribbon when stirred. You'd need two fingers to scoop it.
Three-finger poi: The loosest, most pourable consistency, easily eaten with a spoon or three fingers.
It's important to understand the distinction between traditional Hawaiian poi and our ʻulu poi.
Traditional Hawaiian Poi: This is the original, revered staple, made exclusively from `kalo` (taro). Taro poi has an earthy, slightly tangy flavor and can range in color from purple to gray depending on the taro variety. It's deeply intertwined with Hawaiian identity, history, and agricultural practices.
Breadfruit Poi (`ʻUlu Poi`): This is a modern, alternative poi-style starch that utilizes the potato-like texture of `ʻulu` (breadfruit). It's not a replacement for traditional taro poi but rather a delicious way to prepare breadfruit in a similar smooth, starchy style.
Flavor & Texture Expectations:
Taro Poi: Known for its distinct earthy flavor, often with a slight sour tang as it ferments. Its color varies.
ʻUlu Poi: Lighter in flavor, very mild, and when made from mature breadfruit, can have a pleasant, slightly "buttery potato" taste. It doesn't typically develop the same strong tang as fermented taro poi.
When Breadfruit Works Best: For poi, you'll want to use mature breadfruit – firm, not fully ripe or soft. Think of it like a starchy potato, not a sweet fruit.
Making ʻulu poi is a rewarding experience! While traditional poi is made with a poi board and pounder, we'll focus on modern kitchen tools to make this an easy Hawaiian food experience for you.
The "best" tool for a silky-smooth ʻulu poi is a food processor or a strong blender. These make quick work of pounding the breadfruit. For those interested in a more traditional approach, a poi board and pounder can also be used, though they require more effort and time. You'll also need a large bowl, a spatula, and a measuring cup.
Ingredients
Directions
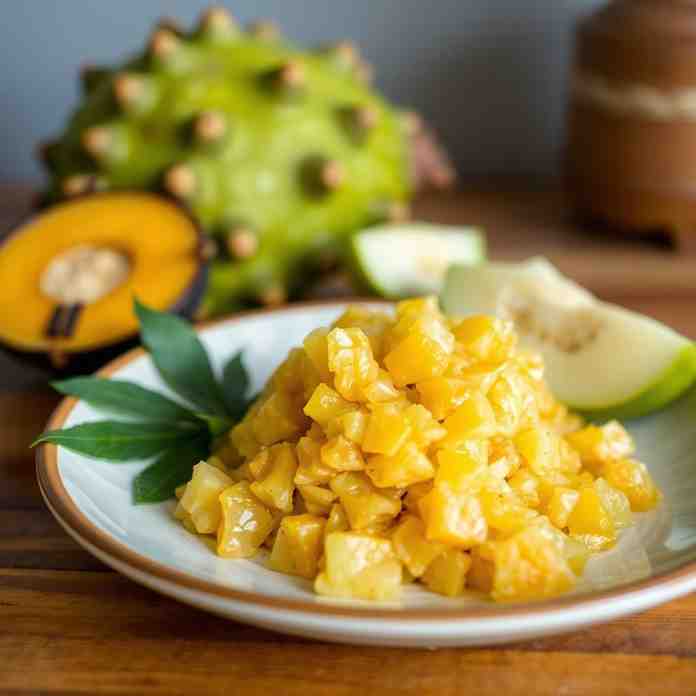
- Pick the Right ʻUlu: Start with a mature and firm breadfruit. It should feel heavy for its size and have a slightly rough, green skin. Avoid breadfruit that is soft or has started to turn yellow, as these are ripe and will have a sweeter, less starchy texture unsuitable for poi.
- Prep the Breadfruit (No Fear Section): First, rinse your breadfruit thoroughly. Breadfruit sap can be sticky, so a good trick is to lightly oil your knife before cutting. Cut the breadfruit into quarters or eighths, depending on its size, and carefully remove the fibrous core. Don't worry if there's a little sap; it's harmless and washes off easily with oil or soap.
- Cook Until Mash-Soft: Steaming is the preferred method as it preserves the flavor and texture best. Place the breadfruit chunks in a steamer basket over boiling water, cover, and steam for 30-45 minutes, or until a fork slides into the flesh easily without resistance. It should be very tender, like a baked potato. Once cooked, let it cool just enough so you can handle it comfortably.
- Peel + Portion: Once cooled, the skin should peel off easily. Remove all skin and cut the cooked breadfruit flesh into smaller, manageable chunks, roughly 1-2 inches in size.
- Make the Base Paste: Transfer the breadfruit chunks to your food processor or strong blender. Process or blend until a thick, smooth paste forms. It's crucial to get it smooth before adding much water. If using a traditional pounder, pound the cooked breadfruit thoroughly until completely smooth, adding very little water at this stage if needed to aid pounding.
- Thin to Your “Finger” Level: Now, slowly add water, a tablespoon or two at a time, while continuing to blend or pound. Stop, scrape down the sides, and let the poi rest for 2 minutes. This allows the water to fully absorb and the texture to stabilize. Continue adding water and blending until you reach your desired "finger" consistency (see guide below).
- Salt + Final Texture Check: Once you've achieved your preferred consistency, stir in the Hawaiian salt or sea salt. Taste and adjust if needed. The final poi should be smooth, glossy, and completely free of lumps.
- Consistency Guide (High Value, Highly Skimmable):
- One-finger: Thick and dense, like soft mashed potatoes. Great for scooping with your fingers or a sturdy spoon.
- Two-finger: Looser and spoonable, slowly forming a ribbon when you lift your spoon. A versatile, popular texture.
- Three-finger: The most liquid consistency, easily pourable and ideal for drinking or serving in a bowl with other dishes.
Easy Hawaiian Food - Make ʻUlu Poi (Breadfruit) Today
-Today.jpg)
- Serves: 6 People
- Prepare Time: 25 minutes
- Cooking Time: 45 minutes
- Calories: -
- Difficulty: Easy
Aloha, friends! Are you ready to dive into the heart of easy Hawaiian food? Today, we're exploring a beloved staple that holds deep cultural significance: poi. While traditionally made from taro (kalo), we're going to guide you through making a delightful, modern twist: ʻUlu Poi, crafted from breadfruit. This isn't just a recipe; it's an invitation to connect with the rich culinary heritage of Hawaiʻi.
Poi is, at its core, a simple yet profoundly important food in Hawaiian culture. Traditionally, it's a paste made from cooked, pounded taro root, thinned with water to various consistencies. Think of it as a smooth, starchy, and subtly tangy paste – a true taste of the islands. Our ʻUlu Poi, on the other hand, uses cooked breadfruit (`ulu` in Hawaiian) to create a similar poi-style starch. It's wonderfully mild, starchy, and incredibly smooth, offering a slightly lighter flavor profile that some describe as a "buttery potato."
This recipe for easy Hawaiian dishes is designed for everyone, from absolute beginners to seasoned home cooks. You'll learn how to transform a humble breadfruit into a versatile, nourishing dish. Get ready to enjoy a taste of Hawaiʻi!
In everyday language, poi is simply cooked starch—most commonly taro—that's been pounded until incredibly smooth, then thinned with water. It's a staple food, much like rice or potatoes are in other cultures, and has been a cornerstone of the Hawaiian diet for centuries. Its mild flavor makes it a perfect accompaniment to savory dishes, balancing richer flavors.
This traditional way of describing poi refers to its thickness:
One-finger poi: Very thick, almost like a soft mashed potato. You'd need one finger to scoop it out of the bowl.
Two-finger poi: A bit looser, spoonable, and forms a slow ribbon when stirred. You'd need two fingers to scoop it.
Three-finger poi: The loosest, most pourable consistency, easily eaten with a spoon or three fingers.
It's important to understand the distinction between traditional Hawaiian poi and our ʻulu poi.
Traditional Hawaiian Poi: This is the original, revered staple, made exclusively from `kalo` (taro). Taro poi has an earthy, slightly tangy flavor and can range in color from purple to gray depending on the taro variety. It's deeply intertwined with Hawaiian identity, history, and agricultural practices.
Breadfruit Poi (`ʻUlu Poi`): This is a modern, alternative poi-style starch that utilizes the potato-like texture of `ʻulu` (breadfruit). It's not a replacement for traditional taro poi but rather a delicious way to prepare breadfruit in a similar smooth, starchy style.
Flavor & Texture Expectations:
Taro Poi: Known for its distinct earthy flavor, often with a slight sour tang as it ferments. Its color varies.
ʻUlu Poi: Lighter in flavor, very mild, and when made from mature breadfruit, can have a pleasant, slightly "buttery potato" taste. It doesn't typically develop the same strong tang as fermented taro poi.
When Breadfruit Works Best: For poi, you'll want to use mature breadfruit – firm, not fully ripe or soft. Think of it like a starchy potato, not a sweet fruit.
Making ʻulu poi is a rewarding experience! While traditional poi is made with a poi board and pounder, we'll focus on modern kitchen tools to make this an easy Hawaiian food experience for you.
The "best" tool for a silky-smooth ʻulu poi is a food processor or a strong blender. These make quick work of pounding the breadfruit. For those interested in a more traditional approach, a poi board and pounder can also be used, though they require more effort and time. You'll also need a large bowl, a spatula, and a measuring cup.
Ingredients
Directions
- Pick the Right ʻUlu: Start with a mature and firm breadfruit. It should feel heavy for its size and have a slightly rough, green skin. Avoid breadfruit that is soft or has started to turn yellow, as these are ripe and will have a sweeter, less starchy texture unsuitable for poi.
- Prep the Breadfruit (No Fear Section): First, rinse your breadfruit thoroughly. Breadfruit sap can be sticky, so a good trick is to lightly oil your knife before cutting. Cut the breadfruit into quarters or eighths, depending on its size, and carefully remove the fibrous core. Don't worry if there's a little sap; it's harmless and washes off easily with oil or soap.
- Cook Until Mash-Soft: Steaming is the preferred method as it preserves the flavor and texture best. Place the breadfruit chunks in a steamer basket over boiling water, cover, and steam for 30-45 minutes, or until a fork slides into the flesh easily without resistance. It should be very tender, like a baked potato. Once cooked, let it cool just enough so you can handle it comfortably.
- Peel + Portion: Once cooled, the skin should peel off easily. Remove all skin and cut the cooked breadfruit flesh into smaller, manageable chunks, roughly 1-2 inches in size.
- Make the Base Paste: Transfer the breadfruit chunks to your food processor or strong blender. Process or blend until a thick, smooth paste forms. It's crucial to get it smooth before adding much water. If using a traditional pounder, pound the cooked breadfruit thoroughly until completely smooth, adding very little water at this stage if needed to aid pounding.
- Thin to Your “Finger” Level: Now, slowly add water, a tablespoon or two at a time, while continuing to blend or pound. Stop, scrape down the sides, and let the poi rest for 2 minutes. This allows the water to fully absorb and the texture to stabilize. Continue adding water and blending until you reach your desired "finger" consistency (see guide below).
- Salt + Final Texture Check: Once you've achieved your preferred consistency, stir in the Hawaiian salt or sea salt. Taste and adjust if needed. The final poi should be smooth, glossy, and completely free of lumps.
- Consistency Guide (High Value, Highly Skimmable):
- One-finger: Thick and dense, like soft mashed potatoes. Great for scooping with your fingers or a sturdy spoon.
- Two-finger: Looser and spoonable, slowly forming a ribbon when you lift your spoon. A versatile, popular texture.
- Three-finger: The most liquid consistency, easily pourable and ideal for drinking or serving in a bowl with other dishes.
You may also like


Hey there! I’m just someone who seriously loves good food and believes that cooking doesn’t have to be complicated to be amazing. Whether it’s a quick weeknight dinner or a cozy weekend meal, I’m all about sharing easy, tasty recipes that actually work.


