
Easy Maltese Pastiċċini - Flaky Ricotta Pastries You Can Bake
Easy Maltese Pastiċċini - Flaky Ricotta Pastries You Can Bake

- Serves: 12 People
- Prepare Time: 1 hour 30 m
- Cooking Time: 25 minutes
- Calories: -
- Difficulty: Medium
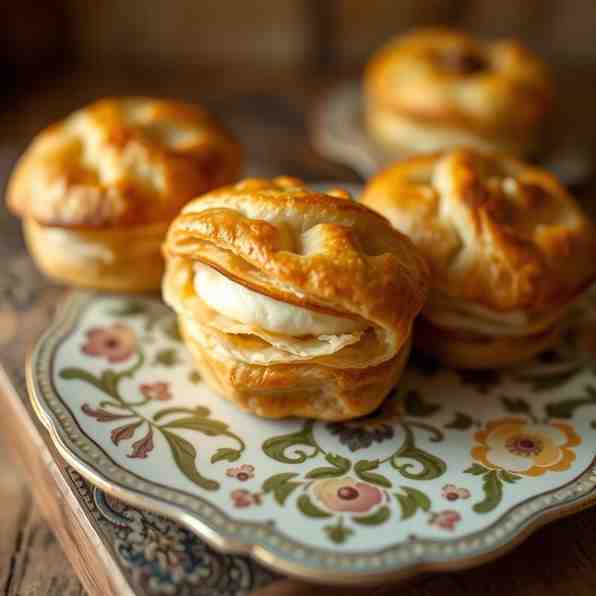
Welcome to the ultimate guide for making Maltese Pastiċċini (pronounced pah-stit-TSEE-nee), those incredibly addictive, flaky ricotta-filled pastries that are a staple of Maltese cuisine! If you're searching for easy to make baking recipes that transport your taste buds, you've hit the jackpot. These savory parcels, often called Pastizzi, are a beloved snack, perfect for breakfast with a cup of coffee or as a satisfying bite any time of day. While they might look intricate, our homemade recipes for this traditional treat are designed to be entirely doable from scratch, even for those new to pastry making.
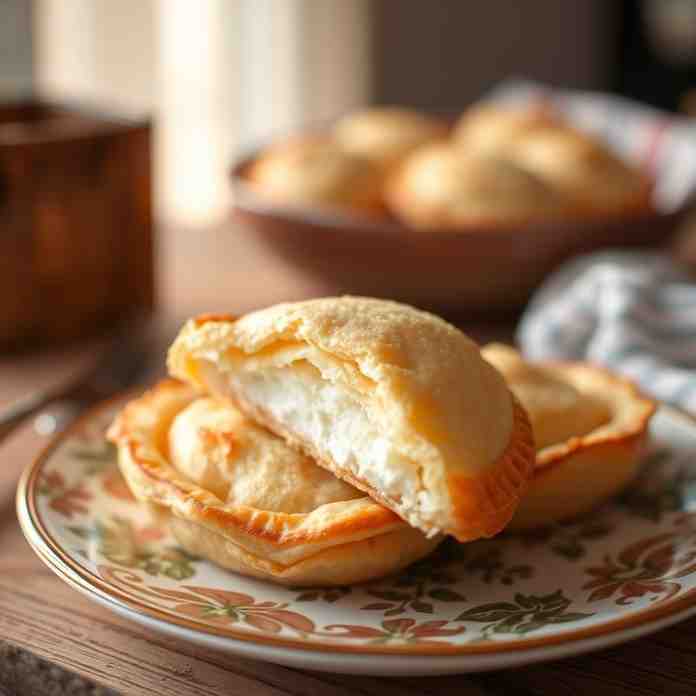
So, what exactly are Pastiċċini? They are Malta's iconic savory street food, typically featuring a crispy, layered pastry shell wrapped around a creamy filling, most commonly ricotta cheese or sometimes a pea mash. You'll often find them served piping hot from a "pastizzeria," enjoyed on the go. While "Pastizzi" is the more common singular term, "Pastiċċini" is the plural and sometimes used interchangeably for these little savory delights.
Why choose this recipe for your Pastiċċini adventure? We've cracked the code to ensure your success:
Flaky layers without complicated pastry-school steps: Our method simplifies the process, giving you that irresistible crunch without the fuss.
Ricotta filling that sets beautifully: Say goodbye to runny fillings! Our creamy ricotta blend is perfectly seasoned and holds its shape.
Shaping method that prevents blowouts: We guide you through the process to ensure your pastries stay sealed and gorgeous during baking.
Get ready to impress yourself and your loved ones with these delightful pastries. Let's dive into making the best Maltese food right in your own kitchen!
Ingredients
Directions
- Part 1: Make the Dough (The Heart of Flakiness)
- Mix the Dough: In a large bowl, whisk together the flour and salt. Add the very cold, cubed butter and shortening. Use your fingertips or a pastry blender to cut the fat into the flour until the mixture resembles coarse crumbs with some pea-sized pieces of fat remaining.
- Add Liquid: Gradually add the ice-cold water (and vinegar/lemon juice, if using), mixing until the dough just comes together. Be careful not to overmix; it should be shaggy but cohesive.
- Rest: Turn the dough out onto a lightly floured surface and gently bring it together into a ball. Wrap it tightly in plastic wrap and refrigerate for at least 30 minutes, or up to 2 hours. This resting period helps the gluten relax, making the dough easier to roll.
- Roll Thin: On a lightly floured surface, roll the chilled dough into a large rectangle, about 1/8-inch thick (roughly 18x24 inches). The thinner you can get it without tearing, the flakier your pastries will be.
- Add Fat & Roll into Log: Spread a thin, even layer of softened (but still cool) butter or shortening (about 2-3 tablespoons) over two-thirds of the rolled dough, leaving one-third bare. Fold the un-buttered section over the middle section, then fold the remaining buttered section over the top, like a letter. You should have three layers. Gently re-roll the dough into a rectangle again (about 1/4-inch thick).
- Form the Log: Starting from a long edge, tightly roll the dough into a log. Aim for a snug roll to create distinct layers.
- Chill/Rest: Wrap the dough log tightly in plastic wrap and refrigerate for at least 1 hour, or preferably 2-3 hours. This chilling allows the fat to firm up, preventing it from melting out during shaping and ensuring those beautiful flaky layers. You can also make the dough a day ahead and chill overnight.
- Part 2: Make the Ricotta Filling
- Drain Ricotta: If your ricotta seems watery, it's essential to drain it. For a fast method, place the ricotta in a fine-mesh sieve lined with cheesecloth and let it drain over a bowl for 30 minutes to an hour. For an optional overnight method, place it in the sieve, cover, and refrigerate overnight. This ensures your filling isn't runny.
- Mix Filling: In a medium bowl, combine the drained ricotta cheese, beaten egg, salt, pepper, and optional chopped parsley. Mix until all ingredients are well combined and the consistency is creamy but firm enough to hold its shape.
- Seasoning Guidance: Taste the filling! Adjust salt and pepper as needed. A pinch of nutmeg can also be added for a traditional touch.
- Part 3: Shape, Fill, and Seal (The Art of Pastiċċini)
- Portion the Dough: Unwrap the chilled dough log. Using a sharp knife, cut the log into 12 equal portions. Each portion will be roughly 1 to 1.5 inches thick.
- Stretch into Oval: Take one dough portion. On a lightly floured surface, gently flatten it with your palm, then use a rolling pin to stretch it into an oval shape, about 4-5 inches long and 3 inches wide. The dough should be thin enough to see through slightly, but not so thin that it tears. Avoid crushing the layers; gentle stretching is key.
- Add Filling: Place about 1 ½ to 2 tablespoons of ricotta filling in the center of the stretched oval. Don't overfill, or it will leak.
- Seal & Shape: Carefully fold one long side of the dough over the filling to meet the other long side, forming a half-moon. Gently press the edges together to seal, creating a slight crimp. Then, using your fingers, gently pull the two corners of the half-moon towards each other, twisting slightly to form the traditional boat or diamond shape of a Pastizz. Ensure the seams are well-sealed to prevent the filling from leaking during baking. Repeat with the remaining dough and filling.
- Photo Checklist Reference: Imagine seeing an oval thickness, the exact amount of filling, hands sealing the edges, and the final raw boat shape.
- Part 4: Bake (Achieve the Crisp & Puff)
- Preheat Oven: Preheat your oven to 400°F (200°C). If you have a convection setting, use it for extra crispiness. Line a baking sheet with parchment paper.Pan Placement: Place the shaped pastizzi on the prepared baking sheet, leaving some space between them.
- Bake Time: Bake for 20-25 minutes, or until the pastries are puffed, golden brown, and deeply colored on the edges. The color is your best indicator of doneness and crispiness.
- Rest: Once out of the oven, let the pastizzi rest on the baking sheet for 5 minutes before serving. This brief rest allows the layers to set and the filling to firm up, ensuring the best texture.
Easy Maltese Pastiċċini - Flaky Ricotta Pastries You Can Bake
- Serves: 12 People
- Prepare Time: 1 hour 30 m
- Cooking Time: 25 minutes
- Calories: -
- Difficulty: Medium
Welcome to the ultimate guide for making Maltese Pastiċċini (pronounced pah-stit-TSEE-nee), those incredibly addictive, flaky ricotta-filled pastries that are a staple of Maltese cuisine! If you're searching for easy to make baking recipes that transport your taste buds, you've hit the jackpot. These savory parcels, often called Pastizzi, are a beloved snack, perfect for breakfast with a cup of coffee or as a satisfying bite any time of day. While they might look intricate, our homemade recipes for this traditional treat are designed to be entirely doable from scratch, even for those new to pastry making.
So, what exactly are Pastiċċini? They are Malta's iconic savory street food, typically featuring a crispy, layered pastry shell wrapped around a creamy filling, most commonly ricotta cheese or sometimes a pea mash. You'll often find them served piping hot from a "pastizzeria," enjoyed on the go. While "Pastizzi" is the more common singular term, "Pastiċċini" is the plural and sometimes used interchangeably for these little savory delights.
Why choose this recipe for your Pastiċċini adventure? We've cracked the code to ensure your success:
Flaky layers without complicated pastry-school steps: Our method simplifies the process, giving you that irresistible crunch without the fuss.
Ricotta filling that sets beautifully: Say goodbye to runny fillings! Our creamy ricotta blend is perfectly seasoned and holds its shape.
Shaping method that prevents blowouts: We guide you through the process to ensure your pastries stay sealed and gorgeous during baking.
Get ready to impress yourself and your loved ones with these delightful pastries. Let's dive into making the best Maltese food right in your own kitchen!
Ingredients
Directions
- Part 1: Make the Dough (The Heart of Flakiness)
- Mix the Dough: In a large bowl, whisk together the flour and salt. Add the very cold, cubed butter and shortening. Use your fingertips or a pastry blender to cut the fat into the flour until the mixture resembles coarse crumbs with some pea-sized pieces of fat remaining.
- Add Liquid: Gradually add the ice-cold water (and vinegar/lemon juice, if using), mixing until the dough just comes together. Be careful not to overmix; it should be shaggy but cohesive.
- Rest: Turn the dough out onto a lightly floured surface and gently bring it together into a ball. Wrap it tightly in plastic wrap and refrigerate for at least 30 minutes, or up to 2 hours. This resting period helps the gluten relax, making the dough easier to roll.
- Roll Thin: On a lightly floured surface, roll the chilled dough into a large rectangle, about 1/8-inch thick (roughly 18x24 inches). The thinner you can get it without tearing, the flakier your pastries will be.
- Add Fat & Roll into Log: Spread a thin, even layer of softened (but still cool) butter or shortening (about 2-3 tablespoons) over two-thirds of the rolled dough, leaving one-third bare. Fold the un-buttered section over the middle section, then fold the remaining buttered section over the top, like a letter. You should have three layers. Gently re-roll the dough into a rectangle again (about 1/4-inch thick).
- Form the Log: Starting from a long edge, tightly roll the dough into a log. Aim for a snug roll to create distinct layers.
- Chill/Rest: Wrap the dough log tightly in plastic wrap and refrigerate for at least 1 hour, or preferably 2-3 hours. This chilling allows the fat to firm up, preventing it from melting out during shaping and ensuring those beautiful flaky layers. You can also make the dough a day ahead and chill overnight.
- Part 2: Make the Ricotta Filling
- Drain Ricotta: If your ricotta seems watery, it's essential to drain it. For a fast method, place the ricotta in a fine-mesh sieve lined with cheesecloth and let it drain over a bowl for 30 minutes to an hour. For an optional overnight method, place it in the sieve, cover, and refrigerate overnight. This ensures your filling isn't runny.
- Mix Filling: In a medium bowl, combine the drained ricotta cheese, beaten egg, salt, pepper, and optional chopped parsley. Mix until all ingredients are well combined and the consistency is creamy but firm enough to hold its shape.
- Seasoning Guidance: Taste the filling! Adjust salt and pepper as needed. A pinch of nutmeg can also be added for a traditional touch.
- Part 3: Shape, Fill, and Seal (The Art of Pastiċċini)
- Portion the Dough: Unwrap the chilled dough log. Using a sharp knife, cut the log into 12 equal portions. Each portion will be roughly 1 to 1.5 inches thick.
- Stretch into Oval: Take one dough portion. On a lightly floured surface, gently flatten it with your palm, then use a rolling pin to stretch it into an oval shape, about 4-5 inches long and 3 inches wide. The dough should be thin enough to see through slightly, but not so thin that it tears. Avoid crushing the layers; gentle stretching is key.
- Add Filling: Place about 1 ½ to 2 tablespoons of ricotta filling in the center of the stretched oval. Don't overfill, or it will leak.
- Seal & Shape: Carefully fold one long side of the dough over the filling to meet the other long side, forming a half-moon. Gently press the edges together to seal, creating a slight crimp. Then, using your fingers, gently pull the two corners of the half-moon towards each other, twisting slightly to form the traditional boat or diamond shape of a Pastizz. Ensure the seams are well-sealed to prevent the filling from leaking during baking. Repeat with the remaining dough and filling.
- Photo Checklist Reference: Imagine seeing an oval thickness, the exact amount of filling, hands sealing the edges, and the final raw boat shape.
- Part 4: Bake (Achieve the Crisp & Puff)
- Preheat Oven: Preheat your oven to 400°F (200°C). If you have a convection setting, use it for extra crispiness. Line a baking sheet with parchment paper.Pan Placement: Place the shaped pastizzi on the prepared baking sheet, leaving some space between them.
- Bake Time: Bake for 20-25 minutes, or until the pastries are puffed, golden brown, and deeply colored on the edges. The color is your best indicator of doneness and crispiness.
- Rest: Once out of the oven, let the pastizzi rest on the baking sheet for 5 minutes before serving. This brief rest allows the layers to set and the filling to firm up, ensuring the best texture.
You may also like


Hey there! I’m just someone who seriously loves good food and believes that cooking doesn’t have to be complicated to be amazing. Whether it’s a quick weeknight dinner or a cozy weekend meal, I’m all about sharing easy, tasty recipes that actually work.


