
Hong Kong Clay Pot Rice - Crispy Bottom Perfection
Hong Kong Clay Pot Rice - Crispy Bottom Perfection
- Serves: 2 People
- Prepare Time: 25 minutes
- Cooking Time: 35 minutes
- Calories: -
- Difficulty: Medium
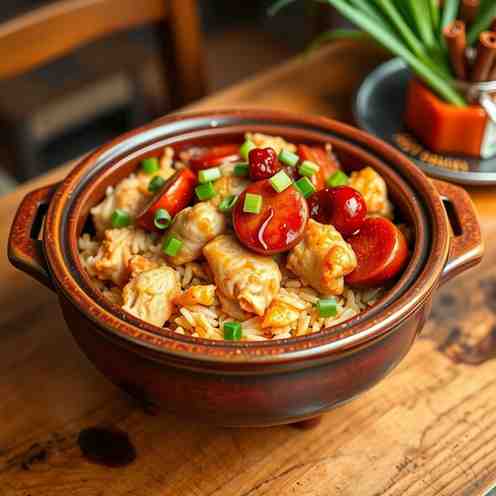
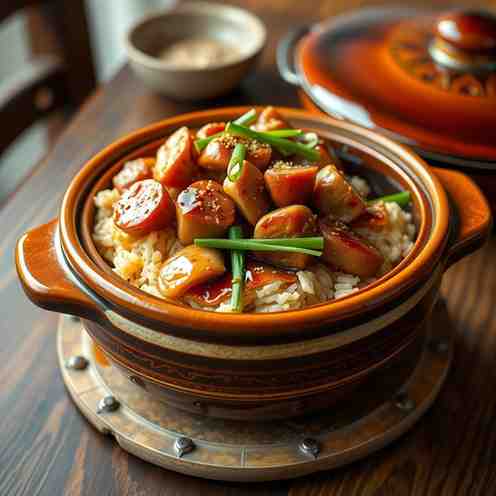
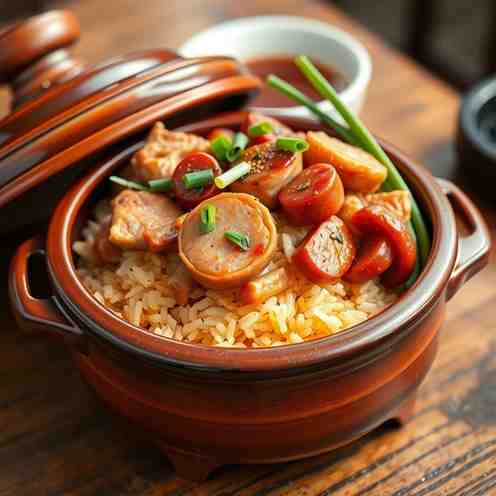
Get ready to transport your taste buds straight to the bustling streets of Hong Kong with a truly iconic dish: authentic Hong Kong Clay Pot Rice, or Bo Zai Fan (煲仔饭)! This isn't just any rice dish; it's a culinary masterpiece where perfectly cooked long grain white rice meets savory toppings, all crowned by the star of the show: a glorious, golden, and incredibly crispy rice bowl bottom. That crunchy, slightly charred fan jiao (rice crust) is the whole point, the textural reward that makes this dish utterly irresistible.
Forget bland one-pot meals. Our recipe is designed to guide you through every step, ensuring you achieve that authentic flavor and, most importantly, a repeatable, crispy-bottom method every single time. We'll demystify the process, from choosing the best pot for cooking rice to mastering the subtle cues that tell you when your crispy crust is ready. Whether you're a seasoned chef or just starting your journey into Chinese dishes to cook at home, you'll learn how to create a show-stopping clay pot rice cooker experience right in your own kitchen. Let's get cooking!
Hong Kong Clay Pot Rice, or Bo Zai Fan, is a beloved Cantonese dish traditionally cooked and served in an individual clay pot. Unlike simple "rice cooker one-pot rice," Bo Zai Fan is characterized by its unique cooking method that creates a thin, golden crust of crispy rice at the bottom and sides of the pot. It’s not burnt, but rather a flavorful, textural contrast to the fluffy rice and savory toppings. This dish embodies comfort food, often enjoyed with various toppings like Chinese sausage, cured meats, or marinated chicken, all drizzled with a special seasoned soy sauce.
Mastering that signature crispy bottom is easier than you think with a few key pointers:
Soak Time: Don't skip soaking your rice! It ensures even cooking and helps develop that beautiful crust without burning.
Rice-to-Water Ratio: Precision is key. Too much water, no crisp; too little, and it's burnt or undercooked.
Lid Rules: Keep that lid on tight during the steaming phase. Only peek when adding toppings, and then seal it again to trap the steam.
The 2 Doneness Cues: Listen for a gentle crackling sound and smell a distinct toasted rice aroma. These are your signals the crust is forming.
While the clay pot rice cooker is in the name, understanding your pot is crucial.
For authentic Bo Zai Fan, you'll want a traditional Chinese clay pot, often glazed on the inside and unglazed on the outside. A good size for 2-3 servings is typically 7-8 inches (18-20 cm) in diameter. The glaze helps with cleaning, while the clay's properties provide excellent heat retention and distribution, essential for that crispy bottom.
Clay pots are fantastic, but they can crack if not handled correctly. Follow these rules to avoid thermal shock:
No Extreme Temperature Changes: Never place a cold pot directly onto high heat, or a hot pot onto a cold surface (like a wet countertop). Always start heating gradually.
Use a Heat Diffuser (Especially for Electric/Induction): If you have an electric coil or induction stove, a heat diffuser ring is highly recommended. It spreads the heat evenly and prevents direct hot spots that can cause cracking. Gas stoves are generally more forgiving, but still, avoid blasting high heat immediately.
Always Have Liquid: Never heat an empty clay pot. Always add your rice and water before placing it on the stove.
Ingredients
Directions
- Rinse + Soak the Rice Rinse the jasmine rice under cold running water until the water runs clear. This removes excess starch, preventing mushiness. Then, place the rinsed rice in your clay pot, add 1 ¼ cups of water, and let it soak for at least 30 minutes, or up to an hour. Soaking helps the rice cook more evenly and contributes significantly to forming that desirable crispy crust.
- Prep Toppings + Mix Sauce While the rice soaks, prepare your toppings. Slice the lap cheong thinly and at an angle; this maximizes surface area for rendering fat and flavor. If using cured pork belly, slice it similarly. If using shiitake mushrooms, rehydrate them in warm water until soft, then slice. For the finishing sauce, whisk together the light soy sauce, dark soy sauce, oyster sauce (if using), sugar, and white pepper in a small bowl. Add 2-3 tablespoons of hot water to dilute the sauce slightly; this ensures it coats the rice beautifully without making it overly salty. Taste and adjust to your preference.
- Start the Rice (the “Steam” Phase) Place your clay pot with the soaked rice and water over medium-low heat. If using an electric or induction stove, ensure you have a heat diffuser. Bring the water to a gentle simmer, then increase the heat slightly to medium. Keep the lid on. You're looking for the water to start bubbling and evaporating. This initial phase is about steaming the rice until most of the surface water is gone, usually 10-12 minutes.
- Add Toppings at the Right Moment Once the surface water is mostly gone and you see small craters forming in the rice (visual cue!), it’s time to add your toppings. Quickly arrange the sliced lap cheong, cured pork belly, or mushrooms evenly over the rice. Replace the lid immediately and reduce the heat to low. Let it continue to cook for another 10-15 minutes, allowing the toppings to steam and their flavors to infuse into the rice.
- Build the Crust (the “Toast” Phase) This is the critical step for the crispy bottom! After the steaming phase, increase the heat to medium-low to medium. Cook for 5-7 minutes. During this time, carefully rotate or shift the pot every minute or so to ensure even heat distribution and crust formation around the bottom and sides. Listen for a gentle, consistent crackling sound – that’s the rice crisping up! You should also start to smell a distinct, toasted rice aroma. Be careful not to burn it; a golden crust is the goal, not black char.
- Rest, Then Finish (Egg + Sauce) Once you hear the crackle and smell the toast, remove the pot from the heat. If using an egg, crack it directly onto the hot rice (it will cook from the residual heat) and immediately replace the lid. Let the pot rest, covered, for 5-10 minutes. This resting period allows the steam to finish cooking the rice, tenderize the toppings, and, crucially, helps the crispy crust release easily from the bottom of the pot.
- Serve After resting, remove the lid. Drizzle the prepared finishing sauce generously over the rice and toppings. If you added an egg, it should be perfectly poached or softly set by now. Gently scrape the rice from the bottom and sides with a rice paddle or spoon, ensuring you get plenty of that delicious crispy crust without damaging your pot. Serve immediately, perhaps with simple blanched Chinese greens on the side for a complete meal.
Hong Kong Clay Pot Rice - Crispy Bottom Perfection
- Serves: 2 People
- Prepare Time: 25 minutes
- Cooking Time: 35 minutes
- Calories: -
- Difficulty: Medium
Get ready to transport your taste buds straight to the bustling streets of Hong Kong with a truly iconic dish: authentic Hong Kong Clay Pot Rice, or Bo Zai Fan (煲仔饭)! This isn't just any rice dish; it's a culinary masterpiece where perfectly cooked long grain white rice meets savory toppings, all crowned by the star of the show: a glorious, golden, and incredibly crispy rice bowl bottom. That crunchy, slightly charred fan jiao (rice crust) is the whole point, the textural reward that makes this dish utterly irresistible.
Forget bland one-pot meals. Our recipe is designed to guide you through every step, ensuring you achieve that authentic flavor and, most importantly, a repeatable, crispy-bottom method every single time. We'll demystify the process, from choosing the best pot for cooking rice to mastering the subtle cues that tell you when your crispy crust is ready. Whether you're a seasoned chef or just starting your journey into Chinese dishes to cook at home, you'll learn how to create a show-stopping clay pot rice cooker experience right in your own kitchen. Let's get cooking!
Hong Kong Clay Pot Rice, or Bo Zai Fan, is a beloved Cantonese dish traditionally cooked and served in an individual clay pot. Unlike simple "rice cooker one-pot rice," Bo Zai Fan is characterized by its unique cooking method that creates a thin, golden crust of crispy rice at the bottom and sides of the pot. It’s not burnt, but rather a flavorful, textural contrast to the fluffy rice and savory toppings. This dish embodies comfort food, often enjoyed with various toppings like Chinese sausage, cured meats, or marinated chicken, all drizzled with a special seasoned soy sauce.
Mastering that signature crispy bottom is easier than you think with a few key pointers:
Soak Time: Don't skip soaking your rice! It ensures even cooking and helps develop that beautiful crust without burning.
Rice-to-Water Ratio: Precision is key. Too much water, no crisp; too little, and it's burnt or undercooked.
Lid Rules: Keep that lid on tight during the steaming phase. Only peek when adding toppings, and then seal it again to trap the steam.
The 2 Doneness Cues: Listen for a gentle crackling sound and smell a distinct toasted rice aroma. These are your signals the crust is forming.
While the clay pot rice cooker is in the name, understanding your pot is crucial.
For authentic Bo Zai Fan, you'll want a traditional Chinese clay pot, often glazed on the inside and unglazed on the outside. A good size for 2-3 servings is typically 7-8 inches (18-20 cm) in diameter. The glaze helps with cleaning, while the clay's properties provide excellent heat retention and distribution, essential for that crispy bottom.
Clay pots are fantastic, but they can crack if not handled correctly. Follow these rules to avoid thermal shock:
No Extreme Temperature Changes: Never place a cold pot directly onto high heat, or a hot pot onto a cold surface (like a wet countertop). Always start heating gradually.
Use a Heat Diffuser (Especially for Electric/Induction): If you have an electric coil or induction stove, a heat diffuser ring is highly recommended. It spreads the heat evenly and prevents direct hot spots that can cause cracking. Gas stoves are generally more forgiving, but still, avoid blasting high heat immediately.
Always Have Liquid: Never heat an empty clay pot. Always add your rice and water before placing it on the stove.
Ingredients
Directions
- Rinse + Soak the Rice Rinse the jasmine rice under cold running water until the water runs clear. This removes excess starch, preventing mushiness. Then, place the rinsed rice in your clay pot, add 1 ¼ cups of water, and let it soak for at least 30 minutes, or up to an hour. Soaking helps the rice cook more evenly and contributes significantly to forming that desirable crispy crust.
- Prep Toppings + Mix Sauce While the rice soaks, prepare your toppings. Slice the lap cheong thinly and at an angle; this maximizes surface area for rendering fat and flavor. If using cured pork belly, slice it similarly. If using shiitake mushrooms, rehydrate them in warm water until soft, then slice. For the finishing sauce, whisk together the light soy sauce, dark soy sauce, oyster sauce (if using), sugar, and white pepper in a small bowl. Add 2-3 tablespoons of hot water to dilute the sauce slightly; this ensures it coats the rice beautifully without making it overly salty. Taste and adjust to your preference.
- Start the Rice (the “Steam” Phase) Place your clay pot with the soaked rice and water over medium-low heat. If using an electric or induction stove, ensure you have a heat diffuser. Bring the water to a gentle simmer, then increase the heat slightly to medium. Keep the lid on. You're looking for the water to start bubbling and evaporating. This initial phase is about steaming the rice until most of the surface water is gone, usually 10-12 minutes.
- Add Toppings at the Right Moment Once the surface water is mostly gone and you see small craters forming in the rice (visual cue!), it’s time to add your toppings. Quickly arrange the sliced lap cheong, cured pork belly, or mushrooms evenly over the rice. Replace the lid immediately and reduce the heat to low. Let it continue to cook for another 10-15 minutes, allowing the toppings to steam and their flavors to infuse into the rice.
- Build the Crust (the “Toast” Phase) This is the critical step for the crispy bottom! After the steaming phase, increase the heat to medium-low to medium. Cook for 5-7 minutes. During this time, carefully rotate or shift the pot every minute or so to ensure even heat distribution and crust formation around the bottom and sides. Listen for a gentle, consistent crackling sound – that’s the rice crisping up! You should also start to smell a distinct, toasted rice aroma. Be careful not to burn it; a golden crust is the goal, not black char.
- Rest, Then Finish (Egg + Sauce) Once you hear the crackle and smell the toast, remove the pot from the heat. If using an egg, crack it directly onto the hot rice (it will cook from the residual heat) and immediately replace the lid. Let the pot rest, covered, for 5-10 minutes. This resting period allows the steam to finish cooking the rice, tenderize the toppings, and, crucially, helps the crispy crust release easily from the bottom of the pot.
- Serve After resting, remove the lid. Drizzle the prepared finishing sauce generously over the rice and toppings. If you added an egg, it should be perfectly poached or softly set by now. Gently scrape the rice from the bottom and sides with a rice paddle or spoon, ensuring you get plenty of that delicious crispy crust without damaging your pot. Serve immediately, perhaps with simple blanched Chinese greens on the side for a complete meal.
You may also like


Hey there! I’m just someone who seriously loves good food and believes that cooking doesn’t have to be complicated to be amazing. Whether it’s a quick weeknight dinner or a cozy weekend meal, I’m all about sharing easy, tasty recipes that actually work.


