Hand Roll Sushi - Easy California Rolls at Home
Hand Roll Sushi - Easy California Rolls at Home
- Serves: 4 People
- Prepare Time: 30 minutes
- Cooking Time: 25 minutes
- Calories: -
- Difficulty: Easy
Ever dreamed of making your own hand roll sushi at home but felt too intimidated? Well, get ready to ditch that doubt, because you absolutely can! This guide is your secret weapon to crafting delicious, restaurant-style California rolls right in your own kitchen. Forget fancy chef skills or expensive ingredients; we’re focusing on simple, accessible Japanese home cooking that anyone can master. You'll learn the secrets to perfect sushi rice, the easy rolling technique for inside-out rolls, and even some quick ideas for variations like spicy tuna or vibrant rainbow toppings. So, grab your apron, and let's roll into the democratic sushi experience!
Ingredients
Directions
- Making the Perfect Sushi Rice:
- Rinse and Soak the Rice: Place the sushi rice in a fine-mesh sieve and rinse under cold running water. Gently agitate the rice with your fingers until the water runs almost clear. This usually takes a few minutes. For slightly better texture, you can soak the rinsed rice in cold water for 10-15 minutes, then drain thoroughly.
- Cook the Rice (Stovetop Method): Transfer the rinsed rice to a medium saucepan with a tight-fitting lid. Add 2 cups of cold water. Bring to a boil over medium-high heat. Once boiling, reduce heat to the lowest setting, cover tightly, and simmer for 15 minutes. Do NOT lift the lid during this time! After 15 minutes, remove from heat and let it steam, still covered, for another 10 minutes.
- Using a Rice Cooker? Combine rinsed rice and water in your rice cooker. Select the "white rice" or "sushi rice" program and let it do its magic!
- Season the Rice: While the rice cooks, prepare your sushi vinegar mixture: In a small bowl, combine the rice vinegar, sugar, and salt. Stir until the sugar and salt are fully dissolved. Once the rice is cooked and rested, transfer it to a large, non-metallic bowl (wood or glass is ideal). Pour the cooled vinegar mixture evenly over the warm rice. Using a rice paddle or a flat spoon, gently fold the seasoning into the rice with a cutting motion. Avoid stirring or mashing, as this can break the grains. Fan the rice gently as you mix to cool it down quickly. The rice should be glossy and separate, not sticky or clumpy.
- Rolling Your California Roll:
- Prep the Fillings and Workspace: Slice your avocado and cucumber into even, thin strips. Shred or slice your imitation crab. Prepare your rolling station: Lay a bamboo rolling mat flat, cover it with plastic wrap (this prevents sticking and makes cleanup a breeze). Have a small bowl of water nearby for wetting your hands.
- Spread the Rice on the Nori: Place a half-sheet of nori, rough side up, on your plastic-wrapped bamboo mat. Dip your fingers in the water (this prevents rice from sticking) and grab about ½ to ¾ cup of seasoned sushi rice. Spread the rice evenly over the entire surface of the nori in a thin layer, pressing gently. Don't pack it too thick! Sprinkle the rice with toasted sesame seeds if desired. Now, carefully flip the nori sheet over so the rice-covered side is facing down on the plastic wrap. The nori should now be facing up, ready for fillings.
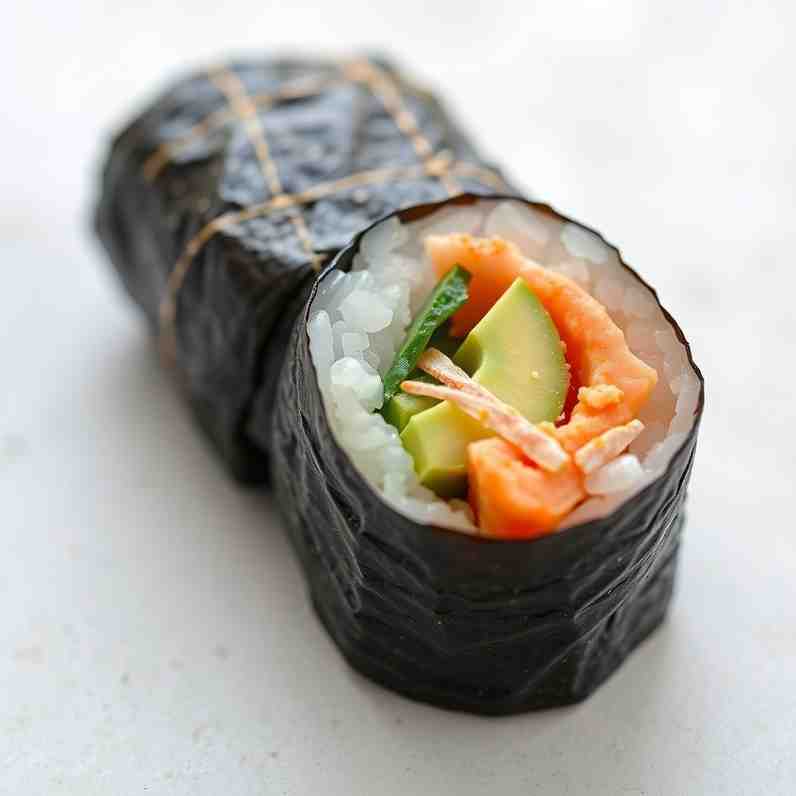
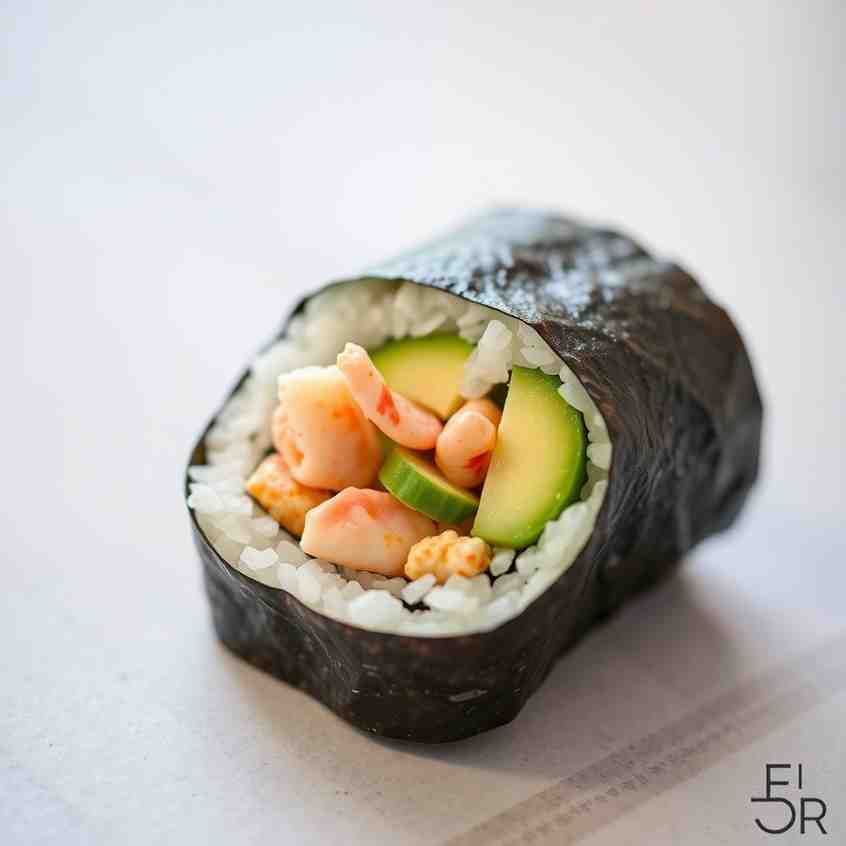
- Add the Filling: Arrange a tight, even line of imitation crab, avocado, and cucumber strips across the center of the nori, about an inch from the bottom edge. Don't overfill, or your roll will be hard to close.
- Roll it Up: Grasp the edge of the bamboo mat closest to you, lifting it over the filling. Begin to roll, tucking the edge of the nori and fillings tightly inward. As you roll, pull the mat towards you, compressing the roll gently to form a firm, even cylinder. Continue rolling until you reach the end, applying gentle pressure to keep everything snug. A tight roll is key to preventing it from falling apart!
- Slice into Clean Pieces: Once rolled, transfer the cylinder to a cutting board. Dip a sharp knife in your bowl of water (wetting the blade between each cut prevents sticking). Trim off the uneven ends of the roll. Then, cut the roll into 6-8 even, bite-sized pieces.
Hand Roll Sushi - Easy California Rolls at Home

- Serves: 4 People
- Prepare Time: 30 minutes
- Cooking Time: 25 minutes
- Calories: -
- Difficulty: Easy
Ever dreamed of making your own hand roll sushi at home but felt too intimidated? Well, get ready to ditch that doubt, because you absolutely can! This guide is your secret weapon to crafting delicious, restaurant-style California rolls right in your own kitchen. Forget fancy chef skills or expensive ingredients; we’re focusing on simple, accessible Japanese home cooking that anyone can master. You'll learn the secrets to perfect sushi rice, the easy rolling technique for inside-out rolls, and even some quick ideas for variations like spicy tuna or vibrant rainbow toppings. So, grab your apron, and let's roll into the democratic sushi experience!
Ingredients
Directions
- Making the Perfect Sushi Rice:
- Rinse and Soak the Rice: Place the sushi rice in a fine-mesh sieve and rinse under cold running water. Gently agitate the rice with your fingers until the water runs almost clear. This usually takes a few minutes. For slightly better texture, you can soak the rinsed rice in cold water for 10-15 minutes, then drain thoroughly.
- Cook the Rice (Stovetop Method): Transfer the rinsed rice to a medium saucepan with a tight-fitting lid. Add 2 cups of cold water. Bring to a boil over medium-high heat. Once boiling, reduce heat to the lowest setting, cover tightly, and simmer for 15 minutes. Do NOT lift the lid during this time! After 15 minutes, remove from heat and let it steam, still covered, for another 10 minutes.
- Using a Rice Cooker? Combine rinsed rice and water in your rice cooker. Select the "white rice" or "sushi rice" program and let it do its magic!
- Season the Rice: While the rice cooks, prepare your sushi vinegar mixture: In a small bowl, combine the rice vinegar, sugar, and salt. Stir until the sugar and salt are fully dissolved. Once the rice is cooked and rested, transfer it to a large, non-metallic bowl (wood or glass is ideal). Pour the cooled vinegar mixture evenly over the warm rice. Using a rice paddle or a flat spoon, gently fold the seasoning into the rice with a cutting motion. Avoid stirring or mashing, as this can break the grains. Fan the rice gently as you mix to cool it down quickly. The rice should be glossy and separate, not sticky or clumpy.
- Rolling Your California Roll:
- Prep the Fillings and Workspace: Slice your avocado and cucumber into even, thin strips. Shred or slice your imitation crab. Prepare your rolling station: Lay a bamboo rolling mat flat, cover it with plastic wrap (this prevents sticking and makes cleanup a breeze). Have a small bowl of water nearby for wetting your hands.
- Spread the Rice on the Nori: Place a half-sheet of nori, rough side up, on your plastic-wrapped bamboo mat. Dip your fingers in the water (this prevents rice from sticking) and grab about ½ to ¾ cup of seasoned sushi rice. Spread the rice evenly over the entire surface of the nori in a thin layer, pressing gently. Don't pack it too thick! Sprinkle the rice with toasted sesame seeds if desired. Now, carefully flip the nori sheet over so the rice-covered side is facing down on the plastic wrap. The nori should now be facing up, ready for fillings.
- Add the Filling: Arrange a tight, even line of imitation crab, avocado, and cucumber strips across the center of the nori, about an inch from the bottom edge. Don't overfill, or your roll will be hard to close.
- Roll it Up: Grasp the edge of the bamboo mat closest to you, lifting it over the filling. Begin to roll, tucking the edge of the nori and fillings tightly inward. As you roll, pull the mat towards you, compressing the roll gently to form a firm, even cylinder. Continue rolling until you reach the end, applying gentle pressure to keep everything snug. A tight roll is key to preventing it from falling apart!
- Slice into Clean Pieces: Once rolled, transfer the cylinder to a cutting board. Dip a sharp knife in your bowl of water (wetting the blade between each cut prevents sticking). Trim off the uneven ends of the roll. Then, cut the roll into 6-8 even, bite-sized pieces.
You may also like


Hey there! I’m just someone who seriously loves good food and believes that cooking doesn’t have to be complicated to be amazing. Whether it’s a quick weeknight dinner or a cozy weekend meal, I’m all about sharing easy, tasty recipes that actually work.